EOG1102AOX EN Oven User Manual
www.electrolux.com CONTENTS 1. SAFETY INFORMATION....................................................................................3 2. SAFETY INSTRUCTIONS..................................................................................4 3. PRODUCT DESCRIPTION................................................................................ 7 4. BEFORE FIRST USE......................................................................................... 7 5. DAILY USE.......................................
ENGLISH 1. 3 SAFETY INFORMATION Before the installation and use of the appliance, carefully read the supplied instructions. The manufacturer is not responsible for any injuries or damages that are the result of incorrect installation or usage. Always keep the instructions in a safe and accessible location for future reference. 1.
www.electrolux.com • • • • • • Always use oven gloves to remove or put in accessories or ovenware. Before maintenance cut the power supply. Ensure that the appliance is switched off before replacing the lamp to avoid the possibility of electric shock. Do not use a steam cleaner to clean the appliance. Do not use harsh abrasive cleaners or sharp metal scrapers to clean the glass door since they can scratch the surface, which may result in shattering of the glass.
ENGLISH • • • • • • • • Do not let mains cables touch or come near the appliance door, especially when the door is hot. The shock protection of live and insulated parts must be fastened in such a way that it cannot be removed without tools. Connect the mains plug to the mains socket only at the end of the installation. Make sure that there is access to the mains plug after the installation. If the mains socket is loose, do not connect the mains plug.
www.electrolux.com • • • • Use a deep pan for moist cakes. Fruit juices cause stains that can be permanent. This appliance is for cooking purposes only. It must not be used for other purposes, for example room heating. Always cook with the oven door closed. If the appliance is installed behind a furniture panel (e.g. a door) make sure the door is never closed when the appliance is in operation.
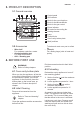
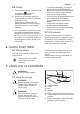
ENGLISH 7 3. PRODUCT DESCRIPTION 3.1 General overview 2 3 4 5 6 1 1 7 8 5 9 4 12 3 2 10 1 11 1 2 3 4 5 6 7 8 9 10 11 12 3.2 Accessories • • • Wire shelf For cookware, cake tins, roasts. Aluminium baking tray For cakes and biscuits.
www.electrolux.com 5. DAILY USE WARNING! Refer to Safety chapters. 5.1 Oven functions Oven function Application Off position The appliance is off. Light To activate the lamp without a cooking function. Grill + Turn‐ spit To grill meat, including kebabs and smaller pieces of meat. Range of tem‐ To adjust the temperature for the electric grill in the perature ad‐ cavity center, from a minimum of about 50 °C to a justment maximum of about 200 °C.
ENGLISH 5.6 Grilling • 1. Turn the knob for the oven functions and set the clockwise to maximum temperature. 2. Adjust the grill and the deep pan runner position to allow for different thickness of food. Place the food close to the top heating element for faster cooking and further away for more gentle cooking. • You should place most foods on the wire shelf in the deep pan to allow maximum circulation of air and to lift the food out of the fats and juices.
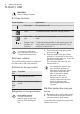
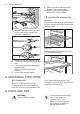
www.electrolux.com 9. Select a function with the turnspit position. The turnspit rotates. 10. Set the necessary temperature. Refer to the cooking tables. 7.2 Inserting the accessories Wire shelf: Push the shelf between the guide bars of the shelf support and make sure that the feet point down. 4. Install the first fork on the spit, then put the meat on the turnspit and install the second fork. Deep pan: Push the deep pan between the guide bars of the shelf support. 5.
ENGLISH 9.1 General information • • • • • The appliance has five shelf positions. Count the shelf positions from the bottom of the appliance floor. Moisture can condense in the appliance or on the door glass panels. This is normal. Always stand back from the appliance when you open the appliance door while cooking. To decrease the condensation, operate the appliance for 10 minutes before cooking. Clean the moisture after each use of the appliance.
www.electrolux.com Food Quantity (kg) Shelf posi‐ tion Tempera‐ ture (°C) Time (min) Goose 2.5 - 3.5 3 220 - 230 160 - 180 Rabbit 2 3 180 - 190 60 - 80 Goat 1.8 3 170 - 180 60 - 90 Food Quantity (kg) Shelf posi‐ tion Tempera‐ ture (°C) Time (min) Thin 1.4 - 1.5 3 or 4 200 - 210 20 - 30 Thick 1.4 - 1.5 3 or 4 200 - 210 25 - 30 Calzone 1.4 - 1.5 3 or 4 190 - 200 25 - 30 Food Quantity (kg) Shelf posi‐ tion Tempera‐ ture (°C) Time (min) Flat cake 0.6 - 1.
ENGLISH 13 Meat & Poultry Food Quantity (kg) Tempera‐ ture (°C) Time (min) Shelf posi‐ tion Comments Beef with bone 1 min. 40 - 50 3 On the wire shelf. Put a deep pan on the second shelf posi‐ tion. Beef without 1 bone 190 50 3 On the wire shelf. Put a deep pan on the second shelf posi‐ tion. Lamb 1 min. 40 - 50 3 On the wire shelf. Put a deep pan on the second shelf posi‐ tion. Pork 1 180 - 190 75 - 85 3 On the wire shelf. Put a deep pan on the second shelf posi‐ tion.
www.electrolux.com Food Quantity (kg) Tempera‐ ture (°C) Time (min) Shelf posi‐ tion Comments English roast beef rare - 220 44 - 50 3 On the wire shelf. Put a deep pan on the second shelf posi‐ tion. English roast beef medium - 220 51 - 55 3 On the wire shelf. Put a deep pan on the second shelf posi‐ tion. English roast beef well done - 220 56 - 60 3 On the wire shelf. Put a deep pan on the second shelf posi‐ tion.
ENGLISH 15 Puddings Food Quantity (kg) Egg Custard in a Bain Marie Tempera‐ ture (°C) Time (min) Shelf posi‐ tion Comments min. 60 - 75 3 9 ceramic glasses in a deep pan with 2 cm of water Cakes Food Quantity (kg) Tempera‐ ture (°C) Time (min) Shelf posi‐ tion Comments Rich fruit cake - min. 150 - 170 4 In a 20 cm mould on the wire shelf Plain fruit cake - min. 150 4 In a 20 cm mould on the wire shelf Madeira - min.
www.electrolux.com 9.7 Grilling Preheat the empty oven for 3 minutes before cooking. Food Quantity Pieces (g) Tempera‐ Time (min) ture (°C) 1st side 2nd side Fillet steaks 4 800 max. 12 - 15 12 - 14 4 Beef steaks 4 600 max. 10 - 12 6-8 4 Sausages 8 - max. 12 - 15 10 - 12 4 Pork chops 4 600 max. 12 - 16 12 - 14 4 Chicken (cut in 2) 2 1000 max. 30 - 35 25 - 30 4 Kebabs 4 - max. 10 - 15 10 - 12 4 Breast of chicken 4 400 max.
ENGLISH 10.1 Notes on cleaning • • • • • • Clean the front of the appliance with a soft cloth with warm water and a cleaning agent. To clean metal surfaces, use a dedicated cleaning agent. Clean the appliance interior after each use. Fat accumulation or other food remains may result in a fire. The risk is higher for the grill pan. Clean stubborn dirt with a special oven cleaner. Clean all accessories after each use and let them dry. Use a soft cloth with warm water and a cleaning agent.
www.electrolux.com the above steps in the opposite sequence. The screen-printing zone must face the inner side of the door. Make sure that after the installation the surface of the glass panel frame on the screen-printing zones is not rough when you touch it. Make sure that you install the internal glass panel in the seats correctly. A 4. Put the door on a soft cloth on a stable surface. 5. Hold the door trim (B) on the top edge of the door at the two sides and push inwards to release the clip seal.
ENGLISH 19 11.1 What to do if... Problem Possible cause Remedy The oven does not heat up. The oven is deactivated. Activate the oven. The oven does not heat up. The fuse is blown. Make sure that the fuse is the cause of the malfunc‐ tion. If the fuse is blown again and again, contact a qualified electrician. The oven does not oper‐ ate. The automatic ignition does not work. Ignite the burner manually with a long match. Hold the flame near the hole in the bottom of the oven cavity.
www.electrolux.com We recommend that you write the data here: Serial number (S.N.) ......................................... 12. INSTALLATION WARNING! Refer to Safety chapters. 12.1 Gas connection WARNING! Before the gas connection, disconnect the mains plug from the mains socket or deactivate the fuse in the fuse box. Close the primary valve of the gas supply. The gas supply ramp is on the rear side of the appliance.
ENGLISH B 21 necessary for the type of gas you use. Refer to “Technical information” chapter. 6. Assemble the burner in a reverse sequence. A Replace the gas type sticker near the gas supply ramp with the one related to the new gas type. The gas oven burner does not need any primary gas regulation. 2. Release the screw (C), which keeps the burner in position. Make sure that the gas supply pressure of the appliance obeys the recommended values.
www.electrolux.com From liquid gas to natu‐ ral gas Release the adjustment screw ap‐ proximately 1/3 of a turn. 50 548 21 4. Attach the knob for the gas control. 5. Connect the appliance to the electricity. WARNING! Only put the mains plug into the mains socket when all parts are back into their initial position. There is a risk of injury. 6. Light the gas oven burner. Refer to "Daily use" chapter. 7.
ENGLISH • When you install a hob above the oven, make different electrical connections for the hob and for the oven. Only make connections with correct cables for the power supplied. Make sure that after the installation there is easy access to the appliance if repairs or maintenance are necessary. 12.6 Securing the appliance to the cabinet A B 23 This appliance is supplied only with a main cable. 12.
www.electrolux.com 13.2 Gas oven burner Gas type NOMINAL NOMINAL GAS POW‐ GAS ER (kW) FLOW (g/h) Reduced BY-PASS gas power NEEDLE (kW) (1/100 mm) G20 (2H) 20 mbar 2.7 - 0.7 Reg. G30/G31 (3B/P) 30/30 mbar 2.7 196 0.7 43 INJECTOR MARK (1/100 mm) 80 14. ENVIRONMENTAL CONCERNS Recycle the materials with the symbol . Put the packaging in applicable containers to recycle it. Help protect the environment and human health and to recycle waste of electrical and electronic appliances.
ENGLISH 25
www.electrolux.
ENGLISH 27
867340220-A-372016 www.electrolux.