
User manual

3. PRODUCT DESCRIPTION
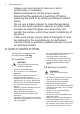
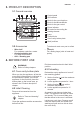
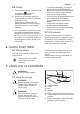
3.1 General overview
1
2 63 4 5
1
12
5
4
3
2
1
7
8
9
11
10
1
Control panel
2
Grill indicator
3
Knob for the oven functions
4
Knob for the Minute Minder
5
Knob for the gas control
6
Power indicator
7
Air vents for the cooling fan
8
Heating element
9
Lamp
10
Turnspit hole
11
Oven cavity bottom plate
12
Shelf positions
3.2 Accessories
• Wire shelf
For cookware, cake tins, roasts.
• Aluminium baking tray
For cakes and biscuits.
• Grill- / Roasting pan
To bake and roast or as pan to collect
fat.
• Turnspit
For roasting larger joints of meat and
poultry.
4. BEFORE FIRST USE
WARNING!
Refer to Safety chapters.
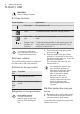
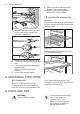
4.1 Oven cavity bottom plate
When you buy the appliance, at first the
oven cavity bottom plate is positioned on
the accessories. Before you use the
appliance for the first time, place the
bottom plate on the burner area, as
shown in the "Product description"
chapter.
4.2 Initial Cleaning
Remove all accessories from the
appliance.
Refer to "Care and cleaning"
chapter.
Clean the appliance and the accessories
before first use.
Put the accessories back to their initial
position.
4.3 Preheating
Preheat the empty appliance to burn off
the remaining grease.
1. Set the function and the maximum
temperature.
2. Let the appliance operate for 1 hour.
3. Set the function and set the
maximum temperature.
4. Let the appliance operate for 15
minutes.
Accessories can become hotter than
usual. The appliance can emit an odour
and smoke. This is normal. Make sure
that the airflow in the room is sufficient.
Let the oven cool down. Dampen a soft
cloth with warm water and a little mild
washing-up liquid and use this to clean
the oven cavity.
ENGLISH 7