user manual Built-in fan / steam oven EOK96030
electrolux Electrolux. Thinking of you. Share more of our thinking at www.electrolux.com Contents Safety information Description of the Appliance Before Using for the first time Using the Oven Uses, Tables and Tips Cleaning and Care What to do if … 2 3 5 6 16 32 35 Electrical Connection Installation Instructions Disposal Guarantee/Customer Service European Guarantee www.electrolux.
electrolux 3 • Rough handling, especially around the edges of the front panel, can cause the glass to break. • Do not store any flammable materials inside the oven. These could ignite when the oven is switched on. • Do not store any moist foods inside the oven. This could cause damage to the enamel. • Do not leave dishes uncovered in the oven after switching off the cooling fan. Moisture may form inside the oven or on the glass door and also get onto the units.
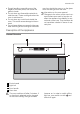
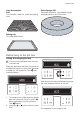
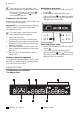
electrolux Control Panel 1 3 2 1 Oven display 2 Function buttons Oven 3 Water Drawer Oven layout 1 7 4 2 3 2 3 1 4 5 6 1 2 3 4 Grill heating element Oven lights Grease filter Back wall fan heating elements 5 Steam generator/Steam rosette 6 Side rails, removable 7 Oven levels
electrolux 5 Oven Accessories Grill For cookware, cake tins, roasts and grilling food. Quick Sponge 180 Extremely absorbent, ring-shaped sponge, adapted exactly to suit its function. Baking tray For cakes and biscuits. Before Using for the first time Setting and changing the time The oven only operates when the time has been set. When the appliance has been connected to the electrical supply or when there has been autoa power cut, the symbol for Time matically flashes.
electrolux The time can only be modified, if the child safety device is deactivated, none of the clock functions Countdown , Cook time or End time nor any oven functions are set. Cleaning for the first time Before you use the oven for the first time, you should clean it thoroughly. Switching on test mode 1. Switch the appliance off with the On/Off button . 2. Press and hold baking/roasting programme buttons and at the same time until an acoustic signal sounds and "d" lights up in the display.
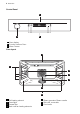
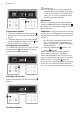
electrolux 7 3 Temperature/Time 4 Clock functions/Operating time 5 Thermometer symbol 6 Baking/Roasting Programmes 7 Cooking Functions Control panel 1 2 3 4 1 2 3 4 8 7 6 5 On/Off button Oven function selection button Clock functions 5 6 7 8 Memory function button Baking/Roasting Programmes Fast warm up General instructions • First of all switch the appliance off with the On/Off button . • When the selected function lights up, the oven begins to heat up or the time set begins to count down.
electrolux Cooling fan The fan switches on automatically to keep the appliance surfaces cool. When the oven is switched off, the fan continues to run to cool the appliance down and then switches itself off. Speedcook After an oven function has been selected, using the additional function Speedcook the empty oven can be pre-heated in a relatively short time. Thermometer symbol • The slowly rising thermometer symbol indicates how far the oven has already heated up.
electrolux 9 Oven function Use Steam cooking For vegetables, potatoes, rice, pasta or other side-dishes. Interval steam cooking For baking, roasting and warming up chilled and frozen meals. Fan oven with circular heating element For cooking and baking on up to two shelves at the same time. Hot air grilling For roasting larger pieces or meat or poultry on one shelf. The function is also suitable for cooking "au gratin" and browning . Grill For grilling flat foods and for toasting .
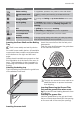
electrolux Taking out the grease filter Hold the grease filter by the grip and unhook it. Steam Cooking Functions Important! The steam cooking functions must always be set in conjunction with the clock functions Cook time or End time (see section Clock Functions Cook time /End time ). Important! Only water can be used as the liquid. A buzzing sound is heard when the water has been used up. When more water is added, the buzzing sound is switched off.
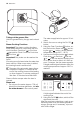
electrolux 11 Leave the door open to let the oven dry completely. Steam hot The continual change from hot air to steam takes place automatically. 1. Do not put the water (approx. 250 ml) directly into the steam generator but via the water drawer on the control panel. 2. Switch the oven on using the On/ Off button. 3. Using the Oven Functions button, select the function Steam hot and using the or button, set the desired temperature. 4.
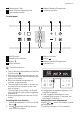
electrolux 1. Switch the oven on using the On/ Off button. 2. Using the Memory function button call up the saved setting. To save another setting, press the Memory function button again for approx. 2 seconds. The previously saved setting is replaced by the new one. Starting the Memory function Clock Functions 2 1 3 4 5 6 1 2 3 4 5 6 Clock functions Time displays Time Cook Time/End Time/Operating Time Clock functions Selector buttons Countdown To set a countdown.
electrolux 13 General instructions • After a clock function has been selected, the corresponding symbol flashes for about 5 seconds. During this time, the desired times can be set or modified using or button. the • When the desired time has been set, the symbol continues to flash for approx. 5 seconds. After this the symbol lights up. The set Countdown begins to count down. • The time set for Cook time and End time begins to count down after the selected function starts. Countdown 1.
electrolux 2. Press the Clock Functions button repeatedly until the symbol for End time flashes. The oven switches itself on. The symbol for Cook time lights up. By repeatedly pressing the Clock Functions button, the current time can be called up. When the time has elapsed, an acoustic signal sounds for 2 minutes. The oven switches itself off. "0.00" is displayed and the symbol for Cook time flashes. To turn off the acoustic signal: Press any button. 3. Using the or switch-off time.
electrolux 15 To turn off the acoustic signal: Press any button. Cook time and End time The oven switches on automatically at the time calculated. e. g. at 13:05. When the set cooking time has elapsed, an acoustic signal sounds for 2 minutes and the oven switches itself off. e. g. at 14:05. combined Cook time and End time can be used simultaneously, if the oven is to be switched on and off automatically at a later time. 1. Select oven function and temperature. 2.
electrolux 2. Press buttons Clock Functions and at the same time until the display comes on again. Child safety device As soon as the child safety device is activated, it is no longer possible to operate the appliance. Activating the child safety device 1. If necessary switch the appliance off with the On/Off button . An oven function must not be selected. 2. Press the and cooking programme buttons at the same time until SAFE appears on the display. 2.
electrolux 17 • For cooking times longer than 30 minutes or when cooking larger quantities of food, top up water, if necessary. • With the Steam Cooking oven function remove the grease filter ; otherwise, cooking time is longer. • If the appliance is not used for prolonged periods, thoroughly rinse out the water drawer, connecting hoses and steam generator (see section Cleaning and Care.
electrolux Water to add via water drawer ml Temperature °C Oven level Time1) in min.
electrolux 19 Food to be cooked Ventitherm ® Fan Operated Cooking Temp. in °C MeatTime in min. Steam cooking (max. 650 ml water 650ml) Meat and sidedishes, time in min. Oven levels Roast beef, 1 kg Brussels sprouts, Polenta 180 60-70 30-35 1 3 Roast pork, 1 kg potatoes, vegetables, Gravy 180 60-70 30-35 1 3 Roast veal, 1 kg, rice, vegetables 180 50-60 30-35 1 3 The times and temperatures given are for guidance only. They will vary depending upon size and amount.
electrolux Cooking on more than one oven level. Food to be cooked Interval steam cooking (max. 250 ml water 250ml) Temperature in °C Time in min. Oven levels Ready-to-bake baguettes, 40-50 g 200 10-15 3 Ready-to-bake baguettes, 40-50 g, frozen 200 10-15 3 Cut up whole roast before warming it up. The times and temperatures given are for guidance only. They will vary depending upon size and amount.
electrolux 21 • Cakes and pastries at different heights may brown at an uneven rate at first. Please do not change the temperature setting if this occurs . Different rates of browning even out as baking progresses. • Your new oven may bake or roast differently from your previous appliance. If this is the case, adjust your normal settings (temperature, cooking times) and oven levels to the recommendations in the following tables.
electrolux Baking on one oven level Type of baking Oven programme Shelf position Temperature °C Time in hours: mins. Fruit flan (made with yeast dough/sponge mixture) Fan oven with circular 2 heating element 160-180 0:25-0:50 Fruit flan made with shortcrust pastry Fan oven with circular 2 heating element 170-190 0:40-1:20 Yeast cakes with delicate toppings (e. g.
electrolux 23 Baking on more than one oven level Type of baking Fan oven with circular heating element Temperature in °C Time in hours: mins. Oven level from the bottom 2 levels Biscuits made with sponge mixture 2/4 160-180 0:25-0:40 Pastries made with egg white, meringues 2/4 80-100 2:10-2:50 Macaroons 2/4 100-120 0:40-1:20 Fancy yeast biscuits 2/4 160-180 0:30-0:60 Puff pastries 2/4 180-200 1) 0:30-0:50 1) Pre-heat oven.
electrolux Type of dish Oven Function Shelf position Temperature °C Time in hours: mins.
electrolux 25 Food to be roasted Convection with ring heating element Oven level Temperature °C Time Hours: Mins.
electrolux 2. Place meat in a roasting dish or directly on the oven shelf with a tray underneath to catch the fat. 3. Place in the oven. Select oven function Low Temperature Cooking , if necessary, change the temperature and cook until done. (See table.). ically switches to a lower temperature to continue cooking. Important! Important: Insert the grease filter when roasting! When using the oven function Low Temperature Cooking always cook dishes uncovered without a lid . 1.
electrolux 27 baking tray filled with 1-1.5 cm of water on shelf level 1. • Grilling is particularly suitable for flat pieces of meat or fish. • With flat pieces of meat and fish, pre-heat for 3 minutes in general. Then insert the food to be grilled as per the table. Place a Dish Caution! Hot steam escapes when the door is opened.
electrolux Food to be dried Temperature in °C Oven level Time in hours (guideline) Vegetables for soup 75 2 2/4 5-6 Mushrooms 50 2 2/4 6-9 Herbs 40-50 2 2/4 2-4 Plums 75 2 2/4 8-12 Apricots 75 2 2/4 8-12 Apple slices 75 2 2/4 6-9 Pears 75 2 2/4 9-13 Fruit Making preserves Oven function: Convection with ring heating element • When making preserves, only use commercially available preserve jars of the same size.
electrolux 29 P4 WHITE BREAD 500-700 G 15 min. P5 ROLLS, 40 G each (party rolls, 40g) P6 FISH FILLET (gratinated) P7 TROUT, 250-300 g P8 PIZZA P9 QUICHE LORRAINE P 10 CHICKEN 1,000 G P 11 SADDLE OF VEAL 1,000 G P 12 WARMING UP VEGETABLES 500-1,000 G (vegetable platter) Cookware: Any kind of cookware that is heat-resistant to at least 100°C can be used.
electrolux WHITE BREAD 500-700 G Ingredients: • 1000 g flour, type 405 • 1 cube of fresh yeast or 2 packets of dried yeast • 600 ml milk • 15 g salt Preparation: Place flour and salt in a large bowl. Dissolve the yeast in tepid milk and add to the flour. Knead all ingredients into a workable dough. More milk may be required, depending on the texture of the flour. Leave the dough to rise until it doubles in volume.
electrolux 31 Cook Time Water to add via water drawer 30 min. 400 ml PIZZA (4, approx. 28cm in diameter) Preparation: Tomato sauce Ingredients for the pastry: • 500 g flour, type 405 • 250 ml water • 20 g yeast • 1 egg • 2 tbsp olive oil • 1 tsp salt Method for the dough: Dissolve the yeast in the water and knead into a soft dough with the other ingredients. Leave dough covered for 30 minutes, deflate three times during this time.
electrolux roasting time until the second acoustic signal (approx. 60 min.) sounds. Heat-resistant glass dish, ceramic dish or cast iron roasting pan. Setting Oven level Setting Oven level P 10 CHICKEN 1200 G 2 P 11 SADDLE OF VEAL 2 Cook Time Water to add via water drawer Cook Time Water to add via water drawer 55 min. 200 ml 80 min. 200 ml SADDLE OF VEAL (serves 4-6) Preparation: Take meat out of the fridge 1 hour beforehand.
electrolux 33 Caution! When using oven sprays, please follow the manufacturer's instructions exactly! Accessories Wash up all insertable parts (oven shelf, baking tray, side rails, etc.) after each use and dry well. For easier cleaning, leave to soak for a while. Grease filter 1. Clean the grease filter in a solution of hot water and washing-up liquid or in the dishwasher. 2. If dirt has become burnt on, simmer in some water and 2-3 tablespoons of dishwasher detergent.
electrolux Steam generator system Important! Wipe the steam generator dry after each use. Soak up water with a sponge. Remove any lime residue with water and vinegar. Replacing the side oven light bulb/ Cleaning the glass panel 1. Take out the side rails on the left. 2. Unscrew the metal frame using a crosstip screwdriver. Important! Chemical descaling agents can damage the oven's surface enamel. Always follow the manufacturer's instructions exactly. Water Drawer and Steam Generator 1.
electrolux 35 3. Grip the oven door with both hands and close it about 3/4 going past the point of resistance . 2. Hold the door at an angle of approx. 60°. 3. Insert the door hinges as far as possible into the two slots on the right and left at the bottom of the oven at the same time . 4. Lift the door up until resistance is met and then open it fully. 3 4 4 3 60 4 2 5 4. Pull the door away from the oven ( Caution: the door is heavy!) 5.
electrolux Problem "d" appears on the display and the oven does not heat up in any mode. Possible Cause Test mode is switched on If you are unable to remedy the problem by following the above suggestions, please contact your dealer or the Customer Care Department. Warning! Repairs to the appliance are only to be carried out by qualified service engineers. Considerable danger to the user may result from improper repairs.
electrolux 37 • The site must provide a connection to the electrical supply by means of a socket that is accessible and outside the coordination space. • Anti-shock protection must be provided by the installation. • The built-in unit must meet the stability requirements of DIN 68930.
electrolux
electrolux 39
electrolux 2 H05VV-F H05RR-F min.
electrolux 41 3 90 0
electrolux 4 20 13 2x3,5x25 Disposal The symbol on the product or on its packaging indicates that this product may not be treated as household waste. Instead it should be taken to the appropriate collection point for the recycling of electrical and electronic equipment. By ensuring this product is disposed of correctly, you will help prevent potential negative consequences for the environment and human health, which could otherwise be caused by inappropriate waste handling of this product.
electrolux 43 • The appliance has been correctly installed and used only on the electricity supply stated on the rating plate. • The appliance has been used for normal domestic purposes only, and in accordance with the manufacturer's instructions. • The appliance has not been serviced, maintained, repaired, taken apart or tampered with by any person not authorised by us.
electrolux • The appliance guarantee is for the same period and to the same extent for labour and parts as exists in your new country of residence for this particular model or range of appliances. • The appliance guarantee is personal to the original purchaser of the appliance and cannot be transferred to another user. • The appliance is installed and used in accordance with instructions issued by Elec- trolux and is only used within the home, i.e. is not used for commercial purposes.
electrolux 45 Portugal +35 12 14 40 39 39 Quinta da Fonte - Edificio Gonçalves Zarco - Q 35 -2774-518 Paço de Arcos Romania +40 21 451 20 30 Str. Garii Progresului 2, S4, 040671 RO Schweiz - Suisse - Svizzera +41 62 88 99 111 Industriestrasse 10, CH-5506 Mägenwil Slovenija +38 61 24 25 731 Gerbičeva ulica 98, 1000 Ljubljana Slovensko +421 2 43 33 43 22 Electrolux Slovakia s.r.o., Electrolux Domáce spotrebiče SK, Seberíniho 1, 821 03 Bratislava Suomi www.electrolux.
electrolux
electrolux 47
www.electrolux.com www.electrolux.co.