user manual Built In Fan/ Steam Oven EOK96030
We were thinking of you when we made this product
electrolux 3 Welcome to the world of Electrolux Thank you for choosing a first class product from Electrolux, which hopefully will provide you with lots of pleasure in the future. The Electrolux ambition is to offer a wide variety of quality products that make your life more comfortable. You will find some examples on the cover in this manual. Please take a few minutes to study this manual so that you can take advantage of the benefits of your new machine.
electrolux contents Contents Safety instructions Description of the Appliance Before Using for the first time Using the Oven Uses, Tables and Tips Cleaning and Care What to do if … Installation Instructions Disposal Guarantee/Customer Service Index Service 5 7 10 12 32 59 66 67 71 72 77 78 The following symbols are used in this user manual: 1 3 2 Important information concerning your personal safety and information on how to avoid damaging the appliance.
safety instructions electrolux 5 Warning: Risk of burns! The oven interior becomes hot during use. • Warning: Do not under any circumstances open the oven door during steam cooking. The escaping steam can cause moisture damage to furniture and cabinets. Avoid any direct contact with the escaping steam. • If you use ingredients containing alcohol in the oven, a slightly flammable mixture of alcohol and air may ensue. In this case, be careful when opening the door.
electrolux safety instructions • • • • damage to or discoloration of the enamel. Rough handling, especially around the edges of the front panel, can cause the glass to break. Do not store any flammable materials inside the oven. These could ignite when the oven is switched on. Do not store any moist foods inside the oven. This could damage the oven enamel. After switching off the cooling fan, do not keep uncovered dishes in the oven.
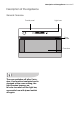
description of the appliance electrolux 7 Description of the Appliance General Overview Control panel Light bars. Door handle Oven door The oven switches off after 2 minutes, if no function is selected and is changed at the oven nothing, the light remains however on. In order to switch off the light bar, oven switch on with and switch off again.
electrolux description of the appliance Control Panel Oven display Water Drawer Function buttons Oven Oven Features Grill heating element Shelf positions Oven lighting Fat Filter Fan heating element Fan Steam generator/ Oven shelf runners, removable
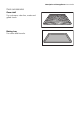
description of the appliance electrolux 9 Oven accessories Oven shelf For cookware, cake tins, roasts and grilled foods. Baking tray For cakes and biscuits.
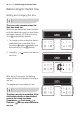
electrolux before using for the first time Before Using for the first time Setting and changing the time The oven only operates when the time has been set. When the appliance has been connected to the electrical supply or when there has been a power cut, the symbol for Time automatically flashes. 1. To change a time of day that has already been set, press the Clock Functions button repeatedly until the symbol for Time flashes. 2. Using the rent time.
before using for the first time electrolux 11 Initial cleaning Clean the oven before using it for the first time. Important: Do not use caustic or abrasive cleaning agents! These can damage the oven surfaces. For the metal surfaces, use commercially available cleaning agents. 1. Open the oven door. The oven light is lit. 2. Remove all oven accessories, and clean them with warm water and a scouring agent. 3. Wash the oven in the same way, and wipe dry. 4. Wipe the front of the appliance with a damp cloth.
electrolux using the oven Using the Oven The Electronic Oven Control The display field Temperature/Clock Steam mode Clock functions/Operating time Memory: P / Test: d Oven Functions Thermometer symbol Baking/roasting programmes
using the oven electrolux 13 The control panel Oven function selection ON/OFF button Speedcook Baking/roasting programmes General instructions • Always switch appliance on first by pressing the On/Off button. • When the selected function is lit, the oven begins to heat up or the time set begins to count down. • When the selected temperature is reached, an audible signal sounds. • The oven light is switched on as long as an oven function is started or the oven door is opened.
electrolux using the oven Selecting oven function 1. Switch on the appliance using the On/Off button. 2. Press Oven Functions button repeatedly until the desired oven function appears. • A suggested temperature appears in the temperature display. • If the suggested temperature is not changed within approx. 5 seconds, the oven starts to heat up. Changing the oven temperature Press the or button, to raise or lower the temperature. The setting changes in 5 °C steps.
using the oven electrolux 15 Switching the oven off Switch off the appliance using the On/ Off button. Cooling fan The fan switches on automatically in order to keep the appliance’s surfaces cool. When the oven is switched off, the fan continues to run to cool the appliance down, then switches itself off automatically.
electrolux using the oven Speedcook After an oven function has been selected, using the additional function Speedcook the empty oven can be pre-heated in a relatively short time. Important!: Do not put the food to be cooked into the oven, until Speedcook is completed and the oven is operating using the desired function. 1. Set and start the desired oven function (e.g. Convection with ring heating element ). If necessary, change the suggested temperature. 2. Press the Speedcook button.
using the oven electrolux 17 Oven Functions The oven has the following functions: Heating element/ fan Oven function Application Steam wet For vegetables, potatoes, rice, pasta or other side-dishes. Steam generator, fan Steam hot For baking, roasting and warming up chilled and frozen meals. Hot air (75%) and steam generator (25%) alternating Convection with ring heating element For roasting and baking on up to two oven levels at the same time.
electrolux using the oven Inserting the Oven Shelf and the Baking Tray Shelf runner safety and anti-tip device As a shelf runner safety device, all insertable components have a small curved indentation at the bottom on the right and left-hand edge. Always insert insertable components so that this indentation is at the back of the oven interior. This indentation is also important for preventing the insertable components from tipping.
using the oven electrolux 19 Inserting the oven shelf: Insert the oven shelf so that the feet point downwards. Push the oven shelf between the guide bars of the selected oven level. The high rim around the oven shelf is an additional device to prevent cookware from slipping. Inserting/Removing the Grease Filter Only use the grease filter when roasting to protect the rear heating elements from fat splashes.
electrolux using the oven Steam Cooking Functions Important: The steam cooking functions must always be set in conjunction with the clock functions Cook time or End time (see section Clock Functions Cook time /End time ). Important: Only water can be used as the liquid. A buzzing sound is heard when the water has been used up. When more water is added, the buzzing sound is switched off. Because of the automatic steam dispersal period of approx.
using the oven electrolux 21 3. Using the Oven Functions button, select the function Steam wet and using the or button, set the desired temperature (range 50°C 96°C). 4. Using the Clock Functions button, select the function Cook time or End time and using the or button, set the desired cooking time or set switch-off time. After about 2 minutes, the first steam becomes visible. A single audible signal indicates when the cooking temperature of around 96°C is reached.
electrolux using the oven Additional functions Baking and roasting programmes Use the pre-set recipes for this function. Selecting the programme 1. Switch the oven on using the On/ Off button. Press baking/roasting programmes button repeatedly until the desired programme (P 1 to P12) appears in the display. – The symbol for the corresponding oven function appears in the function display. – The cooking time appears in the clock display, the symbol for Cook time lights up.
using the oven electrolux 23 Memory function The Memory function can be used to save one setting which is used very frequently. 1. Set oven function, temperature and if necessary the clock functions Cook time and/or End time . 2. Press and hold the Memory function button for approx. 2 seconds, until an acoustic signal sounds. The setting is saved. To save another setting, press the Memory function button again for approx. 2 seconds. The previously saved setting is replaced by the new one.
electrolux using the oven Clock Functions Time display. Time Cook time/End time/Operating time Clock Functions Clock Functions Selector buttons Countdown To set a countdown. A signal sounds after the time has elapsed. This function does not affect the functioning of the oven. Cook time To set how long the oven is to be in use. End time To set when the oven is to switch off again. Time To set, change or check the time (See also section “Before Using for the First Time”).
using the oven electrolux 25 Countdown 1. Press the Clock Functions button repeatedly until the symbol for Countdown flashes. 2. Using the or button set the desired countdown time (max. 99.00 minutes). After about 5 seconds the display shows the time remaining. The symbol for Countdown lights up. When the time set has elapsed, an acoustic signal sounds for 2 minutes. “0.00” lights up and the symbol for Countdown flashes. To turn off the acoustic signal: Press any button.
electrolux using the oven Cook time 1. Select oven function and using or button, select temperature. 2. Press the Clock Functions button repeatedly until the symbol for Cook time flashes. 3. Using the or button set the desired cooking time. The oven switches itself on. The symbol for Cook time lights up. By repeatedly pressing the Clock Functions button, the current time can be called up. When the time has elapsed, an acoustic signal sounds for 2 minutes. The oven switches itself off. “0.
using the oven electrolux 27 End time 1. Select oven function and using or button, select temperature. 2. Press the Clock Functions button repeatedly until the symbol for End time flashes. 3. Using the or button, set the desired switch-off time. The symbols for End time and Cook time light up. The oven automatically switches itself on. By repeatedly pressing the Clock Functions button, the current time can be called up. When the time has elapsed, an acoustic signal sounds for 2 minutes.
electrolux using the oven Cook time bined and End time com- Cook time and End time can be used simultaneously, if the oven is to be switched on and off automatically at a later time. 1. Select oven function and temperature. 2. Using the Cook time function, set the time required for cooking the dish. z. g. 1 hour. 3. Using the End time function, set the time at which the dish is to be ready. z. g. at 14:05. The symbols for Cook time and End time light up.
using the oven electrolux 29 Other functions Switching off the display You can save energy by switching off the display. Switching off the display 1. If necessary, switch off appliance using the On/Off button. No residual heat must be displayed. 2. Press buttons Clock Functions and at the same time until the display goes out. As soon as the appliance is switched on again, the display automatically switches itself on. When the appliance is next switched off, the display goes out again.
electrolux using the oven Child safety device As soon as the child safety device is activated, it is no longer possible to operate the appliance. Activating the child safety device 1. If necessary, switch off appliance using the On/Off button. No oven function must be selected. 2. Press and hold baking/boasting programme button and button at the same time, until SAFE appears in the display. The child safety device is now activated. Deactivating the child safety device 1.
using the oven electrolux 31 Oven safety cut-out If not switched off after a certain time, or if the temperature is not modified, the oven switches off automatically. The last temperature set flashes in the temperature display. The oven switches itself off at an oven temperature of: 30 - 120°C after 120 - 200°C after 200 - 250°C after 12.5 hours 8.5 hours 5.5 hours OFFappears in the display. Using the appliance after a safety cut-out Switch the oven off completely. It can then be switched on again.
electrolux uses, tables and tips Uses, Tables and Tips Cooking with Steam For steam cooking, use the oven functions Steam wet or Steam hot . Warning: During Steam wet do not under any circumstances open the oven door. Important: Only water can be used as the liquid. Cookware for steam cooking • Cookware made of an appropriate heat and corrosion resistant material is suitable for steam cooking. • Chrome steel food containers are very suitable. (See special accessories.
uses, tables and tips electrolux 33 Steam wet The Steam wet Cooking method of preparation is suitable for all types of food, fresh or frozen. It can be used for cooking, warming, defrosting, poaching or blanching vegetables, meat, fish, pasta, rice, sweet corn, semolina and eggs. Cooking of menus Complete menus can be prepared in one go. Ideally dishes that require similar cooking times should be chosen. This will prevent individual components being under or over cooked.
electrolux uses, tables and tips Steam wet table Steam wet Type of food Water via water Tempedrawer rature ml °C Oven level Time in mins.
uses, tables and tips electrolux 35 Convection with ring heating element and Steam wet in succession Convection with ring heating element and Steam wet can be combined to cook meat, vegetables and side-dishes in the oven one after the other and then using Steam wet with one another, so that they will be ready to serve at the same time. • Cook the roast meat with the Convection with ring heating element function.
electrolux uses, tables and tips Steam hot table Cooking on more than one oven level Steam hot (Max. water amount 250ml) Temperature in °C Time in mins. Oven levels Reheating complete meal 6 plates (dia.
uses, tables and tips electrolux 37 Baking Oven function: Convection with ring heating element Baking tins • For Convection with ring heating element light metal tins are suitable. Oven levels • With Convection with ring heating element you can bake on up to 2 baking trays at the same time: 1 baking tray: e.g., oven level 2 1 baking tin: e.g. oven level 1 2 baking trays: e.g.
electrolux uses, tables and tips General instructions With Convection with ring heating element you can also bake two cakes at the same time in tins placed next to each other on the shelf. This does not significantly increase baking time. When frozen foods are used the trays inserted may distort during cooking. This is due to the large difference in temperature between the freezing temperature and the temperature in the oven. Once the trays have cooled the distortion will disappear again.
uses, tables and tips electrolux 39 Baking table Baking on one oven level Convection with ring heating element Type of baking Oven level Temperature °C Time Hrs: Mins.
electrolux uses, tables and tips Convection with ring heating element Type of baking Oven level Temperature °C Time Hrs: Mins.
uses, tables and tips electrolux 41 Tips on Baking Baking results Possible cause Remedy The cake is not browned Wrong oven level enough underneath Place cake lower The cake sinks (becomes Oven temperature too high soggy, lumpy, streaky) Baking time too short Use a slightly lower setting Cake is too dry Cake browns unevenly Cake does not cook in the baking time given Set a longer baking time Baking times cannot be reduced by setting higher temperatures Too much liquid in the mixture Use less liqu
electrolux uses, tables and tips Table Frozen Ready Meals Table Food to be cooked Oven function: Oven level Temperature °C Time Frozen pizza Convection with ring heating element 3 as per manufacturer’s instructions as per manufacturer’s instructions Chips 1) (300-600 g) Convection grilling 3 200-220 as per manufacturer’s instructions Baguettes Convection with ring heating element 3 as per manufacturer’s instructions as per manufacturer’s instructions Fruit flan Convection with ring
uses, tables and tips electrolux 43 Roasting Oven function: Convection with ring heating element Tips on using the Roasting Table The information given in the following table is for guidance only. • We recommend cooking meat and fish weighing 1kg or more in the oven. • To prevent meat juices or fat from burning onto the ovenware, we recommend adding some liquid. • If required, turn the roast (after 1/2 2/3 of the cooking time).
electrolux uses, tables and tips Convection with ring heating element Food to be roasted Oven level Temperature °C Time Hours: Mins.
uses, tables and tips electrolux 45 Low temperature cooking Oven function: Low temperature cooking With the oven function Low temperature cooking meat becomes beautifully tender and remains particularly succulent. We recommend Low temperature cooking for pieces of tender, lean meat and fish. Low temperature cooking is not suitable for e. g, pot roasts or fatty pork roasts. The oven heats up to the pre-set temperature. When this temperature is reached, an acoustic signal sounds.
electrolux uses, tables and tips Low Temperature Cooking Table Weight g Temperature setting Oven level Total time mins.
uses, tables and tips electrolux 47 Grill Oven function: Grill with maximum temperature setting Important: Always grill with the oven door closed. • For grilling, use both the shelf and the tray together. • The grilling times are guidelines. • Grilling is particularly suitable for flat pieces of meat or fish. Grilling table Grilling time Food to be grilled Oven level 1st side 2nd side Rissoles 3 8-10 mins. 6-8 mins. Pork fillet 2 10-12 mins. 6-10 mins. Sausages 3 8-10 mins. 6-8 mins.
electrolux uses, tables and tips Convection grilling Oven function: Convection grilling Temperature in °C Tray Chicken (900-1,000 g) 180-200 1 Stuffed rolled pork roast (2,000 g) 180-200 Pasta bake Gratinated potato bake Grill shelf Grilling time in minutes Turn after … minutes 2 50-60 25-30 1 2 90-95 45 180 --- 2 30 --- 200 --- 2 20-23 --- Gnocchi gratin 180 --- 2 20-23 --- Cauliflower with Hollandaise sauce 200 --- 2 15 --- Dish Oven level
uses, tables and tips electrolux 49 Defrosting Oven function: Drying/Defrost (30°C temperature setting) • Unwrap the food and place it on a plate on the oven shelf. • Do not cover with a plate or bowl, as these can substantially lengthen the defrosting time. • For defrosting, place the shelf in the 1st oven level from the bottom. Defrosting table Defrosting time mins. Further defrosting time (mins.
electrolux uses, tables and tips Drying Oven function: Drying/Defrost • Use with trays covered with greaseproof paper or baking parchment. • You will get a better result if you switch the oven off halfway through the drying time, open the door and leave to cool down, preferably overnight. • After this finish drying the food to be dried.
uses, tables and tips electrolux 51 Making preserves Oven function: Convection with ring heating element • When making preserves, only use commercially available preserve jars of the same size. • Jars with twist-off or bayonet type lids and metal tins are not suitable. • When making preserves, use the first shelf position from the bottom. • Use the baking tray for making preserves. There is enough room on this for up to six 1-litre preserving jars.
electrolux uses, tables and tips Programmed Functions and Rec- CLEANING (Cleaning programme) 1. Place water (approx. 150ml) and ipes The appliance has 12 programmed functions and recipes, which can be selected one after the other using the Baking/Roasting Programmes button.
uses, tables and tips electrolux 53 Recipes VEGETABLE 500-1000G (vegetable platter) Cookware: Any kind of cookware that is heat-resistant to at least 100°C can be used. Ingredients: – 400 g cauliflower – 200 g carrots – 200 g kohlrabi – 200 g yellow and red pepper Method: Rinse cauliflower and divide into florets. Peel carrots and kohlrabi and cut into bite-sized pieces. Wash the peppers and cut into strips. Place all vegetables into an open oven dish and cook without adding water.
electrolux uses, tables and tips WHITE BREAD Ingredients: – 1,000 g flour type 405 – 1 cube fresh yeast or 2 packets dry yeast – 600 ml milk – 15 g salt ROLL PER 40 G (Party rolls 40g) Ingredients: – 500 g flour, type 405 – 20 g cube of fresh yeast or 1 packet of dried yeast – 300 ml water – 10 g salt Method: Place flour and salt in a large bowl. Dissolve the yeast in tepid milk and add to the flour. Knead all ingredients into a workable dough.
uses, tables and tips electrolux 55 FILLET OF FISH (700g) Ingredients: – 700 g pike-perch fillet or sea trout fillet, cubed – 100 g Emmental, grated – 200 ml cream – 50 g breadcrumbs – Salt, pepper, lemon juice – Parsley, chopped – 40 g butter to grease the dish Method: Sprinkle the fish fillet with lemon juice and leave it to marinate for a while. Then dab off surplus juice using kitchen paper. Then season the fish fillets on both sides with salt and pepper. Then place in a greased oven-proof dish.
electrolux uses, tables and tips PIZZA (4 round dia. 28cm) Preparation: Tomate sauce Ingredients for the dough: – 500 g flour, type 405 – 250 ml water – 20 g yeast – 1 egg – 2 tblsp olive oil – 1 tsp salt Method for the dough: Dissolve the yeast in the water and knead to a soft dough with the other ingredients. Cover the dough and leave to rise for 30 minutes until it doubles in volume.
uses, tables and tips electrolux 57 QUICHE LORRAINE Ingredients for the pastry: – 250 g flour, type 405 – 125 g butter – 60 ml water – 1 tsp salt – A little pepper and nutmeg Method: Mix together flour, butter and salt, add the water and knead together briefly to form a pastry. Leave the pastry to cool in the fridge for 1 hour.
electrolux uses, tables and tips RACK OF VEAL (for 4-6 people) Preparation: Take meat out of the fridge 1 hour beforehand. Ingredients: – 1,000 g saddle of veal – 2 tbsp groundnut oil – Salt, pepper, paprika and a little mustard Method: Wash the saddle of veal and dry it with kitchen paper. Mix the seasoning with the groundnut oil and use the mixture to coat the meat evenly.
cleaning and care electrolux 59 Cleaning and Care Clean the oven after every use. This is the easiest way to remove dirt which then cannot burn on. Warning: For cleaning, the appliance must be switched off and cooled down. Warning: For safety reasons, do not clean the appliance with steam jet or high-pressure cleaning equipment. Attention: Do not use any scouring agents, sharp cleaning tools or scourers. 1. When the oven door is opened, the oven lighting automatically switches itself on. 2.
electrolux cleaning and care Oven roof with catalytic selfcleaning surface (rough, porous surface) The oven roof has a catalytic self-cleaning surface, from which small food deposits are burnt off at temperatures over 200°C. Please observe the following instructions to ensure the best working of this self-cleaning surface. Attention: Do not use cloths. Fluff catches and sticks on the rough surface. Accessories Wash all slide-in units (shelf unit, baking tray, shelf support rails etc.
cleaning and care electrolux 61 Side rails The left and right-hand side rails can be removed from the oven, so that the side walls of the oven can be cleaned. Taking out the side rails 1. Undo the screw. 2. Pull the rails sideways. 3. Lift the rails off the rear hook.
electrolux cleaning and care Replacing the side rails 1. Insert the rails into the rear hook and press against the screw thread in a sideways movement. 2. Affix the screw and tighten.
cleaning and care electrolux 63 Steam generation system Important: Wipe the steam generator dry after each use. Soak up water with a sponge. Remove any lime residue with water and vinegar. Important: Chemical descaling agents can damage the oven's surface enamel. Always follow the manufacturer's instructions exactly. Water Drawer and Steam Generator 1. Pour water and vinegar (about 250 ml) into the steam generator via the water drawer. Leave to work for approx. 10 minutes. 2.
electrolux cleaning and care Oven lighting Warning: Risk of electric shock! Before replacing the oven light bulb: • Switch oven off. • Take the fuses out of the fuse box or switch off. To protect the oven light bulb and the glass cover, lay a cloth on the floor of the oven. Replacing the side oven light bulb/ Cleaning the glass panel 1. Take out the side rails on the left. 2. Unscrew the metal frame using a cross-tip screwdriver. 3. Take off the metal frame and seal and clean them. 4.
cleaning and care electrolux 65 Oven Door The door of your appliance may be removed for cleaning. Removing the oven door 1. Open the oven door completely. 2. Completely fold back the clamping levers on both door hinges. 3. Grip the oven door with both hands and close it about 3/4 going past the point of resistance. 4. Pull the door away from the oven (Caution: the door is heavy!) 5. Place the door, outer surface downwards, on a soft, flat surface, (for example on a blanket) to avoid scratches.
electrolux what to do if … What to do if … Problem The oven is not heating up Possible cause Remedy The oven has not been switched on Switch oven on The clock has not been set Set the current time on the clock The required settings have not been made Check the settings Oven safety cut-out has been trig- See Safety Cut-out gered The child safety device is activat- Deactivate child safety device ed. The house wiring fuse (in the fuse Check fuse.
installation instructions electrolux 67 Installation Instructions Important: The new appliance may only be installed and connected by a registered installation engineer. Please comply with this. If you do not, any damage resulting is not covered by the warranty. Safety information for the installer • The set-up of the electrical installation is arranged so that the appliance can be isolated from the mains with a minimum 3mm all-pole contact separation. Suitable separation devices include e. g.
electrolux installation instructions
installation instructions electrolux 69 alternativ
electrolux installation instructions
disposal electrolux 71 Disposal Packaging material The packaging materials are environmentally friendly and can be recycled. The plastic components are identified by markings, e.g. >PE<, >PS<, etc. Please dispose of the packaging materials in the appropriate container at the community waste disposal facilities. Old appliance W on the product or on The symbol its packaging indicates that this product may not be treated as household waste.
electrolux guarantee/customer service Guarantee/Customer Service Belgium DECLARATION OF GUARANTEE TERMS. Our appliances are produced with the greatest of care. However, a defect may still occur. Our consumer services department will repair this upon request, either during or after the guarantee period. The service life of the appliance will not, however, be reduced as a result. This declaration of guarantee terms is based on European Union Directive 99/44/EC and the provisions of the Civil Code.
guarantee/customer service electrolux 73 15. Except in the event where liability is legally imposed, this declaration of guarantee terms excludes any compensation for damage outside the appliance for which the consumer wishes to assert his rights. In the event of legally admitted liability, compensation will not exceed the purchase price paid for the appliance. These guarantee terms are only valid for appliances purchased and used in Belgium.
electrolux guarantee/customer service Address for our consumer services department: Belgium Electrolux Home Products Belgium Consumer services 02/363.04.44 ELECTROLUX SERVICE Bergensesteenweg 719 1502 Lembeek E-mail: consumer.services@electrolux.be 02/363.04.00 02/363.04.60 Luxembourg Grand-Duché de Luxembourg Consumer services 00 352 42 431-1 ELECTROLUX HOME PRODUCTS Rue de Bitbourg. 7 L-1273 Luxembourg-Hamm E-mail: consumer-service.luxembourg@electrolux.
guarantee/customer service electrolux 75 www.electrolux.com p t b Albania +35 5 4 261 450 Rr. Pjeter Bogdani Nr. 7 Tirane Belgique/België/ Belgien +32 2 363 04 44 Bergensesteenweg 719, 1502 Lembeek Èeská republika +420 2 61 12 61 12 Budìjovická 3, Praha 4, 140 21 Danmark +45 70 11 74 00 Sjællandsgade 2, 7000 Fredericia Deutschland +49 180 32 26 622 Muggenhofer Str. 135, 90429 Nürnberg Eesti +37 2 66 50 030 Mustamäe tee 24, 10621 Tallinn España +34 902 11 63 88 Carretera M-300, Km.
electrolux guarantee/customer service p t b Slovensko +421 2 43 33 43 22 Electrolux Slovakia s.r.o., Electrolux Domáce spotrebièe SK, Seberíniho 1, 821 03 Bratislava Suomi www.electrolux.
index electrolux 77 Index A Accessories 9, 18 B Bakes and Gratins 41 Baking 37, 38 Baking and roasting programmes 22 Baking tray 9, 18 Button beep 30 C Child safety device 30 Cleaning accessories 60 Oven interior 59 Oven light bulb 64 Oven roof 60 Pre-cleaning 11 Side rails 61 steam generation system 63 Clock 12 Clock Functions 24 Clock Funktions 22 Control panel 8 D Description of the appliance 7 F Fat Filter 60 G Grease filter 19 I Interval Cooking 35 M Memory function 23 O Oven accessories 9 functions 1
electrolux service Service In the event of technical faults, please first check whether you can remedy the problem yourself with the help of the operating instructions (section “What to do if…”). If you were not able to remedy the problem yourself, please contact the Customer Care Department or one of our service partners. In order to be able to assist you quickly, we require the following information: – Model description – Product number (PNC) – Serial number (S No.
www.electrolux.