user manual Cooker EON42100
electrolux Electrolux. Thinking of you. Share more of our thinking at www.electrolux.com Contents Safety instructions.................................. 3 Description of the Appliance .................. 4 Before Using for the first time ................. 6 Using the Rings...................................... 6 Using the Oven ...................................... 8 Uses, Tables and Tips ............................ 16 Cleaning and Care................................. What to do if …...................
electrolux 3 1 Safety instructions Electrical safety • This appliance must be only connected by a registered electrician. • In the event of a fault or damage to the appliance: Take the fuses out or switch off. • Repairs to the appliance must only be carried out by qualified service engineers. Considerable danger may result from improper repairs. If repairs become necessary, please contact our Customer Services or your dealer. Child Safety • Never leave children unsupervised when the appliance is in use.
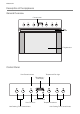
electrolux Description of the Appliance General Overview Control panel Door handle Full glass door Control Panel Temperature Pilot Light Oven Power Indicator Temperature / Time Display Function buttons Oven Functions Hob Cooking Zone Control Knobs Temperature selector Hob Cooking Zone Control Knobs
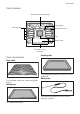
electrolux 5 Oven Features Top heat and heating elements Oven lighting Shelf positions Meat probe socket Fan Bottom Heat Oven shelf runners, removable Oven accessories Roasting Pan Oven shelf For baking and roasting or as a pan for collecting fat. For cookware, cake tins, roasts and grilled foods. Meat probe Baking tray For determining exactly how far joints of meat are cooked. For cakes and biscuits.
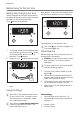
electrolux Before Using for the first time Setting and changing the time After the appliance has been connected to the electrical supply or when there has been a power cut, the function indicator Time flashes automatically. After approx. 5 seconds, the flashing stops and the clock displays the time of day set. The appliance is now ready to use. 3 The Time can only be changed, if no Countdown is set. 1. 2.
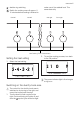
electrolux 7 make use of the residual heat. This saves electricity. = double ring switching 2 Switch the cooking zone off approx. 5- 10 minutes before cooking is finished to front left rear left rear right front right Hob Cooking Zone Control Knobs Setting the heat setting 1. 2. To end the cooking process, turn back to the Off position. Select the heat setting. 3 The power indicator light is lit as long as a ring is on.
electrolux resistance). The stop position will then be clearly detectable. 2. 3. Finally, turn back to the desired setting. After cooking, turn back to the OFF position. 3 To use the dual fry/cook area again afterwards, the larger ring must be switched back on. Using the Oven 3 The oven is equipped with retractable buttons for “Oven functions” and “Temperature selection”. To use, press the relevant button. The button then sticks out.
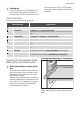
electrolux 9 3 Cooling fan The fan switches on automatically in order to keep the appliance’s surfaces cool. When the oven is switched off, the fan continues to run to cool the appliance down, then switches itself off automatically. Oven Functions The oven has the following functions: Oven function Application Light Using this function you can light up the oven interior, e.g. for cleaning. Convection For baking on up to two oven levels.
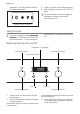
electrolux Inserting the oven shelf: Additional functions Either Countdown be set. or Meat probe can Time or temperature display Insert the oven shelf so that the feet point downwards. Push the oven shelf between the guide bars of the selected oven level. 3 The high rim around the oven shelf is an additional device to prevent cookware from slipping. Inserting the oven shelf and roasting pan together Selector buttons Countdown To set a countdown. Meat probe To set a core temperature.
electrolux 11 Countdown 3 This function has no effect on the operation of the oven. 1. When the time has elapsed, “0.00” is displayed and an audible signal sounds for 2 minutes. Press any button. “0.00” flashes in the display. 3. The signal can be stopped by pressing any button. Meat probe 2. Within 5 seconds set the desired countdown using the or buttons (max. 2 hours 30 minutes). After 5 seconds the display shows the time remaining. 1 Important: Only the meat probe sup1. 2.
electrolux 3. Using the or button set the desired core temperature. 6. Turn oven function selector and temperature selector to the Off position. 1 Warning: The meat probe is hot. There is a risk of being burned when removing the plug and the tip of the meat probe. The display changes to the current core temperature. 7. Remove the meat probe’s plug from the socket and take the meat out of the oven. Changing the core temperature – If necessary, change the temperature using or .
electrolux 13 Mechanical door lock When the appliance is delivered the door lock is deactivated. door and plug the door trim (B) into the upper edge of the door Activating door lock 3 On the open side of the door trim (B) 1. Take hold of the door trim(B) on the upper edge of the door at both sides and press inwards to release the clip seal. Then remove the door trim by pulling it upwards. 2. Activate lever: Remove lever (1) and move 4mm to the left (2) and insert (3). there is a guide bar (C).
electrolux To open the oven door. 1. 2. Keep lever pressed. Open the door. Then remove the door trim by pulling it upwards. 2. Demount lever: Remove lever (1). 3. Remove trim from the under side of the door trim (B)(2) and push in (3). 4. Take hold of the door trim(B) at each side, position it on the inside edge of the To close the oven Close door without pressing the lever. Deactivating door lock To deactivate the door lock, the lever is moved to the right again. Proceed as described above.
electrolux 15 door and push the door trim (B) onto the upper edge of the door 3 On the open side of the door trim(B) there is a guide bar(C). This must be pushed between the outer door panel and the guide corner(D). The clip seal(E) must be snapped in. 5. Close the oven door.
electrolux Uses, Tables and Tips Cooking table The information in the table is for guidance only. Heat setting Cookingprocess 0 suitable for Cooking time Hints Residual heat, Off position Keeping food warm To keep cooked foods warm as necessary Cover Melting Hollandaise sauce, to melt butter, chocolate, gelatine 5-25 mins. Stir occasionally Solidifying Fluffy omelettes, baked eggs 10-40 mins.
electrolux 17 Oven levels • Baking with Conventional is only possible on one level. • With Convection you can bake dry cakes and biscuits on 2 baking trays at the same time. 1 baking tray: e.g. oven level 3 1 cake tin: e.g. oven level 1 2 baking trays: e. g. oven levels 1 and 3 How to use the Baking Tables The tables give the required temperature settings, baking times and oven shelf levels for a selection of typical dishes.
electrolux Baking table Type of baking Ovenfunction Shelf position Temperature °C Time Hours mins.
electrolux 19 Type of baking Ovenfunction Shelf position Temperature °C Time Hours mins.
electrolux Baking results Possible cause Cake browns unevenly Remedy Oven temperature too high and baking Set a lower oven temperature and a time too short longer baking time Cake is not done within the baking time given Mixture is unevenly distributed Spread the mixture evenly on the baking tray Temperature too low Use a slightly higher oven setting Bakes and gratins table Dish Shelf position Temperature °C Time Hours mins.
electrolux 21 Roasting Oven function: Conventional or Convection grilling Roasting dishes • Any heat-resistant ovenware is suitable to use for roasting (please read the manufacturer's instructions). • Large roasting joints can be roasted directly in the roasting tray or on the oven shelf with the roasting tray placed below it. • For all lean meats, we recommend roasting these in a roasting tin with a lid. This will keep the meat more succulent.
electrolux Type of meat Quantity Ovenfunction Shelf position Temperature °C Time Hours mins. 1.5-2 kg Convection grilling 1 160-180 2:00-2:30 Leg of lamb, roast lamb 1-1.5 kg Convection grilling 1 150-170 1:15-2:00 Saddle of lamb 1-1.5 kg Convection grilling 1 160-180 1:00-1:30 up to 1 kg Conventional 3 220-2501) 0:25-0:40 Saddle of venison 1.5-2 kg Conventional 1 210-220 1:15-1:45 Haunch of venison 1.
electrolux 23 Grilling table Grilling time Food to be grilled Oven level 1st side 2nd side Burgers 4 8-10 mins. 6-8 mins. Pork fillet 4 10-12 mins. 6-10 mins. Sausages 4 8-10 mins. 6-8 mins. Fillet steaks, veal steaks 4 6-7 mins. 5-6 mins. Fillet of beef, roast beef (approx. 1 kg) 3 10-12 mins. 10-12 mins. 3 4-6 mins. 3-5 mins. 3 6-8 mins.
electrolux Drying Oven function: Convection • • • Use oven shelves covered with greaseproof paper or baking parchment. You get a better result if you switch the oven off halfway through the drying time, open the door and leave the oven to cool down overnight. After this finish drying the food to be dried.
electrolux 25 Preserves table The times and temperatures for making preserves are for guidance only. Preserve Temperature in°C Cooking time until Continue to cook simmering at 100°C in mins. in mins.
electrolux Shelf Support Rails The shelf support rails on the left and right hand sides of the oven can be removed for cleaning the side walls. Removing the shelf support rails To re-insert, first hook the rail into place at the back (1) and then insert the front and press into place (2). Oven Lighting First pull the front of the rail away from the oven wall (1) and then unhitch at the back (2).
electrolux 27 Oven Ceiling Repositioning the heating element The upper heating element can be folded down to make it easier to clean the oven ceiling. Folding down the heating element 1. 2. 1 Warning: Only fold down the heating el1. 2. 3. ement when the oven is switched off and there is no risk of being burnt! Remove the side shelf support rails. Grip the heating element at the front and pull it forwards and out over the support lug on the inner wall of the oven.
electrolux Oven door 4. Take hold of the oven door with a hand For easier cleaning of the oven interior the oven door of your appliance can be taken off its hinges. Removing the oven door from its hinges 1. Open the oven door as far as it will go. 2. 3. Undo the clamping levers (A) on both door hinges fully. Close the oven door as far as the first position (approx. 45°).
electrolux 29 2. Open the oven door as far as it will go. 3. Fold up the clamping levers (A) on both door hinges back into their original positions. 4. Close the oven door.
electrolux Oven door glass Then remove the door trim by pulling it The oven door is fitted with three panels of glass mounted one behind the other.The inner panels can be removed for cleaning. 1 Important! Rough handling, especially around the edges of the front panel, can cause the glass to break. Removing the door glass panels 1. Open the oven door as far as it will go. 5. 2. upwards.
electrolux 31 door and plug the door trim (B) into the upper edge of the door 4. Fold up the clamping levers (A) on both door hinges back into their original positions 5. Close the oven door. 3 On the open side of the door trim (B) there is a guide bar (C). This must be pushed between the outer door panel and the guide corner (D). 3. The clip seal (E) must be snapped in. Open the oven door as far as it will go.
electrolux What to do if … Problem Possible cause Remedy The cooking zones are not functioning Refer to the operating instructions for the built-in cooking surface The oven is not heating up The oven is not switched on Switch oven on The required settings have not been made Check the settings The house wiring fuse (in the fuse box) has tripped Check the fuses. If the fuses trip repeatedly, please call an authorised electrician.
electrolux 33 Installation Instructions 1 Attention: The new appliance may only be installed and connected by a registered expert. Please comply with this. If you do not, any damage resulting is not covered by the warranty. 1 Safety information for the installer • The electrical installation is to be set up so that the appliance can be isolated from the mains with a minimum 3mm allpole contact separation. • • • Suitable separation devices include e.g.
electrolux
electrolux 35
electrolux
electrolux 37 Guarantee/Customer Service European Guarantee This appliance is guaranteed by Electrolux in each of the countries listed at the back of this user manual, for the period specified in the appliance guarantee or otherwise by law.
electrolux p t b Ireland +353 1 40 90 753 Long Mile Road Dublin 12 Italia +39 (0) 434 558500 C.so Lino Zanussi, 26 - 33080 Porcia (PN) Latvija +37 17 84 59 34 Kr.
electrolux 39 Service In the event of technical faults, please first check whether you can remedy the problem yourself with the help of the operating instructions (section “What to do if…”). If you were not able to remedy the problem yourself, please contact the Customer Care Department or one of our service partners. In order to be able to assist you quickly, we require the following information: – – – Model description Product number (PNC) Serial number (S No.
www.electrolux.