EOL3430 EOR3430 ................................................ .............................................
www.electrolux.com CONTENTS 1. 2. 3. 4. 5. 6. 7. 8. 9. 10. 11. 12. SAFETY INFORMATION . . . . . . . . . . . . . . . . . . . . . . . . . . . . . . . . . . . . . . . . . . . . . . . . . . . 3 SAFETY INSTRUCTIONS . . . . . . . . . . . . . . . . . . . . . . . . . . . . . . . . . . . . . . . . . . . . . . . . . . 4 PRODUCT DESCRIPTION . . . . . . . . . . . . . . . . . . . . . . . . . . . . . . . . . . . . . . . . . . . . . . . . . 6 BEFORE FIRST USE . . . . . . . . . . . . . . . . . . . . . . . . . . . . .
ENGLISH 3 1. SAFETY INFORMATION Before the installation and use of the appliance, carefully read the supplied instructions. The manufacturer is not responsible if an incorrect installation and use causes injuries and damages. Always keep the instructions with the appliance for future reference. 1.1 Children and vulnerable people safety WARNING! Risk of suffocation, injury or permanent disability.
www.electrolux.com • Do not use harsh abrasive cleaners or sharp metal scrapers to clean the glass door since they can scratch the surface, which may result in shattering of the glass. • To remove the shelf supports first pull the front of the shelf support and then the rear end away from the side walls. Install the shelf supports in the opposite sequence. 2. SAFETY INSTRUCTIONS 2.1 Installation WARNING! Only a qualified person must install this appliance. • Remove all the packaging.
ENGLISH • Use this appliance in a household environment. • Do not change the specification of this appliance. • Make sure that the ventilation openings are not blocked. • Do not let the appliance stay unattended during operation. • Deactivate the appliance after each use. • Be careful, when you open the appliance door while the appliance is in operation. Hot air can release. • Do not operate the appliance with wet hands or when it has contact with water. • Do not apply pressure on the open door.
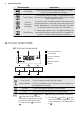
www.electrolux.com • Disconnect the appliance from the mains supply. • Cut off the mains cable and discard it. • Remove the door catch to prevent children and pets to get closed in the appliance. 3. PRODUCT DESCRIPTION 1 2 3 4 6 Grill 5 7 Oven lamp 8 Fan 5 4 11 3 6 9 Shelf support, removable 10 Rating plate 7 11 Shelf positions 8 2 1 10 9 1 Knob for the oven functions 2 Power indicator 3 Electronic programmer 4 Knob for the temperature 5 Temperature indicator 3.
ENGLISH To change the time, press again and again until the indicator for the Time of Day function flashes. You must not set the Duration or End function at the same time. 4.3 Preheating Preheat the empty appliance to burn off the remaining grease. 1. 2. Set the function and the maximum temperature. Let the appliance operate for one hour. 3. 4. 7 Set the function and the maximum temperature. Let the appliance operate for ten minutes. 5. Set the function and the maximum temperature. 6.
www.electrolux.com Oven function Application Fast Grilling To grill flat food items in large quantities. To make toast. The full grill element operates. Turbo Grilling To cook large pieces of meat. The grill element and the oven fan operate one after the other and circulate hot air around the food. True Fan Cooking / Defrosting To roast or roast and bake food with the same cooking temperature on more than one oven level without flavour transference. / To thaw frozen food.
ENGLISH 2. Press the Selection button again and again until the indicator for the necessary clock function flashes. and an acoustic signal sounds for two minutes. 4. 5. hr min 9 With the Duration and End functions, the appliance deactivates automatically. Press a button to stop the signal. Turn the knob for the oven functions and the knob for the temperature to the off position. 6.3 Cancelling the clock functions 1. 3. Press + or - to set the time for the necessary clock function.
www.electrolux.com 2. °C Keep the installation instructions for the telescopic runners for future use. With telescopic runners you can put in and remove the shelves more easily. Put the wire shelf on the telescopic runners and carefully push them into the appliance. Make sure you push back the telescopic runners fully in the appliance before you close the oven door. CAUTION! Do not clean the telescopic runners in the dishwasher. Do not lubricate the telescopic runners. 8. ADDITIONAL FUNCTIONS 8.
ENGLISH recycles the steam. With this system you can cook in a steamy environment and keep the food soft inside and crusty outside. It decreases the cooking time and energy consumption to a minimum. • Moisture can condense in the appliance or on the door glass panels. This is normal. Always stand back from the appliance when you open the appliance door while cooking. To decrease the condensation, operate the appliance for 10 minutes before cooking. • Clean the moisture after each use of the appliance.
www.electrolux.
ENGLISH TYPE OF DISH Conventional Cooking Shelf po- Temp sition [°C] True Fan Cooking Shelf position Tem p [°C] Cooking time [min] 13 Notes Rich fruit cake 1 160 2 150 110 - 120 In a 24 cm cake mould Victoria sandwich 1 170 2 160 50 - 60 In a 20 cm cake mould 1) Preheat for 10 minutes.
www.electrolux.com TYPE OF DISH Cannelloni Conventional Cooking Shelf position 2 Tem p [°C] 180 190 True Fan Cooking Shelf position 2 Tem p [°C] 180 190 Cooking time [min] Notes 25 - 40 In a mould1) 1) Preheat for 10 minutes.
ENGLISH 15 FISH TYPE OF DISH Conventional Cooking True Fan Cooking Cooking Tem time [min] p [°C] Notes Shelf position Tem p [°C] Shelf position Trout / Sea bream 2 190 2 175 40 - 55 3 - 4 fish Tuna fish / Salmon 2 190 2 175 35 - 60 4 - 6 fillets 9.6 Grilling Preheat the empty oven for 10 minutes, before cooking. Quantity Grilling Cooking time [min] TYPE OF DISH Pieces [g] Shelf position Temp [°C] 1st side 2nd side Fillet steaks 4 800 4 max.
www.electrolux.com TYPE OF DISH Quantity Shelf position Temperature [°C] Time [min] Roast beef or fillet, well done per cm of thickness 1 170 - 180 1) 8 - 10 Quantity Shelf position Temperature [°C] Time [min] Shoulder, neck, ham joint 1 - 1.5 kg 1 160 - 180 90 - 120 Chop, spare rib 1 - 1.5 kg 1 170 - 180 60 - 90 Meat loaf 750 g - 1 kg 1 160 - 170 50 - 60 Pork knuckle (precooked) 750 g - 1 kg 1 150 - 170 90 - 120 1) Preheat the oven.
ENGLISH TYPE OF DISH Turkey Quantity Shelf position Temperature [°C] Time [min] 4 - 6 kg 1 140 - 160 150 - 240 Quantity Shelf position Temperature [°C] Time [min] 1 - 1.5 kg 1 210 - 220 40 - 60 17 Fish (steamed) TYPE OF DISH Whole fish 9.8 Defrosting TYPE OF DISH Defrosting time [min] [g] Further defrosting time [min] Notes Chicken 1000 100 - 140 20 - 30 Place the chicken on an upturned saucer placed on a large plate. Turn halfway through.
www.electrolux.com FRUIT TYPE OF DISH Shelf position 1 level 2 levels Temperature [°C] Time [hr] Plums 3 1/4 60 - 70 8 - 10 Apricots 3 1/4 60 - 70 8 - 10 Apple slices 3 1/4 60 - 70 6-8 Pears 3 1/4 60 - 70 6-9 Information on acrylamides Important! According to the newest scientific knowledge, if you brown food (specially the one which contains starch), acrylamides can pose a health risk. Thus, we recommend that you cook at the lowest temperatures and do not brown food too much.
ENGLISH 19 10. CARE AND CLEANING WARNING! Refer to the Safety chapters. • Clean the front of the appliance with a soft cloth with warm water and a cleaning agent. • To clean metal surfaces use a usual cleaning agent. • Clean the oven interior after each use. Then you can remove dirt more easily and it does not burn on. • Clean stubborn dirt with a special oven cleaner. • Clean all oven accessories after each use and let them dry. Use a soft cloth with warm water and a cleaning agent.
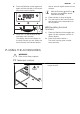
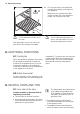
www.electrolux.com 2. 1 2 Installing the shelf supports 10.4 Oven lamp Install the shelf supports in the opposite sequence. WARNING! Be careful when you change the oven lamp. There is a risk of electrical shock. The rounded ends of the shelf supports must point to the front. 10.3 Oven ceiling You can remove the grill to clean the oven ceiling more easily. Before you change the oven lamp: • Deactivate the oven. • Remove the fuses in the fuse box or deactivate the circuit breaker.
ENGLISH 21 Removing the oven door and the glass panels A B 1. Press the buttons at the sides of the door trim (A) on the upper cover and pull it upwards to remove it. 2. Hold the inner glass B tightly with both hands and slide it upwards to remove it from its initial position. CAUTION! Make sure that you tightly hold glass B to prevent the glass from falling. Clean the door with a wet sponge and rub it dry with a soft cloth.
www.electrolux.com Problem Possible cause Remedy The oven does not heat up. The appliance is deactivated. Activate the appliance. The oven does not heat up. The clock is not set. Set the clock. The oven does not heat up. The necessary settings are not set. Make sure that the settings are correct. The oven does not heat up. The fuse in the fuse box is released. Do a check of the fuse. If the fuse is released more than one time, contact a qualified electrician.
ENGLISH 23 12.3 Electrical installation WARNING! Only a qualified person must do the electrical installation. 590 min. 550 20 The manufacturer is not responsible if you do not follow the safety precautions from the chapter "Safety Information". min. 560 This appliance is supplied with a main plug and a main cable. 12.4 Cable 600 Cable types applicable for installation or replacement: H07 RN-F, H05 RN-F, H05 RRF, H05 VV-F, H05 V2V2-F (T90), H05 BB-F.
www.electrolux.com 13. ENVIRONMENT CONCERNS Recycle the materials with the symbol . Put the packaging in applicable containers to recycle it. Help protect the environment and human health and to recycle waste of electrical and electronic appliances. Do not dispose appliances marked with the symbol with the household waste. Return the product to your local recycling facility or contact your municipal office.
ITALIANO 25 INDICE 1. 2. 3. 4. 5. 6. 7. 8. 9. 10. 11. 12. INFORMAZIONI PER LA SICUREZZA . . . . . . . . . . . . . . . . . . . . . . . . . . . . . . . . . . . . . . . . ISTRUZIONI DI SICUREZZA . . . . . . . . . . . . . . . . . . . . . . . . . . . . . . . . . . . . . . . . . . . . . . . DESCRIZIONE DEL PRODOTTO . . . . . . . . . . . . . . . . . . . . . . . . . . . . . . . . . . . . . . . . . . . . PREPARAZIONE AL PRIMO UTILIZZO . . . . . . . . . . . . . . . . . . . . . . . . . . . . . . . . . . . . . . .
www.electrolux.com 1. INFORMAZIONI PER LA SICUREZZA Leggere attentamente le istruzioni fornite prima di installare e utilizzare l'apparecchiatura. Il produttore non è responsabile se un'installazione ed un uso non corretto dell'apparecchiatura provocano lesioni e danni. Tenere sempre le istruzioni a portata di mano in caso di necessità durante l'utilizzo. 1.1 Sicurezza dei bambini e delle persone vulnerabili AVVERTENZA! Rischio di soffocamento, lesioni o invalidità permanente.
ITALIANO • • • • 2. 27 estrarre o inserire accessori o pentole resistenti al calore. Non usare idropulitrici a vapore per pulire l'apparecchiatura. Prima di eseguire le procedure di manutenzione, estrarre la spina dalla presa. Non utilizzare detergenti abrasivi o raschietti di metallo per pulire il vetro della porta per non rigare la superficie e causare la rottura del vetro.
www.electrolux.com • • • • • tale da non poter essere disattivati senza l'uso di attrezzi. Inserire la spina di alimentazione nella presa solo al termine dell'installazione. Verificare che la spina di alimentazione rimanga accessibile dopo l'installazione. Nel caso in cui la spina di corrente sia allentata, non collegarla alla presa. Non tirare il cavo di alimentazione per scollegare l’apparecchiatura. Tirare solo la spina. Servirsi unicamente di dispositivi di isolamento adeguati.
ITALIANO • Sostituire immediatamente i pannelli in vetro della porta nel caso in cui siano danneggiati. Contattare il Centro Assistenza. • Prestare attenzione quando si rimuove la porta dall'apparecchio. La porta è pesante! • Pulire regolarmente l'apparecchiatura per evitare il deterioramento dei materiali che compongono la superficie. • I residui di grassi o alimenti all'interno dell'apparecchiatura possono causare incendi. • Pulire l'apparecchiatura con un panno inumidito e morbido.
www.electrolux.com 4. PREPARAZIONE AL PRIMO UTILIZZO AVVERTENZA! Fare riferimento ai capitoli sulla sicurezza. Dopo circa cinque secondi, la spia smette di lampeggiare e il display mostra l'ora impostata. Per modificare l'ora, premere ripefinché la spia della tutamente funzione Ora non lampeggia. Non è consentito impostare contemporaneamente la funzione Durata o Fine . 4.1 Prima pulizia • Togliere tutti gli accessori e i supporti ripiani rimovibili (se presenti).
ITALIANO 3. L'indicatore della temperatura si accende quando l'apparecchiatura è in fase di riscaldamento. Per disattivare l'apparecchiatura, ruotare la manopola di regolazione delle 31 funzioni del forno e la manopola di regolazione della temperatura in posizione di spento. 5.2 Funzioni del forno Funzione del forno Uso Posizione di spento L'apparecchiatura è spenta. Luce forno Per accendere la lampadina del forno senza una funzione di cottura.
www.electrolux.com 6. FUNZIONI DEL TIMER 6.1 Programmatore elettronico 1 2 3 1 Spie funzione 2 Display Ora 3 Spia funzione 4 Tasto + hr min 5 Tasto di selezione 6 Tasto - 6 5 4 Funzioni dell’orologio Uso Ora Permette di impostare, modificare o controllare l'ora. Contaminuti Per impostare il conto alla rovescia. Questa funzione non ha effetto sull'uso del forno. Durata Per impostare la durata di funzionamento dell'apparecchiatura.
ITALIANO 4. 5. Premere un tasto qualsiasi per disattivare il segnale. Ruotare la manopola di regolazione per le funzioni del forno e la manopola di regolazione per la temperatura in posizione di spento. 2. 33 Tenere premuto il tasto -. La funzione dell'orologio si spegne dopo alcuni secondi. 6.3 Annullamento delle funzioni dell'orologio 1. Premere ripetutamente il tasto di Selezione finché la spia della funzione desiderata non lampeggia. 7.
www.electrolux.com Conservare le istruzioni per l'installazione delle guide telescopiche per un utilizzo futuro. ATTENZIONE Non pulire le guide telescopiche in lavastoviglie. Non lubrificare le guide telescopiche. Grazie alla guide telescopiche sarà possibile inserire ed estrarre i ripiani in modo più facile. 8. FUNZIONI AGGIUNTIVE 8.
ITALIANO • Se si usano due lamiere dolci contemporaneamente, tenere un livello vuoto tra una e l'altra. 35 cottura arrosto, aggiungere dell'acqua nella leccarda. Per evitare la condensa di fumo, aggiungere acqua ogni volta che finisce. 9.3 Cottura di carni e pesce 9.4 Tempi di cottura • Usare una leccarda per alimenti ad alto contenuto di grassi, onde evitare che nel forno si formino macchie che non possono più essere rimosse.
www.electrolux.com TIPO DI PIATTO Cottura tradizioCottura ventilata nale Tempo di cottura Tem Posizione Temp Posizione p. (in minuti) griglia .
ITALIANO 37 PANE E PIZZA TIPO DI PIATTO Cottura tradizioCottura ventilata nale Tempo di cottura Tem Posizio- Temp Posizione (in minuti) p. ne griglia .
www.electrolux.com CARNE TIPO DI PIATTO Cottura tradizioCottura ventilata nale Tempo di cottura Tem Tem PosizioPosizione (in minuti) p. p. ne griglia griglia (°C) (°C) Note Manzo 2 200 2 190 50 - 70 Su un ripiano a filo Maiale 2 180 2 180 90 - 120 Su un ripiano a filo Vitello 2 190 2 175 90 - 120 Su un ripiano a filo Roastbeef inglese al sangue 2 210 2 200 50 - 60 Su un ripiano a filo Roastbeef inglese, cott.
ITALIANO TIPO DI PIATTO Cottura tradizionale Posizione griglia Tem p. (°C) 2 190 Tonno/Salmone 39 Cottura ventilata Tempo di cottura Tem Posizione (in minuti) p. griglia (°C) 2 175 35 - 60 Note 4 - 6 filetti 9.6 Grill Preriscaldare il forno vuoto per 10 minuti prima di iniziare la cottura. Quantità TIPO DI PIETANZA Grill Tempo di cottura (in minuti) Pezzi (g) Posizione griglia Temp. (°C) 1° lato 2° lato Bistecche di filetto 4 800 4 max.
www.electrolux.com Maiale TIPO DI PIETANZA Quantità Posizione griglia Temperatura (°C) Tempo (min.) Spalla, coppa, taglio di prosciutto per arrosto 1 - 1,5 kg 1 160-180 90-120 Braciola, costoletta 1 - 1,5 kg 1 170-180 60-90 Polpettone 750 g-1 kg 1 160-170 50-60 Stinco di maiale (precotto) 750 g-1 kg 1 150-170 90-120 Vitello TIPO DI PIETANZA Quantità Posizione griglia Temperatura Tempo (min.
ITALIANO 41 Pesce al vapore TIPO DI PIETANZA Quantità Posizione griglia Pesce intero fino ad 1 KG 1 - 1,5 kg 1 Temperatura Tempo (min.) (°C) 210-220 40-60 9.8 Scongelamento TIPO DI PIETANZA Tempo di scongelamento (min.) (g) Tempo di scongelamento ulteriore (min.) Note Pollo 1000 100-140 20-30 Sistemare il pollo su un piattino rovesciato sopra un piatto grande. Girare a metà tempo. Carne 1000 100-140 20-30 Girare a metà tempo. Carne 500 90-120 20-30 Girare a metà tempo.
www.electrolux.com FRUTTA TIPO DI PIETANZA Posizione griglia 1 livello 2 livelli Temperatura (°C) Tempo (ore) Prugne 3 1/4 60-70 8-10 Albicocche 3 1/4 60-70 8-10 Mele a fette 3 1/4 60-70 6-8 Pere 3 1/4 60-70 6-9 Informazioni sulle acrilamidi Importante Secondo le più recenti scoperte scientifiche, se si rosolano alimenti (in particolari quelli contenenti amido), le acrilamidi possono rappresentare un rischio per la salute.
ITALIANO 43 10. PULIZIA E CURA AVVERTENZA! Fare riferimento ai capitoli sulla sicurezza. • Pulire la parte anteriore dell'apparecchiatura con un panno morbido inumidito con acqua tiepida saponata. • Per pulire le superfici metalliche, utilizzare un normale detergente. • Pulire l'interno del forno dopo ogni utilizzo. In questo modo è possibile eliminare più facilmente le macchie. • Rimuovere lo sporco tenace con detergenti speciali per forno.
www.electrolux.com 2. 1 2 AVVERTENZA! Verificare che la griglia sia stata installata correttamente e che non cada. Come montare i supporti ripiani Installare i supporti ripiani seguendo al contrario la procedura indicata. Le estremità arrotondate dei supporti ripiani devono essere rivolte in avanti. 10.4 Lampadina forno AVVERTENZA! Si prega di prestare attenzione in fase di sostituzione della lampadina del forno. Sussiste il rischio di scosse elettriche. 10.
ITALIANO ATTENZIONE Non utilizzare l'apparecchiatura senza i pannelli in vetro. 45 La direzione di apertura della porta varia in base al modello del forno. In alcuni modelli la porta si apre da destra e in altri da sinistra. Rimozione della porta del forno e dei pannelli in vetro A B 1. Premere i tasti sui lati della copertura della porta (A) sul bordo superiore e sollevare per rimuoverla. 2. Mantenere saldamente con entrambe le mani il vetro interno B e farlo scorrere verso l'alto.
www.electrolux.com 11. COSA FARE SE… AVVERTENZA! Fare riferimento ai capitoli sulla sicurezza. Problema Causa possibile Soluzione Il forno non si scalda. L'apparecchiatura è disattivata. Accendere l'apparecchiatura. Il forno non si scalda. L'ora non è impostata. Impostare l'ora. Il forno non si scalda. Non sono state effettuate le impostazioni necessarie. Accertarsi che le impostazioni siano corrette. Il forno non si scalda. È scattato il fusibile nella scatola dei fusibili.
ITALIANO 47 12.1 Incasso 548 558 A 20 B 573 589 594 5 12.3 Installazione dell'impianto elettrico 590 min. 550 20 AVVERTENZA! L’installazione dell'apparecchiatura deve essere eseguita da personale qualificato. min. 560 Il produttore non è responsabile qualora non vengano applicate le precauzioni del capitolo "Informazioni per la sicurezza". La dotazione standard dell'apparecchiatura al momento della fornitura prevede una spina e un cavo di rete. 600 min. 550 20 min. 560 12.
www.electrolux.com 13. CONSIDERAZIONI AMBIENTALI Riciclare i materiali con il simbolo . Buttare l'imballaggio negli appositi contenitori per il riciclaggio. Aiutare a proteggere l’ambiente e la salute umana e a riciclare rifiuti derivanti da apparecchiature elettriche ed elettroniche. Non smaltire le apparecchiature che insieme ai normali riportano il simbolo rifiuti domestici. Portare il prodotto al punto di riciclaggio più vicino o contattare il comune di residenza.
ITALIANO 49
www.electrolux.
ITALIANO 51
397280341-C-382012 www.electrolux.