EOU5720AO EN OVEN USER MANUAL
www.electrolux.com CONTENTS 1. SAFETY INFORMATION............................................................................................ 3 2. SAFETY INSTRUCTIONS.......................................................................................... 4 3. PRODUCT DESCRIPTION.........................................................................................6 4. CONTROL PANEL.....................................................................................................7 5.
ENGLISH 1. 3 SAFETY INFORMATION Before the installation and use of the appliance, carefully read the supplied instructions. The manufacturer is not responsible if an incorrect installation and use causes injuries and damages. Always keep the instructions with the appliance for future reference. 1.
www.electrolux.com • • • • • Do not use a steam cleaner to clean the appliance. Do not use harsh abrasive cleaners or sharp metal scrapers to clean the glass door since they can scratch the surface, which may result in shattering of the glass. If the supply cord is damaged, it must be replaced by the manufacturer, its Authorised Service Centre or similarly qualified persons in order to avoid a hazard.
ENGLISH • • • • • access to the mains plug after the installation. If the mains socket is loose, do not connect the mains plug. Do not pull the mains cable to disconnect the appliance. Always pull the mains plug. Use only correct isolation devices: line protecting cut-outs, fuses (screw type fuses removed from the holder), earth leakage trips and contactors. The electrical installation must have an isolation device which lets you disconnect the appliance from the mains at all poles.
www.electrolux.com not use abrasive products, abrasive cleaning pads, solvents or metal objects. • If you use an oven spray, obey the safety instructions on the packaging. • Do not clean the catalytic enamel (if applicable) with any kind of detergent. • Before replacing the lamp, disconnect the appliance from the power supply. • Only use lamps with the same specifications. 2.6 Disposal WARNING! Risk of injury or suffocation. 2.
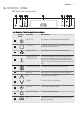
ENGLISH 7 4. CONTROL PANEL 4.1 Electronic programmer 1 2 3 4 5 6 7 8 9 10 11 Use the sensor fields to operate the appliance. Sensor Field 1 2 3 4 7 8 9 10 11 Description ON / OFF To activate and deactivate the appliance. OPTIONS To set an oven function, a cleaning function or an automatic programme. OVEN LIGHT To activate or deactivate the oven lamp. TEMPERATURE / FAST HEAT UP To set and examine the cavity temperature or the core temperature sensor temperature (if present).
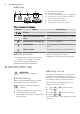
www.electrolux.com 4.2 Display A B C D F E A) B) C) D) Top / Main oven indicator Oven function symbol Number of the oven function / programme Indicators for the clock functions (refer to the table "Clock functions") E) Clock / residual heat display F) Temperature / time of day display Other indicators of the display: Symbol / Name Description h / min A clock function operates. Heat-up / residual heat indicator Shows the temperature level in the appliance.
ENGLISH 5.3 Changing the time You can change the time of day only when the appliance is off. Touch flashes in the display. To set the new time of day, refer to "Setting the time". . 6. DAILY USE 2. Repeatedly press until the top / main oven indicator appears on the display. WARNING! Refer to Safety chapters. 6.1 Selecting an oven 1. To switch on the appliance press . 6.2 Top oven functions Oven function Application True Fan Cooking To bake on 1 shelf positions at the same time and to dry food.
www.electrolux.com 6.3 Main oven functions Oven function Application True Fan Cooking To bake on up to 2 shelf positions at the same time and to dry food. Set the temperature 20 - 40 ºC lower than for Conventional Cooking. Pizza Setting To bake food on 1 shelf position for a more intensive browning and a crispy bottom. Set the temperature 20 - 40 ºC lower than for Conventional Cooking. Conventional Cooking To bake and roast food on 1 shelf position.
ENGLISH 6.5 Changing the temperature Touch or to change the temperature in steps of 5 °C. When the appliance is at the set temperature, an acoustic signal sounds three times and the Heat up indicator goes out. 6.6 Checking the temperature You can see the temperature in the appliance when the function or programme operates. 1. Touch . The Temperature / Time display shows the temperature in the appliance. 2. Touch to go back to the set temperature or the display shows it automatically after five seconds.
www.electrolux.com 7.2 Count Up Timer The Count Up Timer is not activated if Duration and End are set. The Count Up Timer starts to count when the appliance starts to heat. To reset the Count Up Timer, touch and at the same time until the display shows "00:00" and the Count Up Timer starts to count up again. 7.3 Setting the DURATION again and again until the display shows . flashes in the display. or 3. Use DURATION. 4. Touch to set the minutes for to confirm. or 5. Use DURATION.
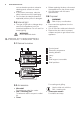
ENGLISH 13 8. USING THE ACCESSORIES WARNING! Refer to Safety chapters. 8.1 Inserting the accessories Wire shelf: Push the shelf between the guide bars of the shelf support and make sure that the feet point down. • All accessories have small indentations at the top of the right and left side to increase safety. The indentations are also antitip devices. • The high rim around the shelf is a device which prevents cookware from slipping.
www.electrolux.com Put the baking tray or deep pan on the telescopic runners. You can use the trivet to roast larger pieces of meat or poultry on one shelf position. 1. Put the trivet into the deep pan so that the supports of the wire shelf point up. Wire shelf and deep pan together: Put the wire shelf on the deep pan. Put the wire shelf and the deep pan on the telescopic runners. 2. Put the deep pan into the oven on the necessary shelf position.
ENGLISH 15 9.3 Using the settings menu To deactivate the Function Lock repeat step 3. You can set the settings menu only when the appliance is deactivated. You can deactivate the appliance when the Function Lock is on. When you deactivate the appliance, the Function Lock deactivates. The settings menu lets you activate or deactivate functions in the main menu. The display shows SET and the number of the setting.
www.electrolux.com deactivate the appliance, the cooling fan can continue to operate until the appliance cools down. 10. HINTS AND TIPS WARNING! Refer to Safety chapters. The temperature and baking times in the tables are guidelines only. They depend on the recipes and the quality and quantity of the ingredients used. 10.1 Double oven Top oven The top oven is the smaller of the two ovens. It has 4 shelf positions. Use it to cook smaller quantities of food.
ENGLISH 17 Baking results Possible cause Remedy The cake sinks and becomes soggy, lumpy or streaky. There is too much liquid in the mixture. Use less liquid. Be careful with mixing times, especially if you use a mixing machine. The cake is too dry. The oven temperature is too The next time you bake, set low. a higher oven temperature. The cake is too dry. The baking time is too long. The next time you bake, set a shorter baking time. The cake browns unevenly.
www.electrolux.com Food Temperature (°C) Time (min) Shelf position - Chicken 160 - 180 75 - 90 1 Convenience Foods Follow manufacturer's instructions. Fish 170 - 190 20 - 30 2 Fish Pie (Potato Topped) 190 - 200 20 - 30 2 Fruit Pies, Crumbles 190 - 200 30 - 50 2 Milk Puddings 150 - 170 90 - 120 2 Pasta, Lasagne etc.
ENGLISH Food Temperature (°C) 19 Time (min) Shelf position Conventional Cooking True Fan Cooking - Small & Queen 170 - 180 160 - 170 18 - 25 2 - Sponges 170 - 180 160 - 170 20 - 25 2 - Madeira 150 - 160 140 - 160 60 - 75 2 - Rich Fruit 140 - 150 130 - 140 120 - 150 2 - Christmas 140 - 150 130 - 140 180 - 270 2 Fish 170 - 180 160 - 180 20 - 30 3 Fruit Pies, Crum- 180 - 200 bles 170 - 180 30 - 50 3 Milk Puddings 150 - 170 140 - 160 60 - 90 3 - Choux 180 - 190 1
www.electrolux.com Food Quantity Temperature (°C) Time (min) Shelf position Roast veal 1000 - 1500 g 150 120 - 150 1 Steak 200 - 300 g 120 20 - 40 1 10.6 Pizza Setting Top oven Food Temperature (°C) Time (min) Shelf position Apple Pie 160 - 180 160 - 180 1 Plate Tart 160 - 180 25 - 50 1 Pizza Follow manufacturer's instructions. 1 Quiches / Tarts 160 - 180 1 25 - 50 10.7 Roasting • Use heat-resistant ovenware to roast (refer to the instructions of the manufacturer).
ENGLISH 21 Pork Food Quantity Temperature (°C) Time (min) Shelf position Shoulder, neck, ham 1 - 1.5 kg 160 - 180 90 - 120 2 Pork chop 1 - 1.5 kg 160 - 180 60 - 90 2 Meat loaf 750 g - 1 kg 160 - 170 45 - 60 2 Knuckle of pork (precooked) 750 g - 1 kg 150 - 170 90 - 120 2 Veal Food Quantity (kg) Temperature (°C) Time (min) Shelf position Roast veal 1 160 - 180 90 - 120 2 Knuckle of veal 1.
www.electrolux.com Food Quantity Temperature (°C) Time (min) Shelf position Goose 3.5 - 5 kg 160 - 180 150 - 210 1 Turkey 2.5 - 3.5 kg 160 - 180 105 - 150 1 Turkey 4 - 6 kg 140 - 160 150 - 240 1 Type of meat Quantity (kg) Temperature (°C) Time (min) Shelf position Whole fish 1 - 1.5 210 - 220 40 - 60 1 Fish (steamed) 10.9 Grilling Grill only flat pieces of meat or fish. Always grill with the maximum temperature setting.
ENGLISH Food Time (min) - Medium 6-8 - Well Done 12 - 15 23 Grilling - Main oven Food Temperature (°C) Time (min) 1st side 2nd side Roast beef 210 - 230 30 - 40 30 - 40 2 Filet of beef 230 20 - 30 20 - 30 3 Back of pork 210 - 230 30 - 40 30 - 40 2 Back of veal 210 - 230 30 - 40 30 - 40 2 Back of lamb 210 - 230 25 - 35 20 - 25 3 Whole Fish, 500 210 - 230 - 1000 g 15 - 30 15 - 30 3/4 10.10 Defrost - Main oven Remove the food packaging and put the food on a plate.
www.electrolux.com 11. CARE AND CLEANING WARNING! Refer to Safety chapters. 11.1 Notes on cleaning • Clean the front of the appliance with a soft cloth with warm water and a cleaning agent. • To clean metal surfaces, use a usual cleaning agent. • Clean the appliance interior after each use. Fat accumulation or other food remains may result in a fire. The risk is higher for the grill pan. • Clean stubborn dirt with a special oven cleaner. • Clean all accessories after each use and let them dry.
ENGLISH You cannot set the Duration, but you can use the End function to delay the start of the cleaning procedure. An acoustic signal sounds after the time ends. The appliance deactivates. 2. Touch a sensor field or open the oven door to stop the acoustic signal. 3. Clean the bottom of the appliance with a soft and moist sponge. 11.5 Removing and installing the door You can remove the door and the internal glass panels to clean it. The number of glass panels is different for different models.
www.electrolux.com 1. Deactivate the appliance. 2. Remove the fuses from the fuse box or deactivate the circuit breaker. The back lamp The lamp glass cover is at the back of the cavity. 1. Turn the lamp glass cover counterclockwise to remove it. 2. Clean the glass cover. 3. Replace the oven lamp with a suitable 300 °C heat-resistant oven lamp. Use the same oven lamp type. 4. Install the glass cover. The side lamp 1. Remove the left shelf support to get access to the lamp. 2.
ENGLISH Problem Possible cause 27 Remedy The lamp does not operate. The lamp is defective. Replace the lamp. It takes too long to cook the The temperature is too low dishes or they cook too or too high. quickly. Adjust the temperature if necessary. Follow the advice in the user manual. Steam and condensation You left the dish in the oven Do not leave the dishes in settle on the food and in the for too long. the oven for longer than 15 cavity of the oven. - 20 minutes after the cooking process ends.
867300103-A-512013 www.electrolux.