
User manual


You cannot set the Duration, but you
can use the End function to delay the
start of the cleaning procedure.
An acoustic signal sounds after the time
ends. The appliance deactivates.
2. Touch a sensor field or open the oven
door to stop the acoustic signal.
3. Clean the bottom of the appliance
with a soft and moist sponge.
11.5 Removing and installing the
door
You can remove the door and the internal
glass panels to clean it. The number of
glass panels is different for different
models.
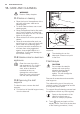
WARNING!
Be careful when you remove
the door from the appliance.
The door is heavy.
1. Open the door fully.
2. Fully lift up the clamping levers (A) on
the two door hinges.
A
A
3. Close the door until it is at an angle of
approximately 45°.
45°
4. Hold the door with one hand on each
side and pull it away from the
appliance at an upwards angle.
5. Put the door with the outer side down
on a soft cloth on a stable surface.
This is to prevent scratches.
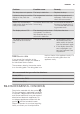
6. Hold the door trim (B) on the top edge
of the door at the two sides and push
inwards to release the clip seal.
1
2
B
CAUTION!
Rough handling of the glass,
especially around the edges
of the front panel, can cause
the glass to break.
7. Pull the door trim to the front to
remove it.
8. Hold the door glass panels on their
top edge one by one and pull them up
out of the guide.
9. Clean the glass panel with water and
soap. Dry the glass panel carefully.
When the cleaning is completed, install the
glass panels and the door. Do the above
steps in the opposite sequence. Install the
smaller panel first, then the larger.
11.6 Replacing the lamp
Put a cloth on the bottom of the interior of
the appliance. It prevents damage to the
lamp glass cover and the cavity.
WARNING!
Danger of electrocution!
Disconnect the fuse before
you replace the lamp. The
lamp and the lamp glass
cover can be hot.
ENGLISH
25