EOY5851AA EN OVEN USER MANUAL
www.electrolux.com CONTENTS 1. SAFETY INFORMATION............................................................................................ 3 2. SAFETY INSTRUCTIONS.......................................................................................... 4 3. PRODUCT DESCRIPTION.........................................................................................7 4. CONTROL PANEL.....................................................................................................8 5.
ENGLISH 1. 3 SAFETY INFORMATION Before the installation and use of the appliance, carefully read the supplied instructions. The manufacturer is not responsible if an incorrect installation and use causes injuries and damages. Always keep the instructions with the appliance for future reference. 1.
www.electrolux.com • • • • • • • Do not use a steam cleaner to clean the appliance. Do not use harsh abrasive cleaners or sharp metal scrapers to clean the glass door since they can scratch the surface, which may result in shattering of the glass. If the supply cord is damaged, it must be replaced by the manufacturer, its Authorised Service Centre or similarly qualified persons in order to avoid a hazard. Excess spillage must be removed before the pyrolytic cleaning. Remove all parts from the oven.
ENGLISH • • • • • • such a way that it cannot be removed without tools. Connect the mains plug to the mains socket only at the end of the installation. Make sure that there is access to the mains plug after the installation. If the mains socket is loose, do not connect the mains plug. Do not pull the mains cable to disconnect the appliance. Always pull the mains plug.
www.electrolux.com • Remaining fat or food in the appliance can cause fire. • Clean the appliance with a moist soft cloth. Only use neutral detergents. Do not use abrasive products, abrasive cleaning pads, solvents or metal objects. • If you use an oven spray, obey the safety instructions on the packaging. • Do not clean the catalytic enamel (if applicable) with any kind of detergent. 2.5 Pyrolytic cleaning Risk of Injury / Fires / Chemical Emissions (Fumes) in Pyrolitic Mode.
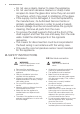
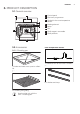
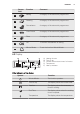
ENGLISH 3. PRODUCT DESCRIPTION 3.1 General overview 1 2 3 4 5 5 4 8 3 6 2 1 1 Control panel 2 Electronic programmer 3 Socket for the core temperature sensor 4 Heating element 5 Lamp 6 Fan 7 Shelf support, removable 8 Shelf positions 7 3.2 Accessories Core temperature sensor Grill- / Roasting pan To measure how far the food is cooked. To bake and roast or as a pan to collect fat. Telescopic runners Trivet For shelves and trays. For roasting and grilling.
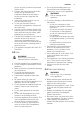
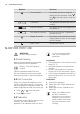
www.electrolux.com 4. CONTROL PANEL 4.1 Electronic programmer 1 2 3 4 5 6 7 8 17 9 10 11 12 13 14 15 16 Use the sensor fields to operate the appliance. Sensor field 1 2 3 4 5 6 7 8 9 10 - Function Comment ON / OFF To activate and deactivate the appliance. Heating Functions or Assisted Cooking Touch the sensor field once to choose a heating function or the menu: Assisted Cooking. Touch the sensor field again to switch between the menus: Heating Functions, Assisted Cooking.
ENGLISH Sensor field 11 12 13 14 15 16 17 Function Comment Baking A category of the automatic programmes. Roasting A category of the automatic programmes. Convenience A category of the automatic programmes. Oven Dishes A category of the automatic programmes. Pizza A category of the automatic programmes. OK To confirm the selection or setting. Minute Minder To set the function: Minute Minder. 4.
www.electrolux.com Symbol Function Time Indication The display shows how long the heating function operates. Press and time. at the same time to reset the Calculation The appliance calculates the time for cooking. Heat-up Indicator The display shows the temperature in the appliance. Fast Heat Up Indicator The function is active. It decreases the heat up time. Weight Automatic The display shows that the automatic weight system is active or that weight can be changed.
ENGLISH 11 CAUTION! Make sure that the appliance is cool before you use it. 6. DAILY USE WARNING! Refer to Safety chapters. 3. Press to move to the submenu or accept the setting. At each point you can go back to the main menu with 6.1 Navigating the menus . 1. Activate the appliance. 2. Press option. or to select the menu 6.2 The menus in overview Main menu Symbol Menu item Application Heating Functions Contains a list of heating functions.
www.electrolux.com Symbol Submenu Description Display Brightness Adjusts the display brightness by degrees. Set Language Sets the language for the display. Buzzer Volume Adjusts the volume of press-tones and signals by degrees. Key Tones Activates and deactivates the tone of the touch fields. It is not possible to deactivate the tone of the ON / OFF touch field. Alarm/Error Tones Activates and deactivates the alarm tones. Cleaning Reminder Reminds you when to clean the appliance.
ENGLISH Heating function 13 Application Moist Fan Baking To save energy when you bake and cook dry baked goods. Also to bake baked goods in tins on 1 shelf position. This function was used to define the energy efficiency class acc. EN50304. ECO Roasting The ECO functions let you optimize the energy consumption during cooking. It is necessary to set the cooking time first. To get more information about the recommended settings, refer to the cooking tables with the equivalent function.
www.electrolux.com 6.5 Activating a heating function 6.7 Fast Heat Up Indicator 1. Activate the appliance. 2. Select the menu: Heating Functions. This function decreases the heat-up time. To activate the function, hold for 3 seconds. The heat-up indicator alternates. 3. Press to confirm. 4. Set a heating function. 6.8 Residual heat 5. Press to confirm. 6. Set the temperature. 7. Press When you deactivate the appliance, the display shows the residual heat.
ENGLISH 7.2 Setting the clock functions • Before you use the functions: Duration, End Time, you must set a heating function and temperature first. The appliance deactivates automatically. • You can use the functions: Duration and End Time at the same time if you want to automatically activate and deactivate the appliance on a given time later. • The functions: Duration and End Time do not work when you use the core temperature sensor. 1. Set a heating function. 2.
www.electrolux.com Auto Cooking: categories Symbol Category Baking Roasting Convenience Oven Dishes Pizza 1. Activate the appliance. 2. Choose the dish and the category from the Food Index. 3. Choose the category on the control panel. 4. Follow the information on the display. 9. USING THE ACCESSORIES WARNING! Refer to Safety chapters. 3. Put the plug of the core temperature sensor into the socket at the front of the appliance. 9.
ENGLISH the operating modes. The appliance calculates the end time in approximately 30 minutes. 6. To change the core temperature, press . When the meat is at the set core temperature, an acoustic signal sounds. The appliance deactivates automatically. 7. Touch a sensor field to stop the signal. 8. Remove the core temperature sensor plug from the socket and remove the meat from the oven. 17 9.
www.electrolux.com You can use the trivet to grill flat dishes in large quantities and to toast. 2. Put the deep pan into the oven on the necessary shelf position. 1. Put the trivet into the deep pan so that the supports of the wire shelf point down. 10. ADDITIONAL FUNCTIONS 10.1 Favourite Programme You can save your favourite settings, such as duration, temperature or heating function. They are available in the menu: Favourite Programme. You can save 20 programmes.
ENGLISH 19 10.3 Function Lock 10.5 Automatic Switch-off This function prevents an accidental change of the heating function. You can activate it only when the appliance operates. For safety reasons the appliance deactivates automatically after some time if a heating function operates and you do not change any settings. 1. Activate the appliance. 2. Set a heating function or setting. Temperature (°C) again and again until the 3. Press display shows: Function Lock. Switch-off time (h) 30 - 115 12.
www.electrolux.com 11. HINTS AND TIPS WARNING! Refer to Safety chapters. The temperature and baking times in the tables are guidelines only. They depend on the recipes and the quality and quantity of the ingredients used. 11.1 Inner side of the door In some models, on the inner side of the door you can find: • the numbers of the shelf positions. • information about the heating functions, recommended shelf positions and temperatures for typical dishes. 11.
ENGLISH 21 Food Ovenware Accessories Comments - Savoury - Tray Multiple small pieces. - Sweet - Tray Multiple small pieces (e.g. sweet yeast rolls). - - English speciality Cake Special: - Victoria Sponge Cake 11.3 Auto Cooking - Roasting Beef/Game/Lamb Food Ovenware Accessories Comments Roast Beef Roasting pan Core temperature sensor and Deep pan Set the necessary intensity of cooking (Rare, Medium or Well-done).
www.electrolux.com Food Ovenware Accessories Comments Duck, whole Roasting tin Deep roasting pan Set the weight. Goose, whole Roasting tin Deep roasting pan Set the weight. Whole Fish Roasting tin Core temperature sensor and deep roasting pan - Pork/Veal Food Ovenware Accessories Comments Loin of Pork Roasting tin Core temperature sensor and deep roasting pan - Loin of Pork Roasting tin Deep roasting pan Set the weight.
ENGLISH 23 Food Ovenware Accessories Comments - Not frozen - Tray - Heat-resistant dish Shelf - - Breaded Fish/Meat - Tray Multiple small pieces, such as fish fingers or cordon bleu. Frozen Pie/Quiche - Tray - - Frozen Heat-resistant dish Shelf - - Fresh Heat-resistant dish Shelf - - Frozen Heat-resistant dish Shelf - - Fresh Heat-resistant dish Shelf - - Frozen Heat-resistant dish Shelf Precooked rice. - Fresh Heat-resistant dish Shelf Precooked rice.
www.electrolux.com Food Ovenware Accessories Comments Pasta Dishes Heat-resistant dish Shelf Sprinkle with Parmesan cheese at the end of the baking time. Vegetable Dishes Heat-resistant dish Shelf - Rice Dishes Heat-resistant dish Shelf Pre-cooked rice. Sweet Dishes Heat-resistant dish Shelf - - One large tin Heat-resistant dish Shelf - - Small Tins In small tins Shelf Multiple tins.
ENGLISH Plate Warming For warming plates and dishes. Distribute plates and dishes evenly on the wire shelf. Move stacks around after half of the warming time (swap top and bottom). The automatic temperature is 70 °C. Recommended shelf position: 3. Dough Proving You can use this automatic function with any recipe for yeast dough you like. It gives you a good atmosphere for rising. Put the dough into a dish that is big enough for rising and cover it with a wet towel or plastic foil.
www.electrolux.com Baking results Possible cause Remedy The cake browns unevenly. The oven temperature is too Set a lower oven temperahigh and the baking time is ture and a longer baking too short. time. The cake browns unevenly. The mixture is unevenly dis- Spread the mixture evenly tributed. on the baking tray. The cake is not ready in the The oven temperature is too The next time you bake, set baking time given. low. a slightly higher oven temperature. 11.
ENGLISH 27 Cakes / pastries / breads on baking trays Food Function Temperature (°C) Time (min) Shelf position Plaited bread / Bread crown Conventional Cooking 170 - 190 30 - 40 3 Christmas stollen Conventional Cooking 160 - 1801) 50 - 70 2 Bread (rye Conventional bread): Cooking 1. First part of baking procedure. 2. Second part of baking procedure. 1. 2301) 2. 160 - 180 1. 20 2.
www.electrolux.com Food Function Temperature (°C) Time (min) Shelf position Yeast cakes with delicate toppings (e.g. quark, cream, custard) Conventional Cooking 160 - 1801) 40 - 80 3 Temperature (°C) Time (min) Shelf position 1) Preheat the oven. 2) Use a deep pan.
ENGLISH Food Function Small cakes / Conventional Small cakes (20 Cooking per tray) 29 Temperature (°C) Time (min) Shelf position 1701) 20 - 30 3 1) Preheat the oven. 11.
www.electrolux.com Food Type of food Temperature (°C) Time (min) Shelf position Biscuits made with yeast dough 160 - 170 20 - 40 2 11.13 Multilevel Baking Use the function: True Fan Cooking. Cakes / pastries / breads on baking trays Food Temperature (°C) Time (min) Cream puffs / Eclairs 160 - 1801) Dry streusel cake 150 - 160 Shelf position 2 positions 3 positions 25 - 45 1/4 - 30 - 45 1/4 - 1) Preheat the oven.
ENGLISH 11.14 Slow Cooking Use this function to prepare lean, tender pieces of meat and fish with core temperatures no more than 65 °C. This function is not applicable to such recipes as pot roast or fatty roast pork. You can use the core temperature sensor to guarantee that the meat has the correct core temperature (see the table for the core temperature sensor). In the first 10 minutes you can set an oven temperature between 80 °C and 150 °C. The default is 90 °C.
www.electrolux.com Food Temperature (°C) Time (min) Shelf position Piroggen (Russian version of calzone) 180 - 2001) 15 - 25 2 1) Preheat the oven. 2) Use a deep pan. 11.16 Roasting • Use heat-resistant ovenware to roast (refer to the instructions of the manufacturer). • You can roast large roasting joints directly in the deep pan (if present) or on the wire shelf above the deep pan. • Roast lean meats in the roasting tin with the lid. This keeps the meat more succulent.
ENGLISH 33 Food Quantity Function Temperature (°C) Time (min) Shelf position Chop / Spare rib 1 - 1.5 kg Turbo Grilling 170 - 180 60 - 90 1 Meatloaf 750 g - 1 kg Turbo Grilling 160 - 170 50 - 60 1 Pork knuckle (precooked) 750 g - 1 kg Turbo Grilling 150 - 170 90 - 120 1 Veal Food Quantity (kg) Function Roast veal 1 Knuckle of veal Temperature (°C) Time (min) Shelf position Turbo Grilling 160 - 180 90 - 120 1 1.
www.electrolux.com Food Quantity Function Half chicken 400 - 500 g each Chicken, poulard Temperature (°C) Time (min) Shelf position Turbo Grilling 190 - 210 35 - 50 1 1 - 1.5 kg Turbo Grilling 190 - 210 50 - 70 1 Duck 1.5 - 2 kg Turbo Grilling 180 - 200 80 - 100 1 Goose 3.5 - 5 kg Turbo Grilling 160 - 180 120 - 180 1 Turkey 2.5 - 3.
ENGLISH Fast Grilling Food Time (min) Shelf position 1st side 2nd side Burgers / Burgers 8 - 10 6-8 4 Pork fillet 10 - 12 6 - 10 4 Sausages 10 - 12 6-8 4 Fillet / Veal steaks 7 - 10 6-8 4 Toast / Toast1) 1-3 1-3 5 Toast with topping 6-8 - 4 1) Preheat the oven. 11.
www.electrolux.com Food Function French fries1) (300 - 600 g) Temperature (°C) Time (min) Temperature (°C) Conventional 200 - 220 Cooking or Turbo Grilling as per manufacturer’s instructions 3 Baguettes Conventional Cooking as per manufacturer’s instructions as per manufacturer’s instructions 3 Fruit flans Conventional Cooking as per manufacturer’s instructions as per manufacturer’s instructions 3 1) Turn the French fries 2 or 3 times during cooking. 11.
ENGLISH • When the liquid in the jars starts to simmer (after approximately 35 - 60 minutes with one-litre jars), stop the oven or decrease the temperature to 100 °C (see the table).
www.electrolux.com Food Temperature (°C) Time (h) 40 - 50 Shelf position 1 position 2 positions 2-3 3 1/4 Temperature (°C) Time (h) Shelf position Plums 60 - 70 Apricots Herbs Fruit Food 1 position 2 positions 8 - 10 3 1/4 60 - 70 8 - 10 3 1/4 Apple slices 60 - 70 6-8 3 1/4 Pears 60 - 70 6-9 3 1/4 11.23 Bread Baking Preheating is not recommended.
ENGLISH Food Food core temperature (°C) Meatloaf 75 - 80 39 Veal Food Food core temperature (°C) Roast veal 75 - 80 Knuckle of veal 85 - 90 Mutton / lamb Food Food core temperature (°C) Leg of mutton 80 - 85 Saddle of mutton 80 - 85 Roast lamb / Leg of lamb 70 - 75 Game Food Food core temperature (°C) Saddle of hare 70 - 75 Leg of hare 70 - 75 Whole hare 70 - 75 Saddle of venison 70 - 75 Leg of venison 70 - 75 Fish Food Food core temperature (°C) Salmon 65 - 70 Trouts 65
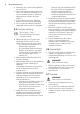
www.electrolux.com 12.2 Removing the shelf supports To clean the oven, remove the shelf supports. 1. Pull the front of the shelf support away from the side wall. CAUTION! If there are other appliances installed in the same cabinet, do not use them at the same time as the function: Pyrolysis. It can cause damage to the appliance. 1. Clean the inner side of the door with hot water, so that the residues do not burn from the hot air. 2.
ENGLISH 41 12.4 Removing and installing the door You can remove the door and the internal glass panels to clean it. The number of glass panels is different for different models. WARNING! Be careful when you remove the door from the appliance. The door is heavy. 1. Open the door fully. 2. Fully press the clamping levers (A) on the two door hinges. 9. Clean the glass panel with water and soap. Dry the glass panel carefully. When the cleaning is completed, install the glass panels and the door.
www.electrolux.com The side lamp 1. Remove the left shelf support to get access to the lamp. 2. Use a narrow, blunt object (e.g. a teaspoon) to remove the glass cover. 3. Clean the glass cover. 4. Replace the lamp with a suitable 300 °C heat-resistant lamp. 5. Install the glass cover. 6. Install the left shelf support. 13. TROUBLESHOOTING WARNING! Refer to Safety chapters. 13.1 What to do if... Problem Possible cause Remedy The oven does not heat up. The oven is deactivated. Activate the oven.
ENGLISH 43 Problem Possible cause Remedy The display shows F111. The plug of the core temperature sensor is not correctly installed into the socket. Put the plug of the core temperature sensor as far as possible into the socket. The display shows an error code that is not in this table. There is an electrical fault. • Deactivate the oven with the house fuse or the safety switch in the fuse box and activate it again. • If the display shows the error code again, contact the Customer Care Department.
www.electrolux.com Number of cavities 1 Heat source Electricity Volume 71 l Type of oven Built-In Oven Mass 41.0 kg EN 60350-1 - Household electric cooking appliances - Part 1: Ranges, ovens, steam ovens and grills - Methods for measuring performance. 14.2 Energy saving The appliance contains features which help you save energy during everyday cooking.
ENGLISH 45
www.electrolux.
ENGLISH 47
867314219-A-342014 www.electrolux.