EOZ3430 ................................................ .............................................
www.electrolux.com CONTENTS 1. 2. 3. 4. 5. 6. 7. 8. 9. 10. 11. 12. SAFETY INFORMATION . . . . . . . . . . . . . . . . . . . . . . . . . . . . . . . . . . . . . . . . . . . . . . . . . . . 3 SAFETY INSTRUCTIONS . . . . . . . . . . . . . . . . . . . . . . . . . . . . . . . . . . . . . . . . . . . . . . . . . . 4 PRODUCT DESCRIPTION . . . . . . . . . . . . . . . . . . . . . . . . . . . . . . . . . . . . . . . . . . . . . . . . . 7 BEFORE FIRST USE . . . . . . . . . . . . . . . . . . . . . . . . . . . . .
ENGLISH 3 1. SAFETY INFORMATION Before the installation and use of the appliance, carefully read the supplied instructions. The manufacturer is not responsible if an incorrect installation and use causes injuries and damages. Always keep the instructions with the appliance for future reference. 1.1 Children and vulnerable people safety WARNING! Risk of suffocation, injury or permanent disability.
www.electrolux.com • Do not use harsh abrasive cleaners or sharp metal scrapers to clean the glass door since they can scratch the surface, which may result in shattering of the glass. • Excess spillage must be removed before the pyrolytic cleaning. Remove all parts from the oven. • To remove the shelf supports first pull the front of the shelf support and then the rear end away from the side walls. Install the shelf supports in the opposite sequence. 2. SAFETY INSTRUCTIONS 2.
ENGLISH • Fully close the appliance door, before you connect the mains plug to the mains socket. 2.2 Use WARNING! Risk of injury, burns or electric shock or explosion. • Use this appliance in a household environment. • Do not change the specification of this appliance. • Make sure that the ventilation openings are not blocked. • Do not let the appliance stay unattended during operation. • Deactivate the appliance after each use.
www.electrolux.com • • • • • • – Any removable objects (including shelves, side rails etc., provided with the product) particularly any nonstick pots, pans, trays, utensils etc. Read carefully all the instructions for Pyrolytic cleaning. Keep children away from the appliance while the Pyrolytic cleaning is in operation. The appliance becomes very hot.
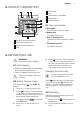
ENGLISH 7 3. PRODUCT DESCRIPTION 1 2 5 Oven lamp 3 6 Fan 7 Shelf support, removable 8 Rating plate 4 5 5 4 9 3 6 2 1 8 7 1 Knob for the oven functions 2 Electronic programmer 3 Knob for the temperature 4 Grill 9 Shelf positions 3.1 Oven accessories • Wire shelf For cookware, cake tins, roasts. • Baking tray For cakes and biscuits. • Grill- / Roasting pan To bake and roast or as pan to collect fat. • Telescopic runners For shelves and trays. 4.
www.electrolux.com 3. 4. Set the function and the maximum temperature. Let the appliance operate for 15 minutes. Accessories can become hotter than usually. The appliance can emit an odour and smoke. This is normal. Make sure that the airflow is sufficient. 5. DAILY USE WARNING! Refer to the Safety chapters. To use the appliance, push the knob. The knob comes out. 2. 3. Turn the knob for the temperature to set the temperature.
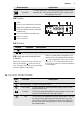
ENGLISH Oven function 9 Application To clean the oven. The high temperature burns off the residual dirt. You can then remove it with a cloth when the appliance is cold. Pyrolysis 5.3 Display 1 Timer 7 1 2 3 2 Heat-up and residual heat indicator 3 Water tank (selected models only) 4 Core temperature sensor (selected models only) 5 Door lock (selected models only) 7 6 Hours / minutes 6 5 4 7 Clock functions 5.4 Buttons Button Function Clock , Description To set a clock function.
www.electrolux.com Press again and again to change the clock function. operation of the oven. You can set the Minute Minder at any time, also if the appliance is off. Press to confirm the settings of the clock functions, or wait 5 seconds for the setting to be confirmed automatically. 1. 2. 6.1 Setting the Duration or End function 1. 2. 3. 4. 5. 6. Press again and again until the symbol or flashes in the display. Press + or - to set the minutes. Press to confirm. Press + or - to set the hour.
ENGLISH 11 7.1 Telescopic runners 1. Pull out the right and left hand telescopic runners. 2. Put the wire shelf on the telescopic runners and carefully push them into the appliance. Make sure you push back the telescopic runners fully in the appliance before you close the oven door. °C °C Keep the installation instructions for the telescopic runners for future use. CAUTION! Do not clean the telescopic runners in the dishwasher. Do not lubricate the telescopic runners.
www.electrolux.com 8.2 Automatic switch-off 8.3 Cooling fan For safety reasons the appliance deactivates after some time: • If an oven function operates. • If you do not change the oven temperature. When the appliance operates, the cooling fan activates automatically to keep the surfaces of the appliance cool. If you deactivate the appliance, the cooling fan continues to operate until the temperature in the appliance cools down. Oven temperature Switch-off time 30 - 120 °C 12.
ENGLISH Initially, monitor the performance when you cook. Find the best settings (heat setting, cooking time, etc.) for your cook- 13 ware, recipes and quantities when you use this appliance. 9.
www.electrolux.
ENGLISH TYPE OF DISH Conventional Cooking Shelf po- Temp sition [°C] True Fan Cooking Shelf position Tem p [°C] Cooking time [min] 15 Notes Pizza 1 200 210 1 200 210 10 - 20 In a baking tray or a deep pan1) Scones 3 200 3 190 10 - 20 In a baking tray1) 1) Preheat for 10 minutes.
www.electrolux.
ENGLISH Quantity TYPE OF DISH Pieces Grilling 17 Cooking time [min] [g] Shelf position Temp [°C] 1st side 2nd side Pork chops 4 600 4 max. 12 - 16 12 - 14 Chicken (cut in 2) 2 1000 4 max. 30 - 35 25 - 30 Kebabs 4 - 4 max. 10 - 15 10 - 12 Breast of chicken 4 400 4 max. 12 - 15 12 - 14 Hamburger 6 600 4 max. 20 - 30 - Fish fillet 4 400 4 max. 12 - 14 10 - 12 Toasted sandwiches 4-6 - 4 max. 5-7 - Toast 4-6 - 4 max. 2-4 2-3 9.
www.electrolux.com TYPE OF DISH Quantity Shelf position Temperature [°C] Time [min] 1.5 - 2 kg 1 160 - 180 120 - 150 TYPE OF DISH Quantity Shelf position Temperature [°C] Time [min] Leg of lamb, roast lamb 1 - 1.5 kg 1 150 - 170 100 - 120 Saddle of lamb 1 - 1.5 kg 1 160 - 180 40 - 60 Quantity Shelf position Temperature [°C] Time [min] Poultry portions 200 - 250 g each 1 200 - 220 30 - 50 Chicken , half 400 - 500 g each 1 190 - 210 35 - 50 Chicken, poulard 1 - 1.
ENGLISH [g] Defrosting time [min] Further defrosting time [min] Notes Trout 150 25 - 35 10 - 15 - Strawberries 300 30 - 40 10 - 20 - Butter 250 30 - 40 10 - 15 - TYPE OF DISH 19 Cream 2 x 200 80 - 100 10 - 15 Cream can also be whipped when still slightly frozen in places. Gateau 1400 60 60 - 9.8 Drying - True Fan Cooking Cover the oven shelves with baking parchment.
www.electrolux.com • Clean the front of the appliance with a soft cloth with warm water and a cleaning agent. • To clean metal surfaces use a usual cleaning agent. • Clean the oven interior after each use. Then you can remove dirt more easily and it does not burn on. • Clean stubborn dirt with a special oven cleaner. • Clean all oven accessories after each use and let them dry. Use a soft cloth with warm water and a cleaning agent.
ENGLISH 2. 3. 4. 5. 6. CAUTION! Do not let the removable shelf supports stay in the appliance during the cleaning procedure. There is a risk of damage. Remove the worst dirt manually. Fully close the oven door. The cleaning procedure cannot start if you do not close the oven door. Set the function Pyrolysis. Refer to "Oven functions". When flashes, press + or - to set the necessary procedure: – P1 - if the oven is not very dirty. The procedure is 1 h long. – P2 - if the oven is more dirty.
www.electrolux.com Removing the oven door and the glass panels A B 1. Press the buttons at the sides of the door trim (A) on the upper cover and pull it upwards to remove it. 2. Hold the inner glass B tightly with both hands and slide it upwards to remove it from its initial position. Do the same with the other glass panels. CAUTION! Make sure that you tightly hold the glasses to prevent them from falling. Clean the door with a wet sponge and rub it dry with a soft cloth.
ENGLISH 23 11. WHAT TO DO IF… WARNING! Refer to the Safety chapters. Problem Possible cause Remedy The oven does not heat up. The appliance is deactivated. Activate the appliance. The oven does not heat up. The clock is not set. Set the clock. Refer to "Setting the time of day". The oven does not heat up. The necessary settings are not set. Make sure that the settings are correct. The oven does not heat up. The automatic switch-off is on. Refer to "Automatic switch-off".
www.electrolux.com Problem The oven does not heat up. The display shows Demo. Possible cause Remedy The demo mode is activated. 1. 2. 3. 4. 5. 6. The display shows an error code that is not on this list. 1. There is an electronic fault. 2. Steam and condensation collect on the food and in the oven. You left the dish in the oven for too long. If you cannot find a solution to the problem yourself, contact your dealer or the service centre. Deactivate the appliance.
ENGLISH 25 12.1 Building In 548 558 A 20 B 573 589 594 5 12.3 Electrical installation WARNING! Only a qualified person must do the electrical installation. 590 min. 550 20 min. 560 The manufacturer is not responsible if you do not follow the safety precautions from the chapter "Safety Information". This appliance is supplied with a main plug and a main cable. 12.4 Cable 600 min. 550 20 min.
www.electrolux.com 13. ENVIRONMENT CONCERNS Recycle the materials with the symbol . Put the packaging in applicable containers to recycle it. Help protect the environment and human health and to recycle waste of electrical and electronic appliances. Do not dispose appliances marked with the symbol with the household waste. Return the product to your local recycling facility or contact your municipal office.
ESPAÑOL 27 ÍNDICE DE MATERIAS 1. 2. 3. 4. 5. 6. 7. 8. 9. 10. 11. 12. INFORMACIÓN SOBRE SEGURIDAD . . . . . . . . . . . . . . . . . . . . . . . . . . . . . . . . . . . . . . . . INSTRUCCIONES DE SEGURIDAD . . . . . . . . . . . . . . . . . . . . . . . . . . . . . . . . . . . . . . . . . . DESCRIPCIÓN DEL PRODUCTO . . . . . . . . . . . . . . . . . . . . . . . . . . . . . . . . . . . . . . . . . . . ANTES DEL PRIMER USO . . . . . . . . . . . . . . . . . . . . . . . . . . . . . . . . . . . . . . . . . . . . .
www.electrolux.com 1. INFORMACIÓN SOBRE SEGURIDAD Antes de instalar y utilizar el aparato, lea atentamente las instrucciones facilitadas. El fabricante no se hace responsable de los daños y lesiones causados por una instalación y uso incorrectos. Guarde siempre las instrucciones junto con el aparato para futuras consultas. 1.1 Seguridad de niños y personas vulnerables ADVERTENCIA Existe riesgo de sufrir asfixia, lesiones o incapacidad permanente.
ESPAÑOL 29 • Antes de realizar tareas de mantenimiento, corte la corriente eléctrica. • No utilice limpiadores abrasivos ásperos ni rascadores de metal afilado para limpiar la puerta de cristal si no quiere arañar su superficie, lo que podría hacer que el cristal se hiciese añicos. • Los restos de derrames deben retirarse antes de la limpieza pirolítica. Saque todas las piezas del horno.
www.electrolux.com • Si la toma de corriente está floja, no conecte el enchufe. • No desconecte el aparato tirando del cable de conexión a la red. Tire siempre del enchufe. • Use únicamente dispositivos de aislamiento correctos: línea con protección contra los cortocircuitos, fusibles (tipo tornillo que puedan retirarse del soporte), dispositivos de fuga a tierra y contactores.
ESPAÑOL • Cambie inmediatamente los paneles de cristal de la puerta que estén dañados. Póngase en contacto con el servicio técnico. • Tenga mucho cuidado al desmontar la puerta del aparato. ¡La puerta es muy pesada! • Limpie periódicamente el aparato para evitar el deterioro del material de la superficie. • Los restos de comida o grasa en el interior del aparato podrían provocar un incendio. • Limpie el aparato con un paño suave humedecido. Utilice sólo detergentes neutros.
www.electrolux.com • Retire el pestillo de la puerta para evitar que los niños y las mascotas queden encerrados en el aparato. 3. DESCRIPCIÓN DEL PRODUCTO 1 2 5 Bombilla del horno 3 6 Ventilador 7 Carril de apoyo, extraíble 8 Placa de características 4 5 5 4 9 3 6 2 1 8 7 1 Mando de las funciones del horno 2 Programador electrónico 3 Mando de temperatura 4 Grill 9 Posiciones de las parrillas 3.1 Accesorios del horno • Parrilla Para utensilios de cocina, pasteles en molde, asados.
ESPAÑOL Pulse repetidamente hasta que el indiparpadee en la pancador de la hora talla. Para ajustar la nueva hora, siga el procedimiento indicado en "Programación del reloj". 4.3 Calentamiento previo Precaliente el aparato vacío para quemar los restos de grasa. 1. Ajuste la función máxima. y la temperatura 2. 33 Deje que el aparato funcione durante 45 minutos. 3. Ajuste la función y la temperatura máxima. 4. Deje que el aparato funcione durante 15 minutos.
www.electrolux.com Función del horno Aplicación Carne Para preparar asados muy tiernos y jugosos. Mantener caliente Para mantener calientes los alimentos. Descongelar Para descongelar alimentos congelados. Pirólisis Para limpiar el horno. La elevada temperatura quema la suciedad residual. A continuación puede retirarla con un paño cuando el aparato esté frío. 5.
ESPAÑOL Símbolo Función 35 Descripción Hora Para ajustar, modificar o comprobar la hora. Consulte "Programación del reloj". Duración Para ajustar cuánto tiempo debe funcionar el aparato. Ajuste una función del horno antes de esta función. Fin de progra- Para configurar cuándo se ha de desactivar el aparato. ma Ajuste una función del horno antes de esta función. Puede utilizar Duración y Fin a la vez (Inicio Diferido) para ajustar la hora a la que debe encenderse y después apagarse el aparato.
www.electrolux.com 7. USO DE LOS ACCESORIOS ADVERTENCIA Consulte los capítulos sobre seguridad. 7.1 Carriles telescópicos 1. Saque los carriles telescópicos de la derecha y la izquierda. 2. Coloque la parrilla en los carriles telescópicos y luego empuje cuidadosamente para introducirlos en el aparato. Asegúrese de empujar los carriles telescópicos hasta el fondo del aparato antes de cerrar la puerta del horno.
ESPAÑOL 2. 3. Mantenga pulsado y + al mismo tiempo durante dos segundos. Se emite una señal acústica. SAFE y se encienden o apagan (cuando se activa o desactiva la tecla de bloqueo) en la pantalla. Si el horno dispone de la función de limpieza pirolítica, la puerta se bloquea. SAFE y se encienden en la pantalla al girar un mando o pulsar un botón. 8.2 Apagado automático Por motivos de seguridad, el aparato se desactiva después de un tiempo: • Si está activada alguna función del horno.
www.electrolux.com 9.2 Carnes y pescados 9.3 Tiempos de cocción • Utilice una bandeja honda con los alimentos muy grasos para evitar que el horno quede manchado de forma permanente. • Antes de trinchar la carne, déjela reposar unos 15 minutos, como mínimo, para que retenga los jugos. • Para evitar que se forme mucho humo en el horno, vierta un poco de agua en la bandeja honda. Para evitar la condensación de humos, añada agua después de que se seque cada vez.
ESPAÑOL TIPO DE ALIMENTO Calor superior + inferior Turbo Tiempo de cocción [min] Notas 39 Posición de la parrilla Temp . [°C] Posición de la parrilla Tem p.
www.electrolux.com PAN Y PIZZA TIPO DE ALIMENTO Calor superior + inferior Posición Temp de la pa. [°C] rrilla Turbo Posición de la parrilla Tem p.
ESPAÑOL 41 CARNE TIPO DE ALIMENTO Calor superior + inferior Turbo Tiempo de cocTem ción [min] p. [°C] Notas Posición de la parrilla Tem p.
www.electrolux.com 9.5 Grill Precaliente el horno vacío durante 10 minutos antes de cocinar. Cantidad Grill Tiempo de cocción [min] TIPO DE ALIMENTO Piezas [g] Posición de la parrilla Temp [°C] 1ª cara 2ª cara Filetes de solomillo 4 800 4 máx. 12-15 12-14 Filetes de vacuno 4 600 4 máx. 10-12 6-8 Salchichas 8 - 4 máx. 12-15 10-12 Chuletas de cerdo 4 600 4 máx. 12-16 12-14 Pollo (cortado en dos) 2 1000 4 máx. 30-35 25-30 Brochetas 4 - 4 máx.
ESPAÑOL 43 Cerdo TIPO DE ALIMENTO Cantidad Posición de la parrilla Temperatura (°C) Tiempo (min) Paletilla, cuello, jamón asado 1-1,5 kg 1 160-180 90-120 Chuletas, costillas y falda 1-1,5 kg 1 170-180 60-90 Pastel de carne 750 g-1 kg 1 160-170 50-60 Codillo de cerdo (precocinado) 750 g-1 kg 1 150-170 90-120 Ternera TIPO DE ALIMENTO Cantidad Posición de la parrilla Temperatura (°C) Tiempo (min) Ternera asada 1 kg 1 160-180 90-120 Codillo de ternera 1,5-2 kg 1 160-180
www.electrolux.com Pescado (al vapor) TIPO DE ALIMENTO Cantidad Posición de la parrilla Temperatura (°C) Tiempo (min) Pescado entero hasta 1 Kg 1-1,5 kg 1 210-220 40-60 9.7 Descongelar TIPO DE ALIMENTO Tiempo de descongelación (min) (g) Tiempo de descongelación adicional (min) Notas Pollo 1000 100-140 20-30 Coloque el pollo sobre un plato puesto del revés sobre otro mayor. Déle la vuelta a media cocción. Carne 1000 100-140 20-30 Déle la vuelta a media cocción.
ESPAÑOL 45 FRUTA TIPO DE ALIMENTO Posición de la parrilla 1 nivel 2 niveles Temperatura (°C) Tiempo (h) Ciruelas 3 1/4 60-70 8-10 Albaricoques 3 1/4 60-70 8-10 Manzana en rodajas 3 1/4 60-70 6-8 Peras 3 1/4 60-70 6-9 Información sobre acrilamidas Importante Según los nuevos descubrimientos científicos, el tostado intensivo de los alimentos, especialmente de los productos que contienen almidón, puede ser un riesgo para la salud.
www.electrolux.com 10. MANTENIMIENTO Y LIMPIEZA ADVERTENCIA Consulte los capítulos sobre seguridad. • Limpie la parte delantera del aparato con un paño suave humedecido en agua templada y jabón neutro. • Limpie las superficies metálicas con jabón neutro. • Limpie el interior del horno después de cada uso. Así podrá retirar la suciedad más fácilmente e impedirá que se queme. • Elimine la suciedad resistente con limpiadores especiales para hornos.
ESPAÑOL 10.2 Limpieza pirolítica ADVERTENCIA El aparato se calienta mucho. Puede quemarse. PRECAUCIÓN No utilice la función de limpieza pirolítica y la placa de cocción al mismo tiempo (si está instalada en el aparato). El aparato podría dañarse. 1. 2. 3. 4. 5. 6. Retire todos los accesorios y carriles de apoyo extraíbles (en su caso) del aparato. Consulte la sección "Retirar los carriles de apoyo". PRECAUCIÓN No deje los carriles de apoyo extraíbles en el aparato durante la limpieza pirolítica.
www.electrolux.com La dirección de apertura de la puerta depende del modelo del horno. La puerta se abre por el lado derecho en algunos modelos y por el lado izquierdo en otros. 10.4 Limpieza de la puerta del horno La puerta del horno tiene cuatro paneles de cristal, instalados uno a continuación del otro Es posible retirar la puerta del horno y los paneles de cristal interiores para limpiarlos. PRECAUCIÓN No utilice el aparato sin los paneles de cristal.
ESPAÑOL 49 un marco negro. En ciertos modelos, el tercer panel de cristal tiene estampados serigráficos. En otros es transparente. La cara impresa debe mirar hacia el interior de la puerta. Asegúrese después de la instalación de que la superficie del marco del panel no esté áspera cuando la toque. 11. QUÉ HACER SI… ADVERTENCIA Consulte los capítulos sobre seguridad. Problema Posible causa Solución El horno no calienta. El aparato está apagado. Encienda el aparato. El horno no calienta.
www.electrolux.com Problema La pantalla muestra F102. Posible causa La puerta no se ha cerrado correctamente o el bloqueo de la puerta es defectuoso. Solución 1. 2. 3. El horno no calienta. La pantalla muestra Demo. El modo de demostración 1. está activado. 2. 3. 4. 5. 6. La pantalla muestra un Hay un fallo electrónico. código de error que no figura en esta lista. 1. 2. Se acumulan vapor y condensación en los alimentos y en el horno. Los platos han permanecido en el horno demasiado tiempo.
ESPAÑOL Si no lograra subsanar el problema, diríjase al Centro de servicio técnico. Los datos necesarios para el servicio técnico están en la placa de características. 51 La placa de características se encuentra en el marco delantero de la cavidad del aparato. Es conveniente que los anote aquí: Modelo (MOD.) ......................................... Número de producto (PNC) ......................................... Número de serie (S.N.) ......................................... 12.
www.electrolux.com 12.3 Instalación eléctrica ADVERTENCIA Deje la instalación eléctrica en manos de un profesional cualificado. H05 RRF, H05 VV-F, H05 V2V2-F (T90), H05 BB-F. En lo que respecta a la sección del cable, consulte la potencia total (que figura en la placa de características) y la tabla: Potencia total Sección del cable máximo de 1380 W 3 x 0,75 mm² máximo de 2300 W 3 x 1 mm² El aparato se suministra con enchufe y cable de red. máximo de 3.680 W 3 x 1,5 mm² 12.
ESPAÑOL 53
www.electrolux.
ESPAÑOL 55
397280501-C-342012 www.electrolux.