user manual al _dj[]hWj[Z XWhX[Yk[ k[ (EQBL100AS and EQBH100AS) AS)
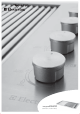
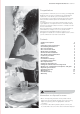
[b[Yjhebkn _dj[]hWj[Z XWhX[Yk[ contents i Congratulations Congratulations and thank you for choosing our integrated barbecue. We are sure you will find your new barbecue a pleasure to use. Before you use the barbecue, we recommend that you read through the entire user manual, which provides the description of the barbecue and its functions.
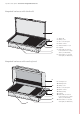
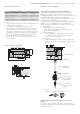
ii product description [b[Yjhebkn _dj[]hWj[Z XWhX[Yk[ Integrated barbecue with slimline lid 1 ' Slimline lid 2 2 Battery cover ) Gas connection point 3 4 + , 4 Burner controls + Grill assemblies x 2 sets , Hotplate - R emovable oil reservoir located at front of cooking surface (not illustrated) .
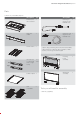
[b[Yjhebkn _dj[]hWj[Z XWhX[Yk[ parts iii Parts Contents of your barbecue pack: Z[iYh_fj_ed gjo Z[iYh_fj_ed gjo Burner box & trim surround 1 Natural gas regulator and braided hose 1 Rear heat shield 1 Universal LPG 1 regulator and braided hose Flame tamers 2 1 plastic bag containing this instruction book, labels, 4 ULPG injectors, allen key, ULPG adaptor, 2 fibre washers, natural gas installation pipe EITHER left Oil reservoirs (1 x left hand and 1 x right hand) 1 LH 1 RH Roasting hood assembl
electrolux integrated barbecue important safety instructions 1 Important safety instructions Please read the user manual carefully and store in a handy place for later reference. Meanings of the symbols used in this manual are shown below: For your safety please read this book before operating your barbecue.
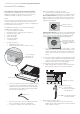
2 assembling electrolux integrated barbecue Assembling the barbecue 1. Remove all components from box. 2. Attach heat shield to rear of unit by inserting the three top tabs into the rear holes and sliding the shield down. 5. Place hotplate and grill sections into desired positions ensuring that the flame tamers are under grill sections NOTE ensure that grill assemblies are orientated correctly so that the surface of the grill is sloping forward to allow oil to drain into oil reservoirs. 3.
electrolux integrated barbecue gas specifications/natural gas installation 3 Gas specifications gas type Natural Gas installation natural gas universal LPG Maximum gas consumption 50 MJ/hr 50 MJ/hr Injector orifice diameter 1.75mm 0.95mm Number of injectors 4 4 Regulator pressure 1.00 kPa 2.75 kPa NOTES såå å4HISåAPPLIANCEå-534åBEåINSTALLEDåANDåSERVICEDåONLYåBYå a qualified licensed person.
4 universal LPG installation electrolux integrated barbecue Universal LPG installation Preparing the unit for Universal LPG installation. This barbecue is supplied set up for Natural Gas and is labelled accordingly. A Universal LPG conversion Kit is included to enable conversion to Universal LPG. NOTE #ONVERSIONåOFåTHISåUNITåTOå5NIVERSALå,0'åMUSTåBEåCARRIEDå out by a qualified licensed person and a Certificate of Compliance must be issued to the owner on completion of the installation and conversion. 2.
electrolux integrated barbecue electronic display controls – electronic models 5 Gas bottle safety information Leak test procedure såå å4HISåAPPLIANCEåONCEåCONVERTEDåTOåUSEå5NIVERSALå,0'åISå designed to use a 9kg (20 lbs) gas cylinder. så å4HEåGASåCYLINDERåMUSTåBEåMADEåANDåMARKEDåINå accordance with specifications for LPG cylinders så å4HEåISOLATIONåVALVEåMUSTåBEåTURNEDåOFFåWHENåTHEå appliance is not in use. så å'ASåCYLINDERSåMUSTåBEåSTOREDåINåANåAPPROVEDåHOUSINGå out of reach of children.
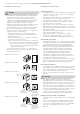
6 installation warnings/installation instructions electrolux integrated barbecue Installation warnings Installation instructions warning så 4 å HISåAPPLIANCEåSHALLåONLYåBEåUSEDåINåANåABOVEåGROUND å open air situation with natural ventilation without stagnant areas, where gas leakage and product of combustion are rapidly dispersed by wind or natural convection. This barbecue has been designed for outdoor use only. Refer to diagrams on right. så å.
electrolux integrated barbecue installation instructions 7 så å4HEåMINIMUMåWIDTHåOFåTHEåMOUNTINGåSURFACEåISå MM så å4HEåCUT OUTåSIZEåREQUIREDåISå MMåXå MMå SEEå diagram). så å&ORåROASTINGåHOODåMODELSåTHEREåISåAåSPECIlCåCLEARANCEå required at the back of the barbecue between the splashback and the bench cut-out of 73mm minimum. This is to allow clearance for the hood to open. warning så 4 å HISåAPPLIANCEåREQUIRESåVENTING å!NåOPENåAREAåASå indicated below must be allowed for.
8 gas requirements/setting up the barbecue/fitting the lid or hood electrolux integrated barbecue Gas requirements Fitting the slimline lid or roasting hood Natural Gas requirements såå å4HEåENCLOSUREåMUSTåBEåCONSTRUCTEDåSOåTHATåACCESSåCANå be gained to the Natural Gas regulator at all times. så å&ORå.ATURALå'ASåTHEåGASåSUPPLYåISåREQUIREDåTOåBEå connected to 1.
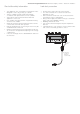
electrolux integrated barbecue configuration of hotplates and grills/operating instructions 9 Options for configuration of hotplates and grills important Ensure flame tamers are positioned under the grill panels grill panels flame tamers Operating instructions Control functions "EFOREåLIGHTINGåTHEåBARBECUE så å#HECKåTHATåALLåHOSESåANDåGASålTTINGSåAREåTIGHT så å/PENåTHEåSLIMLINEåLIDåORåTHEåROASTINGåHOOD NOTE The slimline lid is designed as a cover for weather protection.
10 cleaning and care electrolux integrated barbecue Cleaning and care The Electrolux Integrated barbecue has been constructed from select grade stainless steel which, if not cared for, may discolour over time. To keep your barbecue looking its best we recommend that the cooking surfaces are cleaned after every use. warning Please ensure that your barbecue is switched off and has cooled down before following the instructions below.
electrolux integrated barbecue maintenance/troubleshooting 11 Maintenance The ignition system To change the battery unscrew the cover. Lift out the spring and battery. Replace with a new AA battery and replace the cover. Do not over-tighten the screw cover as this may distort the trim panel. Test by depressing the knob and an audible ‘clicking’ sound should be heard.
12 warranty electrolux integrated barbecue Warranty FOR SALES IN AUSTRALIA AND NEW ZEALAND !00,)!.#% å%,%#42/,58å).4%'2!4%$å"!2"%#5% This document sets out the terms and conditions of product warranties for Electrolux branded appliances. It is an important document. Please keep it with your proof of purchase documents in a safe place for future reference should you require service for your Electrolux appliance. General Terms and Conditions 1.
;b[Yjhebkn >ec[ FheZkYji 7kijhWb_W telephone: 1300 363 640 fax: 1800 350 067 email: customercare@electrolux.com.au web: www.electrolux.com.au J^[ J^ek]^j\kb :[i_]d ?ddelWjeh$ Do you remember the last time you opened a gift that made you say “Oh! How did you know? That’s exactly what I wanted!” That’s the kind of feeling that the designers at Electrolux seek to evoke in everyone who chooses or uses one of our products.