I N F O I N S TA L L AT I O N A N D I N S T R U C T I O N M A N U A L REFRIGERATOR 2222 017-91 ER 7428 C
IMPORTANT SAFETY INFORMATION It is most important that this instruction book should be retained with the appliance for future reference. Should the appliance be sold or transferred to another owner, or should you move house and leave the appliance, always ensure that the book is left with the appliance in order that the new owner can get to know the functioning of the appliance and the relevant safety information. This information has been provided in the interest of safety.
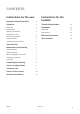
CONTENTS Instructions for the user Important Safety Information 2 Instructions for the Installer Operation 4 Technical Specification 13 Before use 4 Installation 14 Control panel 4 Positioning 14 Starting your appliance 4 Rear Spacers 14 Temperature control 4 Electrical Connection 15 Fresh food refrigeration 4 Movable shelves 5 Door Reversal 16 Positioning the door shelves 5 Hints and Tips 6 Maintenance and Cleaning 7 Internal cleaning 7 External cleaning 7 When the ap
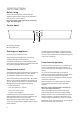
OPERATION Before using Remove all securing tapes. Wash inside the appliance with lukewarm water and bicarbonate of soda (5 ml to 0.5 litre of water). Do not use soap or detergent as the smell may linger. Dry thoroughly. Control panel max min ON A B A. Operating pilot light B. Thermostat knob Starting your appliance Insert the plug into the wall socket. To obtain a lower temperature, turn the thermostat control towards max; to obtain a higher temperature turn the control towards min.
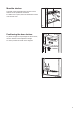
Movable shelves The walls of the refrigerator have runners so that shelves can be positioned as desired. For better use of space, the front half-shelves can lie over the rear ones. D338 Positioning the door shelves To permit storage of food packages of various sizes, the door shelves can be adjusted in height. To do this proceed as shown in the diagram.
HINTS AND TIPS Normal Operating Sounds ¥ You may hear faint gurgling or bubbling sounds when the refrigerant is pumped through the coils or tubing at the rear, to the cooling plate/evaporator. ¥ When the compressor is on, the refrigerant is being pumped round, and you will hear a whirring sound or pulsating noise from the compressor. ¥ A thermostat controls the compressor, and you will hear a faint ÕclickÕ when the thermostat cuts in and out.
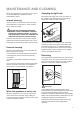
MAINTENANCE AND CLEANING Before any maintenance or cleaning work is carried out, DISCONNECT the appliance from the ELECTRICITY supply. Internal cleaning Changing the light bulb Should the interior light fail to work, first switch off the appliance and disconnect from the electricity supply, then replace the bulb as follows; Clean the inside and accessories with warm water and bicarbonate of soda (5ml to 0.5 litre of water). Rinse and dry thoroughly.
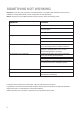
SOMETHING NOT WORKING Important: If you call out an engineer to a fault listed below, or to repair a fault caused by incorrect use or installation a charge will be made, even if the appliance is under guarantee. Before contacting your local Electrolux Service Force Centre, check the following points: Symptom Solution No power to the appliance Check there is power at the socket. Check there is not a power cut by checking the household lights. Check the fuse has not blown.
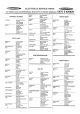
SERVICE AND SPARE PARTS In the event of your appliance requiring service, or if you wish to purchase spare parts, please contact your local Electrolux Service Force Centre by telephoning:- 0870 5 929929 Your telephone call will be automatically routed to the Service Force Centre covering your post code area. The addresses are listed on the following pages. Before calling out an engineer, please ensure you have read the details under the heading ÔSomething Not Working.
GUARANTEE CONDITIONS Standard guarantee conditions We, Electrolux, undertake that if within 12 months of the date of the purchase this Electrolux appliance or any part thereof is proved to be defective by reason only of faulty workmanship or materials, we will, at our option repair or replace the same FREE OF CHARGE for labour, materials or carriage on condition that: The appliance has been correctly installed and used only on the electricity supply stated on the rating plate.
TECHNICAL SPECIFICATIONS DIMENSIONS Height 140 cm Width 59.5 cm Depth 60 cm POWER SUPPLY VOLTAGE AND FREQUENCY 220-240 V / 50 Hz TOTAL POWER ABSORBED 78 W AVERAGE DAILY UNITS ELECTRICITY * 0.42 kWh GROSS CAPACITY Fridge 240 l NET CAPACITY Fridge 235 l * This figure is based on standard test results in accordance with European Standard EN 153. Actual consumption will depend on how the appliance is used and where it is located.
INSTALLATION Warning IF YOU ARE DISCARDING AN OLD APPLIANCE THAT HAS A LOCK OR CATCH ON THE DOOR, YOU MUST ENSURE THAT IT IS MADE UNUSABLE TO PREVENT YOUNG CHILDREN BEING TRAPPED INSIDE. Depending upon the position which you choose for your appliance, you may wish to reverse the way in which the door opens. To do this, refer to instructions on ÒDoor reversal directionsÓ. B 10 mm You should also ensure that air can circulate freely around the back and the top of the cabinet.
Electrical connections Any electrical work required to install this appliance should be carried out by a qualified electrician or competent person. WARNING: THIS APPLIANCE MUST BE EARTHED. The manufacturer declines any liability should this safety measure not be observed. If the plug that is fitted to your appliance is not suitable for your socket outlet, it must be cut off and the appropriate plug fitted. Remove the fuse from the cut off plug.
Door reversal directions 1. Disconnect from the electricity supply. 2. Gently lay the fridge/freezer on its back with the top held away from the floor by 5-8 cm (2-3 inches) of packing; F E F F 3. Remove the ventilation grill (D). D 4. Unscrew the bottom hinge (E). F 5. Slide out the fridge door from pin (G), unscrew the latter and then refit it on the opposite side; 6. Remove the two screws which mask the holes for fixing the hinge from the left hand side; 7.