User manual Side by side refrigerators ESE6107 ESE6977 ESE7007 ESE6077
WE’RE THINKING OF YOU Thank you for purchasing an Electrolux appliance. You’ve chosen a product that brings with it decades of professional experience and innovation. Ingenious and stylish, it has been designed with you in mind. So whenever you use it, you can be safe in the knowledge that you’ll get great results every time. Welcome to Electrolux.
BEFORE USING YOUR APPLIANCE Before you use the refrigerator, we recommend that you read through the relevant sections of this manual, which provides the description of your appliance and its functions. To avoid the risks that are always present when you use an appliance, it is important that the appliance is installed correctly and that you read the safety instructions carefully to avoid misuse and hazards.
General warnings Read the following carefully to avoid damage or injury This symbol indicates never to do this This symbol indicates always do this It is important to use your refrigerator safely. Check these safety points before using your refrigerator. The appliance must be plugged into its own dedicated 220-240V, 50Hz AC electrical outlet. Ensure that the electrical outlet is properly earthed. Consult a qualified electrician if you are unsure.
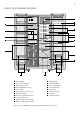
ESE6107 with standard features 1 8 9 2 10 11 3 12 4 13 5 14 15 6 16 17 7 Freezer lighting 2 Twist ice & serve drawer 3 Slide out glass shelves 4 Freezer temperature sensor 5 Bottle caddy 6 Freezer baskets with clear fascia 7 Adjustable door bins 8 Electronic temperature controls 9 Locker compartment 10 SpillsafeTM slide-away glass shelf 11 SpillsafeTM slide-out glass shelves 1 19 18 12 Fridge lighting door bin 14 Sensor & deodoriser 15 Deli compartment 16 Crisper bins 17 Bottle twi
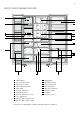
ESE6977 with ice and water features 1 2 8 9 3 10 11 4 12 13 5 14 15 6 17 16 7 Ice maker unit 2 Freezer lighting 3 Removable ice bin 4 Slide out glass shelves 5 Bottle caddy 6 Telescopic freezer bin 7 Adjustable door bins 8 Dairy compartment 9 SpillsafeTM slide-away glass shelf 10 SpillsafeTM slide-out glass shelves 1 19 door bins lighting 13 Freezer temperature sensor 14 Sensor & deodoriser 15 Deli compartment 16 Telescopic crisper bin 17 Bottle twist holder 18 Bottle bins 19 Humidity c
ESE7007 with standard features 1 8 9 2 10 11 3 12 4 13 5 14 15 6 16 17 7 Freezer lighting 2 Twist ice & serve drawer 3 Slide out glass shelves 4 Freezer temperature sensor 5 Bottle caddy 6 Telescopic freezer bins 7 Adjustable door bins 8 Electronic temperature controls 9 Dairy compartment 10 SpillsafeTM slide-away glass shelf 11 SpillsafeTM slide-out glass shelves 1 19 18 12 Fridge lighting door bins 14 Sensor & deodoriser 15 Deli compartment 16 Telescopic Crisper bins 17 Bottle twist
ESE6077 with ice and water features 1 2 8 9 10 3 11 4 12 5 13 14 6 15 16 17 7 Ice maker unit Freezer lighting 3 Removable ice bin 4 Slide out glass shelves 5 Bottle caddy 6 Freezer basket with clear fascia 7 Adjustable door bins 8 Locker compartment 9 SpillsafeTM slide away glass shelf 10 SpillsafeTM slide-out glass shelves 11 Fridge lighting 18 1 12 Adjustable 2 13 16 door bins Sensor & deodoriser 14 Deli compartment 15 Crisper bins 16 Bottle twist holder 17 Bottle bins 18 Humi
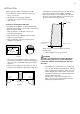
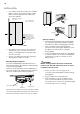
installation When correctly installed, your refrigerator should: • Have adequate clearance to the back, sides and top for air circulation • Be aligned to the surrounding cupboards • Have doors that will self close from a partially open position The refrigerator should arrive with the front rollers wound down. We recommend that the appliance be tilted backwards by about 10 to 15 millimetres, this will allow the doors to self close providing a consistent door seal.
installation 3. If the cabinet is level, then the side walls should be plumb or vertical. If the cabinet is built in or partly built in check the alignment of the cabinet side against the cupboard. Aligned to cupboard – even gap Spanner Top of refrigerator is level – horizontal Spanner Adjust front rollers for unevenness of floor. e.g. adjust this roller down. Packing may be required underneath the rear roller to ensure stability. 4.
Ice & water installation The external water filter kit An external water filter and connection kit has been supplied for use with your ice & water refrigerator. The external filter design allows more space within the refrigerator and provides double the life of previous filters reducing the cost of replacement. The filter is designed to significantly reduce chlorine, taste, odour, heavy metals, turbidity (cloudiness) and scale build up.
Ice & water installation Caution! Never install the water filter in an area of direct sunlight. Check for water leaks at all water connection points in the first 2 to 3 hours after installation, and correct it in case of any water leak. Recheck after 24 hours; if leak still occurs, it is recommended to turn off water supply and contact a licensed plumber for advice. Water is to be connected as per diagram below. Step 4. Install brackets for filter close to tap.
Ice & water installation Step 8. Push shorter tube into tap fitting past insertion mark. Step 12. Turn on water and check all joints and tubes for leaks. Step 9. Push other end into filter INLET. water flow direction Step 13. Reconnect the power. Step 10. Connect remaining tube length into filter OUTLET. Step 11. Connect other end of remaining tube length to inlet on bottom right hand side of refrigerator back.
Ice & water installation Step 15. Using a large container run the water dispenser to clear air from lines. This may take a few minutes. Purge and dispense a minimum of 2 litres of water or until the water runs clear. Initial water may be black in colour. This is residual carbon dust from the filter and is non-toxic. If the water is slow to shut off or the dispenser is dripping, air may still be in the lines.
Ice & water installation Initial start-up Caution! Connect to potable water supply only. Do not put fingers into ice crusher. Surfaces there may be sharp X X X Refrigerator/freezer operation A light frosting will occasionally occur on the interior of the freezer when the door is opened frequently. This is normal and will disappear after a few days in most climates. Make sure you fully close the freezer door after you load or remove food.
Using your refrigerator – general Temperature Sensors Avoid loading food against your freezer temperature sensor. Doing so may adversely affect freezer temperatures. If warm food is inadvertently loaded against the sensor, it may also set off the freezer temperature alarm for up to 50 minutes after the food is loaded against the sensor. NOTE: Product illustrations demonstrate features that may not be completely in line with all current products.
Food compartment features Door storage bins Both the refrigerator and freezer have door storage bins. You can adjust the door bins to meet different storage needs. All the door bins can be removed for cleaning. To remove a fridge or freezer bin, lift it up from the support lugs on the inner door panel. Push the bin down over the support lugs to lock it in place. coin slot • Horizontal – when the bottle twist holder ring is horizontal, any item that fits within the ring can simply be placed inside it.
Food compartment features Open the bin to access the finger tabs at the ends of the telescopic slides, on each side of the bin. Using your thumb and forefinger, lift the bin over the end of the slide and clip in place. If the drawer is not fully engaged on the slide, it’s possible the drawer won’t stay on the slide if fully extended. the end of the slide must be clipped into place 3. Fully close the bin. When replacing the drawers after cleaning, we recommend fitting the lower drawer first.
Ice & water features (where fitted) Twist ice & Serve To use, remove the tray, fill with water and place back in the freezer. Once ice has formed (approximately 3 hours) simply twist the knob at the front clockwise until the ice drops into the bin below. Bottle filling function The bottle filling function facilitates the flow of water directly into the mouth of a bottle, minimising splashing and spillage.
Electronic display panel ESE6107 and ESE7007 models The electronic display panel consists of an LCD display with backlighting and 6 buttons. When the power is first turned on, the display with backlighting will come on. If no buttons have been pressed and the fridge door is closed the backlighting will turn off after 30 seconds.
Electronic display panel Drinks chill timer The drinks chill timer is used to quickly chill a bottle. Place the bottle in the freezer and the timer can be set for a minimum of 5 minutes to a maximum of 30 minutes. To set, simply press the drinks chill button repeatedly for the number of minutes (in 5 minute intervals). Once set, an animated icon appears beside the drinks chill button, with a timer that counts down one minute at a time.
Electronic display panel ESE6077 and ESE6977 models When the power is first turned on the default settings are -18°C, 3°C with the ‘cubed ice’ icon on and ‘icemaker off’. We recommend that when you start your refrigerator for the first time, the temperature of the refrigerator is set to 3°C and the freezer to -18°C. If you want to change the temperatures, use the instructions below. You should make only small adjustments and wait 24 hours to ascertain whether further adjustments are necessary.
Electronic display panel Door alarm If the Freezer or Fridge door is left open for longer than 2 minutes a buzzer will sound and an icon will flash. Close the door to deactivate the alarm. If you want to leave the door open while you load the fridge, the alarm can be muted for 8 minutes by pressing the ‘lock’ button. This icon illuminates automatically if the food door is open. This icon illuminates automatically if the freezer door is open. DOOR AJAR This icon illuminates when either door is open.
Electronic display panel The water filter status can be checked by holding down the ‘filter’ icon. The display will show ‘GOOD’ for 48 weeks, it will then change to ‘ORDER’ for 4 weeks. After a twelve month period the icon will change to ‘REPLACE’ and an alarm will sound. The filter status will also be displayed each time ice or water is dispensed. Refer to the section on ‘changing your water filter’ for instructions. Adjusting Ice cube size Ice cube size will vary slightly with water pressure.
How the water dispenser works The water dispenser water tank is located behind the upper crisper bin in the refrigerator compartment. After the refrigerator is connected to water fill the water tank by holding a large container against the dispenser paddle to run the water and clear air from lines. This may take a few minutes. Purge and dispense a minimum of 2 litres of water. Initial water may be black in colour. This is residual carbon dust from the filter and is non toxic.
Cleaning the ice dispenser Clean the dispenser and ice container at regular intervals, particularly before you take a holiday or move, also clean the dispenser if it sticks. To clean the dispenser: 1. Remove the ice container by lifting it up and out. Empty and carefully clean the container with mild detergent. Rinse carefully ensuring no traces of detergent remain. Do not use harsh or abrasive cleaners. Allow the ice container to dry completely before replacing it in the freezer.
Changing the water filter If you purchased a refrigerator with a water filter (ice and water models), please read the following care and use information. An external water filter and connection kit has been supplied for use with your ice & water refrigerator. The external filter design allows more space within the refrigerator and provides double the life of previous filters reducing the cost of replacement.
Cleaning your refrigerator Warning! BEFORE CLEANING: Turn the refrigerator off at the power point and unplug the cord to prevent any chance of electrocution. Doors and exterior – stainless steel Your stainless steel appliance is manufactured from a mark resistant stainless steel. This stainless steel has a special advanced protective coating that eases the removal of marks such as finger prints and water spots. To keep your stainless steel appliance looking at its best, you should clean it regularly.
Helpful hints for storing food • • I f you keep the freezer compartment filled to capacity, your food mass will help maintain the freezer temperature when you open the door Do not block air vents. Doing so may cause the refrigerator to run longer and use more energy. Switching off your refrigerator If you switch your refrigerator off for an extended period, follow these steps to reduce the chances of mould: 1. Take all the food out of the refrigerator and freezer compartments. 2.
Troubleshooting If you think something may be wrong with your refrigerator, you can carry out some easy checks before calling for service. You may locate the problem, sparing yourself any inconvenience and saving time and money. problem solution When your appliance is not operating • C heck that the power cord is plugged into the power outlet properly and that the outlet is switched ‘ON’ • T ry running another appliance from the power outlet.
Troubleshooting problem solution If the temperature in the refrigerator is too warm • C heck that the appliance has enough clearance at the sides, back and top (refer to the installation instructions at the front of this booklet) • Refer to ‘Controlling the temperature’ • You may have kept the door open too long or too frequently • Food containers or packaging may be holding a door open If the temperature in the refrigerator is too cold • Refer to ‘Controlling the temperature’ • Increase the
ice + water troubleshooting Problem Possible causes Automatic ice-maker The ice maker is not • making any ice • • • I ce maker is in the OFF position Water tap is turned off The freezer is not cold enough The water dispenser may not be dispensing water • Filter may be blocked The ice-maker is not • The ice maker is producing less ice than making enough ice you expect • The freezer is not cold enough • Household water tap is not open • The water dispenser is dispensing slower than normal Ice
notes
notes
Warranty 35 FOR SALES IN AUSTRALIA AND NEW ZEALAND APPLIANCE: REFRIGERATION This document sets out the terms and conditions of the product warranties for Electrolux Appliances. It is an important document. Please keep it with your proof of purchase documents in a safe place for future reference should you require service for your Appliance. 1.
Electrolux Home Products Australia telephone: 1300 363 640 fax: 1800 350 067 email: customercare@electrolux.com.au web: www.electrolux.com.au Electrolux Home Products New Zealand telephone: 09 573 2384 fax: 09 573 2221 email: customercare@electrolux.co.nz web: www.electrolux.co.nz The Thoughtful Design Innovator.