I N F O INSTALLATION UND GEBRAUCHSANWEISUNGEN INSTRUCTIONS POUR LÕINSTALLATION ET LÕEMPLOI INSTALLATION AND INSTRUCTION MANUAL LIBRETTO ISTRUZIONI K†HL-GEFRIERSCHR ANK ER 8137 I REFRIGERATEUR-CONGELATEUR ER 8137 I FRIDGE-FREEZER ER 8137 I FRIGORIFERO-CONGELATORE ER 8137 I 2222 309-82
WARNINGS It is most important that this instruction book should be retained with the appliance for future reference. Should the appliance be sold or transferred to another owner, or should you move house and leave the appliance, always ensure that the book is supplied with the appliance in order that the new owner can be acquainted with the functioning of the appliance and the relevant warnings.
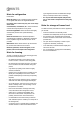
Installation ¥ During normal operation, the condenser and compressor at the back of the appliance heat up considerably. For safety reasons, minimum ventilation must be as shown in the relevant Figure. Attention: keep ventilation openings clear of obstruction. ¥ Care must be taken to ensure that the appliance does not stand on the electrical supply cable. Important: if the supply cord is damaged, it must be replaced by a special cord or assembly available from the manufacturer or its service agent.
USE Cleaning the interior Before using the appliance for the first time, wash the interior and all internal accessories with lukewarm water and some neutral soap so as to remove the typical smell of a brand-new product, then dry thoroughly. Do not use detergents or abrasive powders, as these will damage the finish. Operation Insert the plug into the wall socket. Open the refrigerator door and turn the thermostat knob, clockwise, beyond the ÇOÈ (STOP) position. The appliance will start to operate.
Freezing fresh food Ice-cube production The 4-star compartment is suitable for long term storage of commercially frozen food, and for freezing fresh food. To freeze fresh foods it is not necessary to change the setting of the thermostat knob. However, for a quicker freezing operation, turn the thermostat knob to the coldest setting; but remember that, in this condition, the refrigerator compartment temeprature might drop below 0¡C. If this occurs reset thermostat knob to a warmer setting.
Fresh food refrigeration To obtain the best performance: ¥ do not store warm food or evaporating liquids in the refrigerator; ¥ do cover or wrap the food, particularly if it has a strong flavour. ¥ Position food so that air can circulate freely round it. Movable shelves The walls of the refrigerator are equipped with a series of runners so that the shelves can be positioned as desired. For better use of space, the front half-shelves can lie over the rear ones.
HINTS Hints for refrigeration Useful hints: types together with the recommended storage time (in months) from the time of freezing; ¥ Meat (all types): wrap in polythene bags and place on the glass shelf above the vegetable drawer. For safety, store in this way only one or two days at the most. Cooked foods, cold dishes, etc..: these should be covered and may be placed on any shelf. Fruit and vegetables: these should be thoroughly cleaned and placed in the special drawer(s) provided.
MAINTENANCE Unplug the appliance before carrying out any maintenance operation. Warning Periods of non-operation When the appliance is not in use for long periods, take the following precautions: This appliance contains hydrocarbons in its cooling unit; maintenance and rechanging must therefore only be carried out by authorized technicians. remove the plug from the wall socket; Periodic cleaning leave the door ajar to allow air to circulate to prevent unpleasant smells.
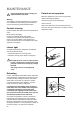
Never use sharp metal tools to scrape off frost from the evaporator as you could damage it. However, when the ice becomes very thick on the inner liner, complete defrosting should be carried out as follows: 1. pull out the plug from the wall socket or turn the thermostat knob to the ÇOÈ setting; 2. remove any stored food, wrap it in several layers of newspaper and put it in a cool place; 3. leave the door open, introduce the plastic scraper in the appropriate seating at the bottom centre, as shown in Fig.
TECHNICAL INFORMATION Energy Efficiency Class A Fridge Net Capacity lt. 210 Freezer Net Capacity lt. 70 Energy Consumption kWh/24h 0,86 Energy Consumption kWh/annuo 314 Freezing Capacity kg/24h 4 Rising Time 20 The Technical info are on the rating plate situated on the left inside the appliance. INSTALLATION Location The appliance should be installed well away from sources of heat such as radiators, boilers, direct sunlight etc.
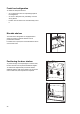
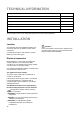
I nstructions for totally built-in appliances Door reversibility P P A P1 P1 D114 Right opening Left opening Remove the pins (P) and (P1) Remove (P) from both sides and the door. Remove the middle hinge (A) and refit it on the opposite side. Refit the door and (P) on the left side. Remove (P1) from the right side. 50 mm Dimensions of the recess Height 1780 mm Depth 550 mm Width 560 mm The applianceÕs door has been locked in position for transport by means of pins on both sides.
Push appliance into the housing until stop strip (A) touches the kitchen unit. A D023 If after having carried out the previously described operation there is still some space left between the appliance and the kitchen unit, fit the trimming provided together with the appliance on the stop strip (A). A D265 Open the door and push the appliance against the side of the kitchen unit opposite to that of appliance hinges. Fasten the appliance with 4 screws provided in the kit included with the appliance.
Apply covers (B) on joint cover lugs and into hinge holes. B D726 Separate parts A, B, C, D as shown in the figure B A C D PR266 50mm Place guide (A) on the inside part of the furniture door, up and down as shown in the figure and mark the position of external holes. After having drilled holes, fix the guide with the screws supplied. A 20 m m PR166 Fix cover (C) on guide (A) until it clips into place.
Open the appliance door and the furniture door at 90¡. Insert the small square (B) into guide (A). Put together the appliance door and the furniture door and mark the holes as indicated in the figure. Remove the squares and drill holes with ¿ 2 mm at 8 mm from the outer edge of the door. Place the small square on the guide again and fix it with the screws supplied. 8mm A PR167 B Should the lining up of the furniture door be necessary, use the clearance of slots.
Servicestellen Points de service Servizio post-vendita ZŸrich/MŠgenwil 5506 MŠgenwil Industriestrasse 10 1204 Gen•ve Rue des Rois 15 6915 Noranco Strada Noranco-Figino 8762 Schwanden Sernftalstrasse 1028 PrŽverenges Route dÕYverdon/Le TrŽsi 9202 Gossau Poststrasse 10 3966 RŽchy Route de Gr™ne 4133 Pratteln Rheinpark-Center Netzibodenstrasse 23 b 8400 Winterthur BŸrglistrasse 27 6020 EmmenbrŸcke RŸeggisingerstrasse 9 7000 Chur Ringstrasse 37 Service-Helpline 3063 Ittigen/Bern Ey 5 Ersatzteilverk