
User manual


10
Electrical connection
Before plugging in, ensure that the voltage and
frequency shown on the serial number plate
correspond to your domestic power supply. Voltage
can vary by ±6% of the rated voltage.
For operation with different voltages, a suitably sized
auto-transformer must be used.
The appliance must be earthed.
The power supply cable plug is provided with a
contact for this purpose.
If the domestic power supply socket is not earthed,
connect the appliance to a separate earth in
compliance with current regulations, consulting a
specialist technician.
The Manufacturer declines all responsibility if
the above safety precautions are not observed.
This appliance complies with the following
E.E.C. Directives:
- 87/308 EEC of 2/6/87 relative to radio interference
suppression.
- 73/23 EEC of 19.2.73 (Low Voltage Directive) and
subsequent modifications;
- 89/336 EEC of 3.5.89 (Electromagnetic
Compatibility Directive) and subsequent
modifications.
INSTALLATION
Location
The appliance should be installed well away from
sources of heat such as radiators, boilers, direct
sunlight etc.
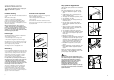
Ensure that air can circulate freely around the back
of the cabinet. To ensure best performance, if the
appliance is positioned below an overhanging wall
unit, the minimum distance between the top of the
cabinet and the wall unit must be at least 100 mm
(A). Ideally, however, the appliance should not be
positioned below overhanging wall units (B).
Accurate levelling is ensured by one or more
adjustable feet at the base of the cabinet.
A
B
NP004
100 mm10 mm
10 mm
Rear spacers
In the bag with the documentation, there are two
spacers which must be fitted in the two top
corners.
Slacken the screws and insert the spacer under the
screw head, then re-tighten the screws.
D594
19
Ancak iç kaplaman›n üstünde çok kal›n bir buzlanma
olufltu¤unda eritme ifllemi afla¤›daki flekilde
gerçeklefltirilmelidir:
1. Fifli çekin veya termostat dü¤mesini << O >>
ayar›na getirin.
2. Yiyecekleri ç›kart›n. Birkaç kat gazeteyle sararak
serin bir yerde muhafaza ediniz.
3. Kapıyı açık bırakınız;
4. Eritme ifllemi tamamlandı¤ında, iç kısmı iyice
kurulayınız;
5. Termostat dü¤mesini istenilen ayara geri çevirin
veya fifli tak›n.
6. ‹ki veya üç saat sonra ç›kard›¤›n›z yiyecekleri
tekrar bölmelere koyun.
Önemlidir:
Buharlaflt›r›c›daki (evaparatördeki) karlanmay›
temizlemek için hiçbir zaman keskin madeni
aletler kullanmay›n›z, aksi taktirde
buharlaflt›r›c›ya hasar verebilirsiniz.
Çözdürme ifllemini h›zland›rmak amac› ile üretici
taraf›ndan önerilenler d›fl›nda bir mekanik ayg›t
ya da suni yöntemler kullanmay›n›z.
Eritme ifllemi s›ras›nda donmufl g›dalar›n ›s›s›
artaca¤›ndan güvenli saklama süreleri
k›salabilecektir.
MÜfiTER‹ H‹ZMETLER‹ VE YEDEK PARÇA
E¤er cihaz düzgün çal›flm›yorsa flunlar› kontrol edin:
• Fifl tam olarak prize tak›l› ve ana açma/kapama
dü¤mesi aç›k m›?
• Elektrik geliyor mu? (baflka bir cihaz takarak
deneyin.)
• Termostat dü¤mesi do¤ru pozisyonda m›?
• E¤er kabinin alt›nda su tanecikleri varsa, su
süzdürme bölümünün t›kan›p t›kanmad›¤›n›
kontrol edin. (Çözdürme bölümüne bak›n›z)
• E¤er cihaz›n›z hala problemli çal›fl›yorsa
yukar›daki kontrolleri yapt›ktan sonra en yak›n
yetkili servisi aray›n›z.
H›zl› servis alabilmeniz için, baflvurdu¤unuzda
garanti belgesi veya cihaz›n içinde sol kenarda s›n›f
tabakas› üzerinde bulabilece¤iniz cihaz model ve
seri numaras›n› belirtiniz.