
User manual


11
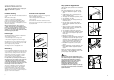
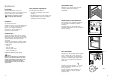
Door reversibility
Before carrying out any operations, remove the plug
from the power socket.
To change the opening direction of the door,
proceed as follows:
1. pull off the ventilation grille (D) which is clipped
into place;
2. remove the hole cover (G) and the bottom hinge
(E) by unscrewing its three fixing screws;
3. remove the lower door, sliding it out of the middle
hinge;
4. unscrew the middle hinge (H);
5. Remove the fridge door by releasing it from the
top hinge pin (G).
6. Remove the pin (G) then mount it on the opposite
side, after having removed the plugs which must
be refitted on the other side.
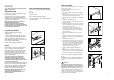
7. remove the two plugs of the door (where
available), discovering the holes for the hinge
pins, assemble them on the opposite side and
refit the upper door;
8. reassemble the middle hinge on the opposite
side;
9. using a 10 mm spanner, unscrew the hinge pin
(E) and reassemble it on the opposite side of the
hinge;
10. reassemble the lower door;
11. reassemble the lower hinge (E) on the opposite
side, using the screws previously removed; insert
the hole cover (G) on the lower hinge. Slide the
hole cover (F) out of the ventilation grille (D) by
pushing it in the direction of the arrow and
reassemble it on the opposite side;
12. refit the ventilation grille (D), clipping it into
place.
13.Dismantle the handles and reassemble them on
the opposite side. Cover the holes left open with
the plugs contained in the documentation pack.
The doors can be aligned by adjusting the middle
hinge.
The middle hinge can be adjusted horizontally, with
the help of a tool, after having slackened the two
screws.
Warning:
After having reversed the opening direction of
the doors check that all the screws are properly
tightened and that the magnetic seal adheres to
the cabinet. If the ambient temperature is cold (i.e.
in Winter), the gasket may not fit perfectly to the
cabinet. In that case, wait for the natural fitting of the
gasket or accelerate this process by heating up the
part involved with a normal hairdrier.
H
PR228
G
18
BAKIM
Herhangi bir temizlik ve bak›m iflleminden
önce fifli çekiniz.
Periyodik temizlik
Cihaz›n içini ›l›k su ve sodyum bikarbonatla siliniz.
‹yice durulay›p temizleyiniz.
Kondanser (siyah ›zgara) ve cihaz›n arkas›ndaki
kompresörü bir f›rça veya elektrik süpürgesiyle
temizleyin. Bu ifllem cihaz›n performans›n› art›racak
ve enerji tasarrufu sa¤layacakt›r.
Mutfak yüzeyleri için özel birçok deterjan, bu
cihazın plastik kısımlarına zarar
verebilecek/aflındıracak kimyasal maddeler
içerirler. Bu nedenle, bu cihazın dıfl kaplamasının,
küçük bir miktar sıvı bulaflık deterjanı içeren sıcak
suyla temizlenmesi tavsiye edilir.
Uzun Süre Kullan›lmayaca¤›nda
Cihaz uzun süre devre d›fl› kald›¤›nda flu önlemleri
al›n›z :
Fifli ç›kart›n.
Yiyecekleri ç›kart›n.
‹çini ve aksesuarlar› çözülmeye b›rak›n.
Hava ak›m› sa¤lamak ve kötü kokular› önlemek için
kap›y› aral›k b›rak›n.
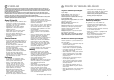
‹ç ayd›nlatma lambas›
So¤utucu bölümündeki lamba ampülüne
ulaflabilmek için:
- lambanın kapa¤ını tespit eden vidayı sökünüz
- hareketli parçayı flekilde gösterildi¤i gibi çıkartınız
E¤er kap› aç›ld›¤›nda ›fl›k yanmazsa yerine tam
olarak vidalanm›fl olup olmadı¤ını kontrol edin. E¤er
hala yanm›yorsa ampülü de¤ifltirin.
Ampülün de¤eri kapa¤›nda gösterilmifltir.
D037
D411
Eritme
Normal kullan›m s›ras›nda motor kompresörü her
devre d›fl› kald›¤›nda so¤utucu bölümündeki
buharlaflt›r›c›da biriken karlanma otomatik olarak
eritilir. Eritme sonucunda ortaya ç›kan su bir oluk
vas›tas› ile buzdolab›n›n arka taraf›nda, motor
kompresörünün üst k›sm›nda bulunan özel bir kapta
birikir ve orada buharlafl›r.
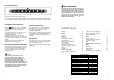
Suyun tafl›p g›dalar›n üstüne damlamas›n›
önlemek için so¤utucu bölmesi kanal›n›n
ortas›ndaki su tahliye deli¤i periyodik olarak
temizlenmelidir. Tahliye deli¤inin içinde bulunan
özel temizlik aletini kullan›n›z.
Ancak dondurucu bölümü zamanla karlanacakt›r. Bu
karlanma 4 mm .kal›nl›¤›na ulaflt›¤›nda buzdolab› ile
birlikte verilen özel plastik raspa ile temizlenmelidir.
Bu ifllem s›ras›nda buzdolab›n› kapatmak ya da
içindeki g›dalar› ç›kartmak gerekmemektedir.
Buharlaflt›r›c›daki karlanmay› temizlemek için
hiçbir zaman keskin madeni aletler
kullanmay›n›z, aksi taktirde buharlaflt›r›c›ya
hasar verebilirsiniz.