
User manual


14
CONTENTS
Warnings 13
Use 15
Cleaning the interior 15
Operation 15
Temperature regulation 15
Fresh food refrigeration 15
Movable shelves 16
Bottle rack 16
Positioning the door shelves 16
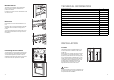
Freezing calendar 17
Freezing fresh food 17
Storage of frozen food 17
Thawing 17
Ice-cube production 17
Hints 18
Hints for refrigeration 18
Hints for freezing 18
Hints for storage of frozen food 18
Maintenance 19
Periodic cleaning 19
Periods of no operation 19
Interior light 19
Defrosting 19
Customer service and spare parts 20
Technical information 21
Installation 21
Location 21
Electrical connection 22
Rear spacers 22
Changing the opening direction of the doors 23
Installation
¥ During normal operation, the condenser and
compressor at the back of the appliance heat up
considerably. For safety reasons, minimum
ventilation must be as shown in the instructions.
Attention: keep ventilation openings clear of
obstruction.
¥ Care must be taken to ensure that the appliance
does not stand on the electrical supply cable.
Important: if the supply cord is damaged, it must
be replaced by a special cord or assembly availa-
ble from the manufacturer or its service agent.
¥ If the appliance is transported horizontally, it is
possible that the oil contained in the compressor
flows in the refrigerant circuit. It is advisable to
wait at least two hours before connecting the
appliance to allow the oil to flow back in the
compressor.
¥ There are working parts in this product which
heat up. Always ensure that there is adequate
ventilation as a failure to do this will result in
component failure and possible food loss. See
installation instructions.
¥ Parts which heat up should not be exposed.
Wherever possible the back of the product
should be against a wall.
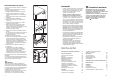
Environment Protection
This appliance does not contain gasses which
could damage the ozone layer, in either its
refrigerant circuit or insulation materials. The
appliance shall not be discarded together with
the urban refuse and rubbish. Avoid damaging
the cooling unit, especially at the rear near the
heat exchanger. Information on your local
disposal sites may be obtained from municipal
authorities. The materials used on this appliance
marked by the symbol are recyclable.
23
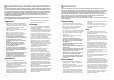
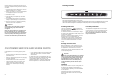
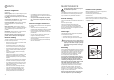
Door reversibility
Before carrying out any operations, remove the plug
from the power socket.
To change the opening direction of the door,
proceed as follows:
1. pull off the ventilation grille (D) which is clipped
into place;
2. remove the hole cover (G) and the bottom hinge
(E) by unscrewing its three fixing screws;
3. remove the lower door, sliding it out of the middle
hinge;
4. unscrew the middle hinge (H);
5. Remove the fridge door by releasing it from the
top hinge pin (G).
6. Remove the pin (G) then mount it on the opposite
side, after having removed the plugs which must
be refitted on the other side.
7. remove the two plugs of the door (where
available), discovering the holes for the hinge
pins, assemble them on the opposite side and
refit the upper door;
8. reassemble the middle hinge on the opposite
side;
9. using a 10 mm spanner, unscrew the hinge pin
(E) and reassemble it on the opposite side of the
hinge;
10. reassemble the lower door;
11. reassemble the lower hinge (E) on the opposite
side, using the screws previously removed; insert
the hole cover (G) on the lower hinge. Slide the
hole cover (F) out of the ventilation grille (D) by
pushing it in the direction of the arrow and
reassemble it on the opposite side;
12. refit the ventilation grille (D), clipping it into
place.
13.Dismantle the handles and reassemble them on
the opposite side. Cover the holes left open with
the plugs contained in the documentation pack.
The doors can be aligned by adjusting the middle
hinge.
The middle hinge can be adjusted horizontally, with
the help of a tool, after having slackened the two
screws.
Warning:
After having reversed the opening direction of
the doors check that all the screws are properly
tightened and that the magnetic seal adheres to
the cabinet. If the ambient temperature is cold (i.e.
in Winter), the gasket may not fit perfectly to the
cabinet. In that case, wait for the natural fitting of the
gasket or accelerate this process by heating up the
part involved with a normal hairdrier.
H
F
D
PR18
F
F
F
E
E
G
PR228
G