Refrigerator INSTRUCTION BOOKLET ER8817C GB 818 14 51--01/7 DK
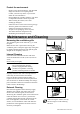
Important Safety Instructions GB Your new fridge may have other functions compared to your previous one. Carefully read these instructions to learn how the appliance works and how to care for it. Keep the instruction booklet. It will come in handy if you later sell the cabinet or give it to somebody else. These warnings are provided in the interests of your safety. Ensure that you understand them all before installing or using the appliance. Your safety is of paramount importance.
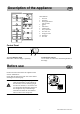
Description of the Appliance 7 1 Modell ER8817C 2 8 1 9 1 4 4 11 3 5 GB 1 1 11 1. Wire shelf 2. Bottle shelf 3. Dividing plate between fridge and chiller 4. Egg tray 5. Salad drawer 6. Ventilation grille 7. Dairy compartment 8. Door shelf + box 9. Hanging doorshelf 1 10. Bottle shelf 5 11. Door shelf 10 6 Control Panel A B A. Green indicator light Illuminates when the fridge is operating. B.
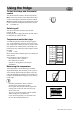
Using the fridge GB To start the fridge and thermostat control Turn the thermostat control to the desired position. MIN The lowest position of the thermostat control results in the highest temperature inside the cabinet. MAX The highest position of the thermostat control results in the lowest temperature inside the cabinet. H : Switched off. Switching off Turn the control anti-clockwise past the click position to "H". Unplug the power supply plug from the wall socket or, alternatively, remove the fuse.
Cabinet interior The shelves and door compartments are removable and can easily be re-arranged. Certain shelves must be lifted up by the rear edge to enable them to be removed. The lower door compartment and the glass shelf above the salad drawer must not be moved. They are required for proper air circulation inside the cabinet. Shelves with a raised edge should be placed with the raised edge facing the rear wall of the cabinet, and thus prevent food products from touching the cooling plate.
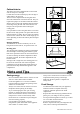
Protect the environment · Hand over the cabinet packaging and discarded · · · · · · fridges and freezers to a recycling station. Contact your local city office or your closest dealer for more information. Keep foodstuff in re-usable containers. Cut down on disposable material as much as possible. When cleaning the cabinet, use a mild washing-up detergent. Follow the advice in the section "Saving energy" The door gasket and coolant used in this cabinet will not harm the ozone layer.
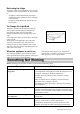
Defrosting the fridge The fridge is defrosted automatically every time the compressor stops. Frost formation can be prevented by: · not putting warm foodstuff inside the cabinet. · avoiding frequently opening the door or keeping it open too long. · not placing foodstuffs directly against the cold cooling plate. To Change the Light Bulb The light is switched on automatically when the door is opened. Before replacing the light bulb, disconnect the power plug from the outlet.
Water comes out on the floor. Place the drain hose at the back of the cabinet above the drain bowl. See the chapter "Before use" The compressor operates continuously. Set a warmer temperature. Make sure that the door is completely closed and that the rubber door seal is complete and clean. The temperature where the cabinet is placed is above normal room temperature. The cabinet does not operate at all. Cooling or interior light does not operate. No indicator lamps light.
Zanussi Service Force To contact your local Zanussi Service Center telephone 08705 929 929 NORWICH (M52) 2b Trafalgar Street Norwich NR1 3HN Hanbury Road Widford Ind Estate Chelmsford Essex CM12 3AE SUNBURY (M63) Unit 1a The Summit Hanworth Road Hanworth Ind Estate Sunbury on Thames TW16 5D Unit 14 Capitol Park Capitol Way Colindale London NW9 0EQ SOUTH EAST ASHFORD (M58) Unit 2 Bridge Road Business Estate Bridge Road Ashford Kent TN2 1BB ELTHAM (M78) 194 Court Road Mottingham Eltham London SE9 4
Zanussi Service Force To contact your local Zanussi Service Center telephone 08705 JERSEY Jersey Electricity Company PO Box 45 Queens Road St Helier Jersey Channel Islands JE4 8NY SCOTLAND 929 929 ORKNEY (M65) Corsie Domestics 7 King Street Kirkwall Orkney KW15 GRIMSBY (M42) 15 Hainton Avenue Grimsby South Humberside DN32 9AS PERTH Hydro Electric Inveralmond House Ruthervenfield Road Perth PH1 3AQ HULL (M41) Unit 1 Boulevard Industrial Estate Hull HU3 4AY Graham Begg Unit 4 Airport Ind Estate WI
Guarantee Conditions GB Standard Guarantee Conditions We, undertake that if within 12 months of the date of the purchase this appliance or any part thereof is proved to be defective by reason only of faulty workmanship or materials, we will, at our option repair or replace the same FREE OF CHARGE for labour, materials or carriage on condition that: · The appliance has been correctly installed and used only on the electrical supply stated on the rating plate.
Technical specification Model ER8817C Gross volume 379 l Width 595 mm Height 1800 mm Depth 600 mm Energy consumption 292 kWh/year Energy class C Rated power 110 W Weight 62 kg Number of compressors 1 Installation GB GB Unpacking Unpack the cabinet and check that it is in good condition and free of any transport damage. Notify the dealer immediately of any damage. Hand the packaging over for recycling. Do not allow children to play with the packaging.
Installing the cabinet To obtain the best performance from the cabinet, ensure : · the cabinet is placed in a dry, cool place and is not exposed to direct sunlight. · the cabinet is not placed close to a source of heat, e.g. a cooker or dishwasher. · the room in which the cabinet is placed has a temperature of +16C to +32C. · the cabinet is level. The cabinet should not lean against any wall. If necessary adjust the feet using the adjustment spanner supplied.
Door Reversal 1 1. Close the cabinet and disconnect the appliance from the electricity supply. 2 2. Remove the ventilation grille. There is a part on the grille that can be removed. Remove it and transfer to the opposite side. 3 3. Support the cabinet on a wooden block when it is laid down. This will make it easier to grip under the cabinet when resupporting to an upright position. 4. On the upper part of the cabinet. Remove the hinge pin and replace on the other side. 4 5.
qÜÉ=bäÉÅíêçäìñ=dêçìé=áë=íÜÉ=ïçêäÇDë=ä~êÖÉëí=éêçÇìÅÉê=çÑ=éçïÉêÉÇ=~ééäá~åÅÉë=Ñçê=âáíÅÜÉåI=ÅäÉ~åáåÖ=~åÇ=çìíÇççê=ìëÉK jçêÉ=íÜ~å=RR=ãáääáçå=bäÉÅíêçäìñ=dêçìé=éêçÇìÅíë=EëìÅÜ=~ë=êÉÑêáÖÉê~íçêëI=ÅççâÉêëI=ï~ëÜáåÖ=ã~ÅÜáåÉëI=î~Åììã=ÅäÉ~åÉêëI ÅÜ~áå=ë~ïë=~åÇ=ä~ïå=ãçïÉêëF=~êÉ=ëçäÇ=É~ÅÜ=óÉ~ê=íç=~=î~äìÉ=çÑ=~ééêçñK=rpa=NQ=Äáääáçå=áå=ãçêÉ=íÜ~å=NRM=ÅçìåíêáÉë ~êçìåÇ=íÜÉ=ïçêäÇK E Electrolux Household Appliances Limited 2000 MARIESTAD K--MJ