Refrigerator INSTRUCTION BOOKLET ER8817C GB 818 14 51--02/5 DK
Important Safety Instructions GB Your new fridge may have other functions compared to your previous one. These warnings are provided in the interests of your safety. Ensure that you understand them all before installing or using the appliance. Your safety is of paramount importance. If you are unsure about any of the meanings or warnings contact the Customer Care Department. Keep the instruction booklet. It will come in handy if you later sell the cabinet or give it to somebody else.
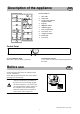
Description of the Appliance GB Modell ER8817C 7 1 2 1. 2. 3. Wire shelf Bottle shelf Dividing plate between fridge and chiller 4. Egg tray 5. Vegetable drawer 6. Ventilation grille 7. Dairy compartment 8. Door shelf + box 9. Hanging doorshelf 10. Bottle shelf 11. Door shelf 8 1 9 11 1 4 11 3 5 4 1 1 11 1 5 10 6 Control Panel A B A. Green indicator light Illuminates when the fridge is operating. B. Thermostat control Use to switch on and set the desired temperature in the fridge.
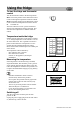
Using the fridge GB To start the fridge and thermostat control Turn the thermostat control to the desired position. MIN The lowest position of the thermostat control results in the highest temperature inside the cabinet. MAX The highest position of the thermostat control results in the lowest temperature inside the cabinet. H : Switched off. Allow the cabinet to run for a period of 24 hours whenever the temperature setting is changed. This will allow the temperature to stabilise inside the cabinet.
Cabinet interior The shelves and door compartments are removable and can easily be re-arranged. Certain shelves must be lifted up by the rear edge to enable them to be removed. The lower door compartment and the glass shelf above the salad drawer must not be moved. They are required for proper air circulation inside the cabinet. Shelves with a raised edge should be placed with the raised edge facing the rear wall of the cabinet, and thus prevent food products from touching the cooling plate.
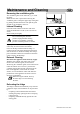
Maintenance and Cleaning GB Removing the ventilation grille The ventilation grille can be removed, e.g. to wash the grille. Make sure the door is open when removing the ventilation grille. Unsnap the upper edge of the grille by pulling outward/downward. Then pull the grille straight out to completely remove it. Internal Cleaning Clean the inside and the accessories with warm water and bicarbonate of soda (5 ml to 0,5 litre of water). Rinse and dry thoroughly.
To Change the Light Bulb The light is switched on automatically when the door is opened. Before replacing the light bulb, disconnect the power plug from the outlet. Fold the grille backward by unsnapping the front edge. Use a bulb of the same type, E14 socket, maximum rating of 25 W. When replacing the light bulb, use a bulb of the same type as the original one. The glass must measure at least 18 mm in diameter at the socket. This will ensure close fitting of the bulb against the rubber seal in the socket.
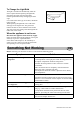
The compressor operates continuously. Set a warmer temperature. Make sure that the door is completely closed and that the rubber door seal is complete and clean. The temperature where the cabinet is placed is above normal room temperature. The cabinet does not operate at all. Cooling or interior light does not operate. No indicator lamps light. The power plug is not properly connected. The fuse has blown. The cabinet is not switched on. Power does not reach the cabinet.
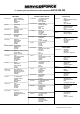
To contact your local Service Force Centre telephone 08705 CHANNEL ISLANDS GUERNSEY Guernsey Electricity PO Box 4 Vale, Guernsey Channel Islands GY1 3AD JERSEY Jersey Electricity Company Haut De L’orme Rue De Haut De L’orme Trinity Jersey Channel Islands JE3 5FG SCOTLAND ABERDEEN AUCHTERMUCHTY BLANTYRE 54 Claremont Street Aberdeen AB10 6RA 33a Burnside Auchtermuchty Fife KY14 7AJ Unit 5 Block 2 Auchenraith Ind.
To contact your local Service Centre telephone 08705 MIDLANDS BIRMINGHAM 66 Birch Road East Wyrley Trading Estate Witton Birmingham B6 7DB BOURNE Pinfold Road Bourne PE10 9HT BRIDGNORTH 68 St.
Guarantee Conditions GB Standard Guarantee Conditions We, undertake that if within 12 months of the date of the purchase this appliance or any part thereof is proved to be defective by reason only of faulty workmanship or materials, we will, at our option repair or replace the same FREE OF CHARGE for labour, materials or carriage on condition that: · The appliance has been correctly installed and used only on the electrical supply stated on the rating plate.
Technical specification Model ER8817C Gross volume 379 l Width 595 mm Height 1800 mm Depth 600 mm Energy consumption 292 kWh/year Energy class C Rated power 110 W Installation GB GB Unpacking Unpack the cabinet and check that it is in good condition and free of any transport damage. Notify the dealer immediately of any damage. Hand the packaging over for recycling. Do not allow children to play with the packaging. The plastic film can cause suffocation.
Installing the cabinet To obtain the best performance from the cabinet, ensure : · the cabinet is placed in a dry, cool place and is not exposed to direct sunlight. · the cabinet is not placed close to a source of heat, e.g. a cooker or dishwasher. · the cabinet is level. The cabinet should not lean against any wall. If necessary adjust the feet using the adjustment spanner supplied. · there is good air circulation around the cabinet and that the air channels below and behind the cabinet are not blocked.
Electrical connection Any electrical work required to install this appliance should be carried out by a qualified electrician or competent person. This appliance must be earthed. The manufacturer declines any liability should these safety measures not be observed. Electrical Requirements Before switching on, make sure the electricity supply voltage is the same as that indicated on the appliance rating plate. The appliance is supplied with a 13amp plug fitted.
Door Reversal 1 1. Close the cabinet and disconnect the appliance from the electricity socket. 2 2. Remove the ventilation grille. There is a part on the grille that can be removed. Reposition it and transfer to the opposite side. 3 3. Support the cabinet on a wooden block when it is laid down. This will make it easier to grip under the cabinet when resupporting to an upright position. 4. On the upper part of the cabinet. Remove the hinge pin and replace on the other side. 4 5.
qÜÉ=bäÉÅíêçäìñ=dêçìé=áë=íÜÉ=ïçêäÇDë=ä~êÖÉëí=éêçÇìÅÉê=çÑ=éçïÉêÉÇ=~ééäá~åÅÉë=Ñçê=âáíÅÜÉåI=ÅäÉ~åáåÖ=~åÇ=çìíÇççê=ìëÉK jçêÉ=íÜ~å=RR=ãáääáçå=bäÉÅíêçäìñ=dêçìé=éêçÇìÅíë=EëìÅÜ=~ë=êÉÑêáÖÉê~íçêëI=ÅççâÉêëI=ï~ëÜáåÖ=ã~ÅÜáåÉëI=î~Åììã=ÅäÉ~åÉêëI ÅÜ~áå=ë~ïë=~åÇ=ä~ïå=ãçïÉêëF=~êÉ=ëçäÇ=É~ÅÜ=óÉ~ê=íç=~=î~äìÉ=çÑ=~ééêçñK=rpa=NQ=Äáääáçå=áå=ãçêÉ=íÜ~å=NRM=ÅçìåíêáÉë ~êçìåÇ=íÜÉ=ïçêäÇK MARIESTAD DT--AV