
User manual


13
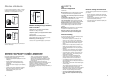
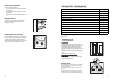
Zmiana kierunku otwierania drzwi
Przed przystàpieniem do wykonywania
jakichkolwiek czynnoÊci nale˝y wyjàç wtyczk´ z
gniazdka zasilajàcego.
Aby zmieniç kierunek otwierania drzwi, nale˝y
postàpiç nast´pujàco:
1. wyciàgnàç kratk´ wentylacyjnà (D);
2. wyjàç dolny zawias (E), odkr´cajàc Êruby s∏u˝àce
do jego zamocowania;
3. wyjàç dolne drzwi, wyjmujàc je z zawiasu
Êrodkowego;
4. wyjàç zawias Êrodkowy (H);
5. wyjàç górne drzwi, wyjmujac je z trzpienia
górnego (G);
6. odkr´ciç górny trzpieƒ (G) i umieÊciç go po
przeciwnej stronie;
7. wyjàç dwie zaÊlepki z drzwi (jeÊli zosta∏y
przewidziane), w celu uzyskania otworów
s∏u˝àcych do za∏o˝enia zawiasu, po czym
umieÊciç je z przeciwnej strony, a nast´pnie
za∏o˝yç drzwi górne;
8. zamocowaç zawias Êrodkowy po przeciwnej
stronie;
9. za∏o˝yç dolne drzwi;
10. kluczem 10 mm odkr´ciç trzpieƒ zawiasu (E) i
za∏o˝yç go po przeciwnej stronie tego samego
zawiasu;
11. zamocowaç dolny zawias (E) po przeciwnej
stronie przy pomocy poprzednio wyj´tych Êrub.
Wyjàç zaÊlepk´ (F) z kratki wentylacyjnej (D)
wciskajàc jà zgodnie z kierunkiem strza∏ki, a
nast´pnie za∏o˝yç po przeciwnej stronie.
12. ponownie za∏o˝yç kratk´ wentylacyjnà (D)
poprzez wciÊni´cie.
13.Odkr´ciç uchwyty. Przek∏uç zaÊlepki przy
pomocy ostrego narz´dzia, zamocowaç uchwyty
po przeciwnej stronie. Zakryç pozosta∏e po
uchwytach otwory zaÊlepkami znajdujàcymi si´ w
opakowaniu z dokumentacjà.
Wzajemne ustawienie osiowe drzwi uzyskuje si´
poprzez poziomà regulacj´ zawiasu Êrodkowego (H)
przy pomocy w∏aÊciwego przyrzàdu, po uprzednim
poluzowaniu dwóch Êrub (por. rys.).
Uwaga:
Po prze∏o˝eniu drzwi nale˝y sprawdziç, czy
wszystkie Êruby sà dobrze dokr´cone i czy
uszczelka magnetyczna w∏aÊciwie przylega do
obudowy. Je˝eli temperatura otoczenia jest niska
(np. zimà) i uszczelka przylega niedok∏adnie, mo˝na
poczekaç na jej powrót do naturalnego stanu lub
przyspieszyç ten proces, ogrzewajàc wymagajàcy
tego odcinek zwyk∏à suszarkà do w∏osów.
G
H
F
F
D
F
F
E
E
16
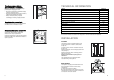
Cleaning the interior
Before using the appliance for the first time, wash
the interior and all internal accessories with luke-
warm water and some neutral soap so as to remove
the typical smell of a brand-new product, then dry
thoroughly.
USE
Control panel
A. Pilot light
B. N-S operating control light
C. Normal/Super (quick-freezing) switch
D. Thermostat knob
Do not use detergents or abrasive
powders, as these will damage the finish.
CB
D
A
ON
N-S
Temperature regulation
The temperature is automatically regulated and can
be increased to achieve a higher temperature
(warmer) by rotating the thermostat knob toward
lower settings or reduced (colder) rotating the knob
towards higher settings.
However, the exact setting should be chosen
keeping in mind that the temperature inside the
refrigerator depends on:
• room temperature;
• how often the door is opened;
• the quantity of food stored;
• location of appliance.
A medium setting is generally the most suitable.
USE OF THE FRIDGE
Operation
Insert the power supply plug into the nearest wall
socket.
Turn the thermostat knob (D) to the right to a
medium setting.
The pilot light (C) will light up.
To turn off the refrigerator, turn the thermostat knob
to the «■» position.
Quick-freezing
For quick-freezing, press the N/S switch (B). The
quick-freezing indicator light (A) will then light up.
Freezing fresh food
The 4-star compartment is suitable for
long term storage of commercially frozen food, and
for freezing fresh food.
To freeze fresh foods press the quick freezing switch
at least 12 hours before introducing the food into the
freezer in order to ensure better freezing results.
Place the food to be frozen on the upper
compartment.
Important
If the ambient temperature is high or the
appliance is fully loaded, and the appliance is
set to the lowest temperatures, it may run
continuously causing frost to form on the rear
wall. In this case the dial must be set to a higher
temperature to allow automatic defrosting and
therefore reduced energy consumption.