
User manual


4
Czyszczenie wn´trza
Przed rozpocz´ciem u˝ytkowania nowego
urzàdzenia nale˝y umyç starannie jego wn´trze i
wszystkie akcesoria letnià wodà z ∏agodnym
detergentem, w celu usuni´cia zapachu typowego
dla fabrycznie nowego wyrobu, a nast´pnie
dok∏adnie osuszyç mi´kkà szmatkà.
Nie nale˝y u˝ywaç detergentów i Êrodków
szorujàcych, mogàcych uszkodziç
powierzchni´ urzàdzenia.
KORZYSTANIE Z CHLODZIARKI
Uruchomienie
W∏o˝yç wtyczk´ do najbli˝szego gniazdka w Êcianie.
Przekr´ciç pokr´t∏o termostatu (D) w prawo na
pozycj´ poÊrednià.
Lampka (C) zaÊwieci si´.
W celu wy∏àczenia lodówki, przekr´ciç pokr´t∏o
termostatu na pozycj´ «».
Regulacja temperatury
Regulacja temperatury odbywa si´ automatycznie.
Przestawienie pokr´t∏a termostatu na ni˝szà wartoÊç
powoduje wzrost temperatury wewn´trznej.
Temperatura spada wraz z przestawieniem pokr´t∏a
na wy˝szà wartoÊç.
W∏aÊciwy wybór temperatury uzale˝niony jest od
nast´pujàcych czynników:
• temperatury otoczenia
• cz´stotliwoÊci otwierania drzwi
• iloÊci przechowywanej ˝ywnoÊci
• lokalizacji urzàdzenia.
Ustawienie temperatury w pozycji poÊredniej jest
zalecane przy normalnym u˝ywaniu sprz´tu.
UU˚˚YTKOWANIE
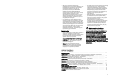
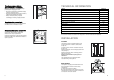
Panel sterujàcy
CB
D
A
ON
N-S
A.
Lampka kontrolna zasilania
B.
Lampka kontrolna szybkiego zamra˝ania
C.
Pokr´t∏o szybkiego zamra˝ania
D.
Pokr´t∏o termostatu
Wa˝ne:
JeÊli temperatura otoczenia jest wysoka lub
urzàdzenie jest maksymalnie wype∏nione i
ustawione na najni˝szà temperatur´, urzàdzenie
b´dzie pracowaç bez przerwy powodujàc
gromadzenie si´ lodu na tylnej Êcianie. W tym
wypadku nale˝y przestawiç termostat na ni˝szà
wartoÊç, umo˝liwiajàc samoczynne rozmra˝anie i
obni˝ajàc zu˝ycie energii.
Szybkie zamra˝anie
W∏àczenie szybkiego zamra˝ania wymaga
wciÊni´cia wy∏àcznika (B). Zapala si´ lampka
kontrolna (A).
Zamra˝anie Êwie˝ej ˝ywnoÊci
Komora oznaczona 4 gwiazdkami jest
przeznaczona do d∏ugoterminowego
przechowywania mro˝onek i do zamra˝ania Êwie˝ej
˝ywnoÊci. Nie nale˝y przekraczaç daty wa˝noÊci
podanej przez producenta na oryginalnym
opakowaniu.
Aby zamroziç Êwie˝à ˝ywnoÊç, nale˝y ustawiç
funkcj´ szybkiego mro˝enia 12 godzin przed
w∏o˝eniem ˝ywnoÊci.
˚ywnoÊç przeznaczonà do zamro˝enia nale˝y
umieÊciç w górnej cz´Êci komory zamra˝arki.
25
H
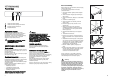
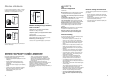
Door reversibility
Before carrying out any operations, remove the plug
from the power socket.
To change the opening direction of the door,
proceed as follows:
1. pull off the ventilation grille (D) which is clipped
into place;
2. remove the bottom hinge (E) by unscrewing its
fixing screws;
3. remove the lower door, sliding it out of the middle
hinge;
4. unscrew the middle hinge (H);
5. remove the upper door, releasing it from the
upper pin (G);
6. unscrew the upper pin (G) and refit it on the
opposite side;
7. remove the two plugs of the door (where
available), discovering the holes for the hinge
pins, assemble them on the opposite side and
refit the upper door;
8. reassemble the middle hinge on the opposite
side;
9. reassemble the lower door;
10. using a 10 mm spanner, unscrew the hinge pin
(E) and reassemble it on the opposite side of the
hinge;
11. reassemble the lower hinge (E) on the opposite
side, using the screws previously removed. Slide
the hole cover (F) out of the ventilation grille (D)
by pushing it in the direction of the arrow and
reassemble it on the opposite side;
12. refit the ventilation grille (D), clipping it into
place.
13.Unscrew the handles. Refit them on the opposite
side after having pierced the plugs with a punch.
Cover the holes left open with the plugs
contained in the documentation pack.
To line up the doors, it is possible to adjust the
middle hinge (H) horizontally by means of a tool,
after slackening the two screws (see figure).
Warning:
After having reversed the opening direction of
the doors check that all the screws are properly
tightened and that the magnetic seal adheres to
the cabinet. If the ambient temperature is cold
(i.e. in Winter), the gasket may not fit perfectly to
the cabinet. In that case, wait for the natural
fitting of the gasket or accelerate this process by
heating up the part involved with a normal
hairdrier.
G
F
F
D
F
F
E
E