
User manual


15
D338
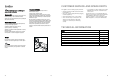
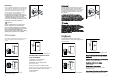
Nastavitelné poliãky
Na bocích chladniãky se nachází nûkolik pfiíchytek,
na nûÏ se umistují ro‰ty do rÛzn˘ch poloh.
Rozmístûní poliãek vestavûn˘ch do dvefií
Aby bylo moÏné skladovat balené potraviny rÛzn˘ch
rozmûrÛ, mÛÏete poliãky vestavûné do dvefií
rozmístit do rÛzn˘ch v˘‰kov˘ch poloh.
Pfii tûchto úpravách postupujte takto: postupnû
vysunujte poliãku ve smûru oznaãeném ‰ipkou,
dokud se celkem neuvolní a pak ji umístûte do
poÏadované pozice.
RRAADY
RRaady pro pouÏití chladniãky
UÏiteãné rady:
Masa (v‰ech druhÛ):
zabalte do polyetylénov˘ch
sáãkÛ a umístûte na sklenûnou polici nad zásuvkou
na ovoce a zeleninu.
Pro jistotu maso skladujte tímto zpÛsobem pouze
jeden aÏ dva dny.
Vafiené potraviny, studená jídla atd.:
tyto potraviny
by mûly b˘t pfiikryty a umístûny na jednotlivé ro‰ty.
Ovoce a zelenina:
tyto potraviny by mûly b˘t
oãi‰tûny a uskladnûny do pfiíslu‰né zásuvky.
Máslo a s˘ry:
by mûly b˘t umístûny do zvlá‰tních
hermetick˘ch nádob nebo zabaleny do alobalu nebo
polyethylénov˘ch sáãkÛ, aby se k nim vzduch dostal
co nejménû.
Láhve s mlékem:
mûly by b˘t uzavfieny víãkem a
uloÏeny v poliãce pro lahve ve dvefiích.
Banány, brambory, cibule a ãesnek: pokud nejsou
zabaleny, nelze je skladovat v chladniãce.
30
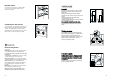
INSTALLATION
Location
The appliance should be installed well away from
sources of heat such as radiators, boilers, direct
sunlight etc. For safety reasons, minimum ventilation
must be as shown in Fig.
Appliance positioned under overhanging kitchen wall
units (see Fig. A).
Appliance positioned without overhanging kitchen
wall units (see Fig. B).
Attention: keep ventilation openings clear of
obstruction.
Two adjustable feet at the cabinet base allow
accurate levelling of the appliance.
100 mm10 mm
10 mm
A
B
NP00
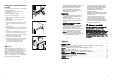
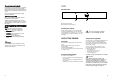
Shelf holders
Your appliance is equipped with shelf retainers that
make it possible to secure the shelves during
transportation.
To remove them proceed as follows:
Move the shelf retainers in the direction of the arrow,
raise the shelf from the rear and push it forward until
it is freed and remove the retainers.
A
C
B
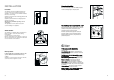
Rear spacers
In the bag with the documentation, there are two
spacers which must be fitted in the two top
corners.
Slacken the screws and insert the spacer under the
screw head, then re-tighten the screws.
D594