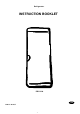
Refrigerator INSTRUCTION BOOKLET ERC3709 GB 818 21 42--01/1 DK
Important Safety Instructions Your new fridge may have other functions compared to your previous one. These warnings are provided in the interests of your safety. Ensure that you understand them all before installing or using the appliance. Your safety is of paramount importance. If you are unsure about any of the meanings or warnings contact the Customer Care Department. Keep the instruction booklet. It will come in handy if you later sell the appliance or give it to somebody else.
Contents Important Safety Instructions . . . . . . . 2 Internal Cleaning . . . . . . . . . . . . . . . . . . . . . . . . . . . External Cleaning . . . . . . . . . . . . . . . . . . . . . . . . . . Defrosting the fridge . . . . . . . . . . . . . . . . . . . . . . . . To Change the Light Bulb . . . . . . . . . . . . . . . . . . . . When the appliance is not in use . . . . . . . . . . . . . . . Scrapping old cabinets . . . . . . . . . . . . . . . . . . . . . . . 2 Contents . . . . . . . . . . . . . . . . .
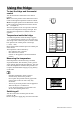
Description of the Appliance Model ERC3709 7 1 2 1. 2. 3. 4. 5. 6. 7. 8. 9. 10. 8 9 1 10 1 4 1 5 5 1 10 1 1 glass shelf bottle shelf bottle shelf egg holder vegetable drawer ventilation grille butter compartment door shelf +box sliding shelf door shelf 3 5 6 Control Panel A B A. Green pilot light Illuminates when the fridge is operating. B. Thermostat control knob Use to switch on and set the desired temperature in the fridge. Before use GB ·Remove all securing tapes.
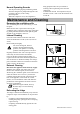
Using the fridge To start the fridge and thermostat control Turn the thermostat control knob to the desired position. MIN The lowest position of the thermostat control results in the highest temperature inside the cabinet. MAX The highest position of the thermostat control results in the lowest temperature inside the cabinet. H : Switched off. Allow the appliance to run for a period of 24 hours whenever the temperature setting is changed. This will allow the temperature to stabilise inside the appliance.
Cabinet interior The shelves and door compartments are removable and can easily be re-arranged. Certain shelves must be lifted up by the rear edge to enable them to be removed. The lower door compartment and the glass shelf above the salad drawer must not be moved. They are required for proper air circulation inside the cabinet. Shelves with a raised edge should be placed with the raised edge facing the rear wall of the cabinet, and thus prevent food products from touching the cooling plate.
Normal Operating Sounds · You may hear faint gurgling or bubbling sounds · when the refrigerant is pumped through the coils or tubing at the rear, to the cooling plate/evaporator. When the compressor is on, the refrigerant is · being pumped round, and you will hear a whirring sound or pulsating noise from the compressor. A thermostat controls the compressor and you will hear a faint " click" when the termostat cuts in and out.
To change the light bulb The light is switched on automatically when the door is opened. Before replacing the light bulb, disconnect the power plug from the outlet. Press the spring together and pull the grille downward at the same time. Use a bulb of the same type, E14 socket, maximum rating of 25 W. When the appliance is not in use Disconnect the appliance from electricity supply. Empty all foods and clean the appliance, leaving the doors ajar to prevent unpleasant smells.
Noise The refrigerating system will always produce some sounds. A pulsing sound is heard when coolant is pumped inside the cooling pipes. A ticking sound from the thermostat can be heard when the compressor switches on and off. The sound level varies depending on the operation of the cabinet. If you feel the sound level is incorrect: If the cushion spacers (between the cabinet wall and pipes) come loose, put them back in place again.
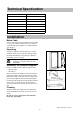
Technical Specification Model ERC3709 Gross volume 370 l Width 595 mm Height 1800 mm Depth 600 mm Energy consumption 179 kWh/year Energy class A Rated power 110 W Installation Mains Cable In the event of damage to the appliance's main cable, to avoid risks only an authorised service company recommended by the supplier or a qualified person may adjust it. Unpacking Unpack the appliance and check that it is in good condition and free of any transport damage.
Installing the appliance When two appliances are placed beside each other, the spacers enclosed in the plastic wrapping should be glued between the appliances. As shown in the illustration. To obtain the best performance from the appliance, ensure : · the appliance is placed in a dry, cool place and is not exposed to direct sunlight. · the appliance is not placed close to a source of heat, e.g. a cooker or dishwasher. · the appliance is level. The appliance should not lean against any wall.
Electrical connection Any electrical work required to install this appliance should be carried out by a qualified electrician or competent person. This appliance must be earthed. The manufacturer declines any liability should these safety measures not be observed. Electrical Requirements Before switching on, make sure the electricity supply voltage is the same as that indicated on the appliance rating plate. The appliance is supplied with a 13amp plug fitted.
Door Reversal 1 1. Close the appliance and disconnect the appliance from the electricity socket. 2 2. Remove the ventilation grille. There is a part on the grille that can be removed. Remove and reposition it on the opposite side. 3 3. Support the appliance on a wooden block when it is laid down. This will make it easier to grip under the appliance when returning to an upright position. 4. On the upper part of the appliance. Remove the hinge pin and replace on the other side. 4 5.
Electrolux 818 21 42-01/1 14
Electrolux 818 21 42-01/1 15
qÜÉ=bäÉÅíêçäìñ=dêçìé=áë=íÜÉ=ïçêäÇDë=ä~êÖÉëí=éêçÇìÅÉê=çÑ=éçïÉêÉÇ=~ééäá~åÅÉë=Ñçê=âáíÅÜÉåI=ÅäÉ~åáåÖ=~åÇ=çìíÇççê=ìëÉK jçêÉ=íÜ~å=RR=ãáääáçå=bäÉÅíêçäìñ=dêçìé=éêçÇìÅíë=EëìÅÜ=~ë=êÉÑêáÖÉê~íçêëI=ÅççâÉêëI=ï~ëÜáåÖ=ã~ÅÜáåÉëI=î~Åììã=ÅäÉ~åÉêëI ÅÜ~áå=ë~ïë=~åÇ=ä~ïå=ãçïÉêëF=~êÉ=ëçäÇ=É~ÅÜ=óÉ~ê=íç=~=î~äìÉ=çÑ=~ééêçñK=rpa=NQ=Äáääáçå=áå=ãçêÉ=íÜ~å=NRM=ÅçìåíêáÉë ~êçìåÇ=íÜÉ=ïçêäÇK MARIESTAD DT-AV © Electrolux plc 2003