Use & Care Manual Refrigerator EN Manuel d’utilisation et d’entretien Réfrigérateur FR Manual de uso y cuidado FrigorÍfico SP electrolux.com\register electrolux.
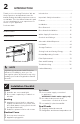
INTRODUCTION Thank you for choosing Electrolux. We are the progressive and premium home life brand, making desirable experiences more sustainable. This Use & Care Manual is part of our commitment to your experience for the life of your appliance. Purchase date Introduction.............................................................. 2 Important Safety information............................3 Features .....................................................................6 Installation...................
IMPORTANT SAFETY INFORMATION WARNING Please read all instructions before using this appliance. Safety Definitions This is the safety alert symbol. It is used to alert of potential personal injury hazards. Obey all safety messages that follow this symbol to avoid possible injury or death. DANGER DANGER indicates an imminently hazardous situation which, if not avoided, will result in death or serious injury.
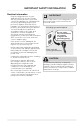
IMPORTANT SAFETY INFORMATION Child Safety Destroy or recycle the carton, plastic bags, and any exterior wrapping material immediately after the refrigerator is unpacked. Children should NEVER use these items to play. Cartons covered with rugs, bedspreads, plastic sheets or stretch wrap may become airtight chambers, and can quickly cause suffocation. Safety Instructions • DO NOT store or use gasoline, or other flammable liquids in the vicinity of this or any other appliance.
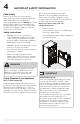
IMPORTANT SAFETY INFORMATION Electrical information • Plug the refrigerator into its own dedicated 115 Volt, 60 Hz., 15 Amp, AC only electrical outlet. The power cord of the appliance is equipped with a 3-prong grounding plug for your protection against electrical shock hazards. You must plug it directly into a properly grounded 3-prong receptacle. You must install the receptacle in accordance with local codes and ordinances. Consult a qualified electrician.
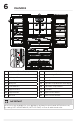
FEATURES H I G J F F K D F E L C F N M O B A B P Q R A Appliance Control Display J Slide Under ½ Width Shelves B Condiment Bins K Edge-to-edge Glass Shelf C L-Shaped Bin L Crispers D Water Dispenser M Water Filter E Dairy Bin N Adjustable Temp Drawer Control Display F Standard Bins O Adjustable Temp Drawer G Flipper Mullion P Ice Maker H Flipper Guide Q Upper Freezer Basket I Air Filter R Lower Freezer Basket IMPORTANT Accessories are available for your
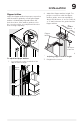
INSTALLATION 7 Tools Necessary: (OR) Phillips Head or Quadrex Head Screwdriver AND OR AND ⅜" and ¼" Socket Wrench 6mm Allen Wrench Components Provided: Top Hinge Cover Front Screw Top Hinge Cover Rear Screw OR Adjustable Wrench ⅜" Fixed Wrench WARNING This appliance is intended for use in residential household and similar interior applications such as: • Kitchen / Kitchenette Top Lower Hinge Hinge Screw Screw This Use & Care Manual provides general installation and operating instructions for
INSTALLATION 3. Ensure both doors are bind-free with their seals touching the cabinet on all 4 sides and the cabinet is stable. 4. After you level the unit, lower the antitip leg until it firmly contacts the floor. You may need to use an adjustable wrench for adjustment. NOTE If your refrigerator is placed with the door hinge side against a wall, you may have to allow additional space so the door can be opened wider.
INSTALLATION Flipper Mullion 2. Adjust the flipper mullion for proper connection with the mullion guide by ensuring the flipper mullion is folded and perpendicular to the fresh food door. If the mullion guide is not in the correct position, it could prevent the door from closing completely. 9 Adjust the flipper mullion height. For proper connection with the flipper mullion guide, ensure a separation about the thickness of a coin (0.060 in., or 1.5 mm) between the guide and the flipper mullion.
DOOR REMOVAL Getting through narrow spaces If your refrigerator will not fit through an entrance area, you can remove the doors. Check first by measuring the entrance. To prepare for removing the doors: 1. Make sure the electrical power cord is unplugged from the wall outlet. 2. Remove any food from the door shelves and close the doors. To remove refrigerator doors: 1.
DOOR REMOVAL 4. Remove the bulkhead cover at the rear of the unit to access water tubing. Disconnect the water tube at the pushlock connection on the rear of the unit below the bulkhead. The dispenser line is connected to the yellow water line coming from the main water valve. 11 NOTE You will be pulling approximately 5 ft. of water tube from the back of the refrigerator. Use care while pulling the water tube from the unit to be sure you do not kink the tube. 6. Open both doors to a 90° angle.
9. DOOR REMOVAL Unscrew the 3 bottom hinge screws and remove the bottom hinges. To reinstall the refrigerator doors: 1. Replace the 3 bottom hinge screws and hinges on both sides of the cabinet. Ensure the screws are tightly snug to hinges on both sides of the cabinet before reinstalling doors 2. Holding the door at a 90° angle, drop the pin down into the bottom hinge opening. Rotate it slightly in either direction until the door falls onto the hinge and is fully seated.
DOOR REMOVAL 13 To reset the door pin: NOTE Upon replacement, fully insert the tube up to the marking line. 3. Reinstall the top hinges and screws. 4. Insert and feed the water line back into the conduit at the top left door hinge until the tube reappears at the rear of the unit. If you remove the doors at less than a 40° angle, the pin returns to the home position.
DOOR REMOVAL Removing the Freezer Drawer CAUTION Replacing the Freezer Drawer 1. Extend the freezer slides from the unit. 2. Carefully align the support pin with the hooks on end of the freezer slides, and then lower the freezer door onto the slides. 3. Replace the 4 hex head screws that secure the slides to the door (2 on each side) and tighten. The drawer is heavy. Use caution when lifting. 1. Remove the 4 hex head drawer screws (2 per side) that secure the drawer to the slide assemblies. 2.
DOOR HANDLE INSTALLATION 15 CAUTION Wear gloves and safety goggles. Use extreme CAUTION when installing these handles. Door Handle Mounting Instructions Remove the handles from the carton and any other protective packaging. 2. Position the refrigerator handle end over the upper and lower preinstalled shoulder bolts (A) that are fastened into door, ensuring the holes for the set screws are facing toward the opposite door. 3.
WATER SUPPLY CONNECTION WARNING To avoid electric shock, which can cause death or severe personal injury, disconnect the unit from electrical power source before connecting a water supply line to the appliance. Before Installing the Water Supply Line, You Will Need: • Basic Tools: adjustable wrench, flat-blade screwdriver, and PhillipsTM screwdriver • Access to a household cold water line with water pressure between 30 and 100 psi. • A water supply line made of ¼ in. (6.
WATER SUPPLY CONNECTION To Connect the Water Supply Line To the Water Inlet Valve: 1. Disconnect the refrigerator from the electrical power source. 2. Place the end of the water supply line into a sink or bucket. Turn ON the water supply and flush the supply line until the water is clear. Turn OFF the water supply at the shutoff valve. 3. Remove the plastic cap from the water valve inlet and discard the cap.
5. WATER SUPPLY CONNECTION With the steel clamp and screw, secure the water supply line (copper tubing only) to the rear panel of refrigerator as shown. 6. Coil the excess water supply line (copper tubing only), about 2½ turns, behind refrigerator as shown and arrange coils so they do not vibrate or wear against any other surface. 7. Turn ON the water supply at shutoff valve and tighten any connections that leak. 8. Reconnect the appliance to electrical power source. 9.
CONTROLS AND SETTINGS 19 Internal Water Dispenser Appliance Control Display 1 Change Temperature Select the Freezer or Refrigerator icon to change the temperature. Press +/— buttons to set the temperature 3 4 5 6 7 8 -6˚F/-21˚C to 6˚F/-15˚C Refrigerator control range: 34˚F/1˚C to 44˚F/7˚C 2 Clear Alerts Resets any active alarms illuminated on the appliance control display (DOOR OPEN, HIGH TEMP, POWER OUTAGE).
CONTROLS AND SETTINGS Clear Alerts Sabbath Mode DOOR OPEN The Sabbath mode is a feature that disables portions of the refrigerator and its controls in accordance with observance of the weekly Sabbath and religious holidays within the Orthodox Jewish community. If the freezer or refrigerator doors have been left open for 5 minutes or more, an alarm will sound and the door open indicator illuminates on the display. Press CLEAR ALERTS to reset any system alarms.
AUTOMATIC WATER DISPENSER Your refrigerator is equipped with an internal water dispenser mounted inside the cabinet, on the left hand fresh food door. 1. Using the dispenser after installation 2. Water dispenser ON 21 Before dispensing, please ensure you enable Water Dispenser on the display (LEDs above the button are lit). Begin filling the system by pressing and holding a drinking glass against the water dispenser paddle. Water dispenser OFF 1.
ICE MAKER Ice Maker Operation and Care Ice maker tips After you install the refrigerator properly, the ice maker can produce ice within 24 hours. When using the ice maker for the first time, and in order for it to work properly, you need to clear air from the water tubing and the filter. Furthermore, if you do not flush the system, the first ice cubes may be discolored or have an odd flavor.
STORAGE FEATURES Shelves CAUTION To avoid personal injury or property damage, handle tempered glass shelves carefully. Shelves may break suddenly if nicked, scratched, or exposed to sudden temperature change. Allow the glass shelves to stabilize to room temperature before cleaning. Do not wash in the dishwasher. You can easily adjust shelf positions in the refrigerator compartments to suit your needs. The shelves have mounting brackets that attach to slotted supports at the rear of each compartment.
STORAGE FEATURES Drawers To remove the auto humidity control membrane: Your refrigerator includes a variety of storage drawers. 1. Remove crispers, crisper cover divider, and crisper cover from the unit. Crispers 2. Remove 3 screws on the bottom of the crisper cover to release the auto humidity cover. Crispers are designed for storing fruits, vegetables, and other fresh produce. Opening the Crisper Removing the Auto Humidity Control Membrane 3.
STORAGE FEATURES To remove the crisper for cleaning: 1. Pull the crisper out until it stops. 2. Lift the front slightly and remove it. 25 NOTE The gasket should be on the outside wall of the crisper after being removed and reinstalled into the unit. Removing the Crisper CAUTION Remove the PureAdvantage Produce Keeper™ prior to washing the crisper. To replace the crisper after cleaning: 1. Place the crisper on top of the deli cover and tilt upward slightly. 2.
STORAGE FEATURES Adjustable Temp Drawer 1 2 The Adjustable Temp Drawer is ideal for storing deli meats, cheese, and beverages. Using Your Adjustable Temp Drawer IMPORTANT Do not use the Adjustable Temp Drawer to store fresh produce as these items may freeze and cause damage to the fruits and leafy vegetables stored in the drawer. 3 4 1 Lock Control The drawer automatically locks to prevent any unwanted use. To change the drawer’s settings, you first need to unlock it.
STORAGE FEATURES 27 Doors Freezer Accessories Storage bins (varies by model) Your freezer has baskets and dividers you can adjust to suit your needs. The doors to your refrigerator compartment use a system of modular storage bins. You can remove all of these bins for easy cleaning. Some of them have fixed positions, while you can adjust others to suit your needs. To remove the upper freezer basket: 1. Open freezer drawer fully. 2. Extend the upper freezer drawer all the way out from the cabinet.
STORAGE FEATURES To replace the upper freezer basket: 1. 2. 3. 4. Open the freezer drawer completely. To remove the lower freezer basket: 1. Open freezer compartment completely. 2. Locate basket clips in the rear corners of the basket and pull them out to remove. Pull both upper slides out of the freezer compartment, extending them fully. 3. Lift the basket up and remove.
STORING FOOD AND SAVING ENERGY Ideas for storing foods Refrigerator storage • Keep the refrigerator compartment between 34°F and 40°F with an optimum temperature of 37°F. • Avoid overcrowding the refrigerator shelves, which reduces air circulation and causes uneven cooling. • Avoid placing food in front of air ports. (See CONTROLS AND SETTINGS for illustration.) Fruits and vegetables • Store fruits and vegetables in crispers, where trapped moisture helps preserve food quality for longer time periods.
NORMAL OPERATING SOUNDS NOTE NOTE Energy efficient foam in your refrigerator is not a sound insulator. During the automatic defrost cycle, a red glow in the back wall vents of your freezer compartment is normal. Understanding the sounds you may hear Your new, high-efficiency refrigerator may introduce unfamiliar sounds. These sounds normally indicate your refrigerator is operating correctly. Some surfaces on floors, walls, and kitchen cabinets may make these sounds more noticeable.
FILTER REPLACEMENT PureAdvantage™ AF-2™ Air Filter The air filter is located at the top of the air tower. 31 PureAdvantage™ PWF-1™Water & Ice Refrigerator Filter Your refrigerator is equipped with water filtering system. The water filter system filters all dispensed drinking water, as well as the water used to produce ice. The water filter is located at the bottom left of the refrigerator compartment next to the Adjustable Temp Drawer.
5. 6. 7. 8. 9. FILTER REPLACEMENT Push firmly until the cartridge snaps into place (you should hear a click as the cartridge engages the snap-in connector). Press a drinking glass against the water dispenser while checking for any leaks at the filter housing. Any spurts and sputters that occur as the system purges air out of the dispenser system are normal. After filling one glass of water, continue flushing the system for about 4 minutes. Turn On the ice maker(s).
FILTER REPLACEMENT PureAdvantage Produce Keeper™ Keep fruits and vegetables fresher longer with PureAdvantage Produce Keeper. Our produce keeper absorbs ethylene gas, the natural gas that causes produce to ripen quicker. Reduce food waste, save money and enjoy fresh-tasting produce with a longer storage life. Here are the product numbers to request when ordering: PureAdvantage Produce Keeper™ Refill Part # ELPAPKRF . Installing the PureAdvantage Produce Keeper: 1. Remove the plastic wrapper.
CARE AND CLEANING Protecting your investment Keeping your refrigerator clean maintains its appearance and prevents odor build-up. NOTE Do not use abrasive cleaners such as window sprays, scouring cleansers, flammable fluids, cleaning waxes, concentrated detergents, bleaches, or cleansers containing petroleum products on plastic parts, interior doors, gaskets, or cabinet liners. Do not use paper towels, scouring pads, or other abrasive cleaning materials.
CARE AND CLEANING 35 Vacation and moving tips Occasion Tips Short • Leave refrigerator operating during vacations of three weeks or less. Vacations • Use all perishable items from refrigerator compartment. • Turn automatic ice maker off and empty ice bucket, even if you will only be gone a few days. Long • Remove all food and ice if you will be gone one month or more. Vacations • Turn the cooling system off (see “Controls” section for location of On/Off button) and disconnect power cord.
TROUBLESHOOTING Let us help you troubleshoot your concern! This section will help you with common issues. If you need us, visit our website, chat with an agent, or call us. We may be able to help you avoid a service visit. If you do need service, we can get that started for you! 1-877-4ELECTROLUX (1-877-435-3287) Electrolux.com Concern Potential Cause Automatic Ice Maker Ice maker is not making any ice. Common Solution • Ice maker is turned off. • Turn on the ice maker.
TROUBLESHOOTING Concern Potential Cause Automatic Ice Maker (Cont’d) Ice maker is not making enough ice. 37 Common Solution • Ice maker is producing less ice than you expect. • The ice maker will produce approximately 2 to 2.5 lbs every 24 hours depending on usage conditions. • The water filter may be clogged with foreign material. • If water dispenses slower than normal, or if the filter is 6 months old or older, you should replace it. • The water supply line is kinked.
TROUBLESHOOTING Concern Potential Cause Dispenser (Ice & Water) Dispenser will not dispense ice. Common Solution • No ice in the bin to be dispensed. • See the Ice maker is not making any ice section above. • The refrigerator doors are not completely closed. • Be sure the refrigerator doors are completely closed. • Dispenser paddle has been pressed too long and the dispenser motor has overheated. • The motor overload protector will reset in about 3 minutes, and then you can dispense ice.
TROUBLESHOOTING 39 Concern Potential Cause Common Solution Opening/Closing Of Doors/Drawers Door(s) will not close. Drawers are difficult to move. • Door was closed too hard, causing other door to open slightly. • Close both doors gently. • Refrigerator is not level. It rocks on the floor when moved slightly. • Ensure the floor is level and solid, and can adequately support the refrigerator. Contact a carpenter to correct a sagging or sloping floor. • Refrigerator is touching a wall or cabinet.
TROUBLESHOOTING Concern Potential Cause Common Solution Water/Moisture/Frost Inside Refrigerator Moisture collects on inside the refrigerator walls. • Weather is hot and humid. • The rate of frost buildup and internal sweating increases. • Flipper mullion • Adjust the flipper mullion. (See Flipper Mullion in INSTALLATION.) Water collects on bottom side of the drawer cover. • Vegetables contain and give off moisture. • It is not unusual to have moisture on the bottom side of the cover.
LIMITED WARRANTY 41 Major Appliance Warranty Information Your appliance is covered by a one year limited warranty. For one year from your original date of purchase, Electrolux will repair or replace any parts of this appliance that prove to be defective in materials or workmanship when such appliance is installed, used, and maintained in accordance with the provided instructions.
electrolux.