Kühlschrank / refrigerator GEBRAUCHSANWEISUNGEN INSTRUCTION BOOKLET ERN 1572 ERN 2272 D 2222 744-63 GB
t Safety Instructions Please read these operating instructions carefully before installing the appliance. These warnings are provided in the interests of your safety. Ensure you fully understand them before installing or using the appliance. If you are unsure about the meaning of these warnings contact the Customer Care Department. Domestic Use ¥ The domestic refrigerators and freezers are designed to be used specifically for the storage of edible foodstuffs only.
Instructions for the use of the instructions booklet Notes which are important for your safety or for the proper functioning of the appliance Supplementary information regarding operation and practical applications of the appliance. Tips and notes concerning economical and environmentally sound use of the appliance Disposal Appliance Packaging Information ¥ The materials used on this appliance marked with the symbol are recyclable.
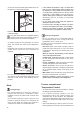
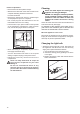
¥ To remove the internal shelf pull forward until it can be tipped up or down and removed. D338 ¥ If the ambient temperature is high, the thermostat knob is on the coldest setting (higher numbers) and the appliance is fully loaded, the compressor may run continuously, causing frost or ice to form on the evaporator. If this happens, turn the knob to a warmer setting (lower numbers) to allow automatic defrosting and so a saving in electricity consumption. ¥ Do not place warm foods inside the appliance.
the appliance run for at least two hours on the coldest setting, then turn the thermostat knob to the normal operating position. Interior Accessories Ice-cube production This appliance is equipped with one or more trays for the production of ice-cubes. Fill these trays with water, then put them in the freezer compartment. Do not use metallic instruments to remove the trays from the freezer.
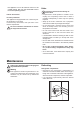
Freezer compartment ¥ Remove the frost with a plastic scraper. ¥ Whenever the thickness of the frost exceeds 5 mm complete defrosting should be carried out. Prooceed as follows: ¥ Remove any stored food, wrap it in several layers of newspaper and put it in a cool place. ¥ Pull out the plug from the wall socket or turn the thermostat knob to the ÇOÈ setting. ¥ Leave the door open, place a basin on the top shelf of the refrigerator compartment, under the drain hole, remove the plug as shown in the figure.
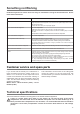
Something not Working Problems may be due to causes which can easily be solved before calling the Technical Service. Please follow these instructions: SYMPTOM SOLUTION Doors do not close Level properly the appliances if it is not well levelled. Weight surpasses the storage limit of the door shelf so spread weight more evenly or take some products out. Readjust the doors if they are not properly aligned. It is too warm inside the refrigerator Set a lower temperature.
Installation Take utmost care when handling your appliance so as not to cause any damages to the cooling unit with consequent possible fluid leakages. ¥ During normal operation, the condenser and compressor at the back of the appliance heat up considerably. Always ensure that there is adequate ventilation as a failure to do this will result in component failure and possible food loss. See installation instructions.
Door reversal The applianceÕs door has been locked in position for transport by means of pins on both sides. According to the door opening direction, remove relevant pins at the top and at the bottom. A Warning! If the ambient temperature is cold (i.e. in Winter), the gasket may not fit perfectly to the cabinet. In that case, wait for the natural fitting of the gasket or accelerate this process by heating up the part involved with a normal hairdrier.
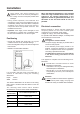
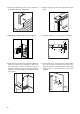
1. Slide the appliance into the recess, pushing it against the wall on the handle side. 4. Apply covers (B) on joint cover lugs and into hinge holes. A B D013 D022 2. Apply joint the sealing strip as shown in figure. 5. Separate parts A, B, C, D as shown in the figure. B A C D PR266 D132 3. Open the door and push the appliance against the side of the kitchen unit opposite to that of appliance hinges. Fasten the appliance with 4 screws provided in the kit included with the appliance.
7. Fix cover (C) on guide (A) until it clips into place. 10. Fix cover (D) on guide (B) until it clips into place. A B C D PR33/2 PR167/1 8. Open the appliance door and the furniture door at 90¡. Insert the small square (B) into guide (A). Put together the appliance door and the furniture door and mark the holes as indicated in the figure. Remove the squares and drill holes with ¯ 2 mm at 8 mm from the outer edge of the door.
923 692 683 / 923 458 605 ELECTROLUX HOME PRODUCTS OPERATIONS EUROPE