K ü h l s c h r a n k / r e f r i g e r a t o r / хoлoдильник GEBRAUCHSANWEISUNGEN INSTRUCTION BOOKLET РУКОВОДСТВО ПО ЭКСПЛУАТАЦИИ ERN 15500 ERN 22501 D GB 2222 744-65 RUS
D Sicherheitshinweise Bevor Sie Ihr neues KŠltegerŠt in Betrieb nehmen, lesen Sie bitte diese Gebrauchsanweisung aufmerksam durch. Diese sind Sicherheitshinweise. Wir ersuchen Sie daher, die folgenden Punkte vor der Installation des Gerätes und seiner Inbetriebnahme aufmerksam durchzulesen. Es wird empfohlen, diese Gebrauchsanweisung gut aufzubewahren und bei einem eventuellen Verkauf des Gerätes dem neuen Besitzer auszuhändigen.
Hinweise zur Benutzung der Gebrauchsanweisung Die folgenden Symbole erleichtern das Lesen der Gebrauchanweisung: Sicherheitshinweise bezŸglich der Benutzung des GerŠtes RatschlŠge fŸr den korrekten Gebrauch und die optimale Ausnutzung des GerŠtes. Informationen zum Umweltschutz Entsorgung Verpackungsmaterialien ¥ Die mit dem Symbol gekennzeichneten Materialien sind recyclingfŠhig. >PE<=PolyŠthylen >PS<=Polystyrol >PP<=Polypropylen SŠmtliche Verpackungsmaterialien sind recyclingfŠhig.
KŸhlabteilausstattung Tips Abstellregale ¥ Zur besseren Reinigung kann die obere Ablage genommen werden. ¥ Zur Einlagerung von Lebensmittel-Packungen verschiedener Grš§e, sind die Abstellregale hšhenverstellbar. ¥ Dazu die AbstellflŠche soweit nach vorne ziehen, bis sie sich nach oben oder unten abschwenken und herausnehmen lŠ§t. D338 ¥ Das Einsetzen in eine andere Hšhe bitte in umgekehrter Reihenfolge vornehmen.
Gefrierabteil Inbetriebnahme ¥ Der Thermostatknopf regelt das KŸhl- und Gefrierabteil. ¥ FŸr das Einfrieren von Lebensmitteln ist es nicht nštig die Einstellung des Thermostatknopfes von der Ÿblichen Normalstellung zu Šndern. ¥ Nach einem lŠngeren Stillstand oder bei der ersten Inbetriebnahme des GerŠtes mu§ vor der Einlagerung der TiefkŸhlkost die hšchste Stellung des Thermostatknopfes gewŠhlt werden. Nach ca. 2 Std. kann dieser auf eine mittlere Stellung zurŸckgedreht werden.
Gefrierraum ¥ Die Reifschicht mit einem Plastikschaber abkratzen. ¥ Wenn im Gefrierabteil die Eisschicht stŠrker als ca. 5 mm ist, tauen Sie Ihr GerŠt ab. Um ein vollstŠndiges Abtauen durchzufŸhren, geht man wie folgt vor: ¥ TiefkŸhlgut herausnehmen, in mehrere Lagen Zeitungspapier einpacken und abgedeckt an einem kŸhlen Ort lagern. ¥ Thermostatknopf auf ÇOÈ einstellen oder Stecker aus der Steckdose herausziehen; ¥ TŸr offen lassen. Ein GefŠ§ auf den ersten Rost direkt unter das Ablaufloch stellen.
Wenn etwas nicht funktioniert Falls das GerŠt Stšrungen aufweisen sollte, bevor Sie den Kundendienst verstŠndigen, ŸberprŸfen Sie zuerst folgendes: Störung Abhilfe Im GerŠt wird es nicht kalt genug Der Drehknopf auf kŠltere Temperatur drehen. Die Lebensmittel mŸssen so eingelagert werden, dass die KŠlte um sie frei zirkulieren kann. TŸr richtig schlie§en. Die Umgebungstemperatur ist zu warm. GerŠt kŸhlt zu stark. Der Drehknopf auf wŠrmere Temperatur drehen.
Installation Vor der Installation sicherstellen, dass das GerŠt nicht beschŠdigt ist. Mšgliche TransportschŠden sind dem HŠndler unverzŸglich mitzuteilen. ¥ WŠhrend das GerŠt in Betrieb ist, werden der VerflŸssiger und der Kompressor, die sich auf der RŸckseite des GerŠtes befinden, hei§. Aus GrŸnden der Sicherheit muss eine MindestbelŸftung gesichert sein. Siehe Aufstellungsanweisungen. ¥ Wichtig: Beschädigte Versorgungskabel müssen durch ein Spezialkabel bzw.
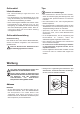
Wichtig Es muss mšglich sein, das GerŠt vom Netz zu trennen; nach der Installation muss die Steckdose daher zugŠnglich bleiben. TŸranschlag wechseln Zur Transportsicherung wurde die GerŠtetŸr an beiden Auschlagseiten mit Scharnierstiften befestigt. Je nach TŸranschlag, Scharnierstift auf einer Seite oben und unten entfernen. A Achtung! Bei einer niedrigen Raumtemperatur (z.B. im Winter) kann es vorkommen, dass die Dichtung nicht perfekt am Schrank haftet.
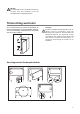
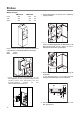
Einbau Ma§zeichnungen ERN 15500 Hšhe Tiefe Breite ERN 22501 880 550 560 540 1225 550 560 mm mm mm 2. Fugenabdeckprofil am GerŠt, wie in Abbildung gezeigt ankleben. 50 3 2 I 1 PR0 Ferner ist auch am hinteren Einbauschrankteil ein LŸftungskamin mit folgenden Massen notwendig: Tiefe 50 mm Breite 540 mm 3. T Ÿ r šffnen und GerŠt gegenŸber der Bandseite an die Mšbelseitenwand rŸcken. GerŠt mit den 4 beiliegenden Schrauben (I) befestigen. D C 1 E B 2 D022 1.
ca. 50 mm 8mm 90° 21 m m 90° K Ha ca. 50 mm 21 m m 6. Die Schiene auf der Innenseite der MšbeltŸr oben und unten auflegen (siehe Abb.) und die Position der Šu§eren Bohrlšcher anzeichnen. Nachdem die Lšcher gebohrt wurden, die Schiene mit den mitgelieferten Schrauben befestigen. PR167 9. Die Winkeleisen entfernen und 8 mm vom Šusseren Rand der TŸr mit dem Nagel (K) kennzeichnen. Ha Hc Hb PR33 PR168 7. Die Abdeckung (Hc) in die Scheine (Ha) eindrŸcken, bis sie einrastet. 10.
t Safety Instructions Please read these operating instructions carefully before installing the appliance. These warnings are provided in the interests of your safety. Ensure you fully understand them before installing or using the appliance. If you are unsure about the meaning of these warnings contact the Customer Care Department. Domestic Use ¥ The domestic refrigerators and freezers are designed to be used specifically for the storage of edible foodstuffs only.
Instructions for the use of the instructions booklet Notes which are important for your safety or for the proper functioning of the appliance Supplementary information regarding operation and practical applications of the appliance. Tips and notes concerning economical and environmentally sound use of the appliance Disposal Appliance Packaging Information ¥ The materials used on this appliance marked with the symbol are recyclable.
¥ To permit storage of food packages of various sizes, the shelves can be placed at different heights. ¥ To remove the internal shelf pull forward until it can be tipped up or down and removed. compressor to switch on unnecessarily often. ¥ If the ambient temperature is high, the thermostat knob is on the coldest setting (higher numbers) and the appliance is fully loaded, the compressor may run continuously, causing frost or ice to form on the evaporator.
the appliance run for at least two hours on the coldest setting, then turn the thermostat knob to the normal operating position. Interior Accessories Ice-cube production This appliance is equipped with one or more trays for the production of ice-cubes. Fill these trays with water, then put them in the freezer compartment. Do not use metallic instruments to remove the trays from the freezer.
Freezer compartment ¥ Remove the frost with a plastic scraper. ¥ Whenever the thickness of the frost exceeds 5 mm complete defrosting should be carried out. Prooceed as follows: ¥ Remove any stored food, wrap it in several layers of newspaper and put it in a cool place. ¥ Pull out the plug from the wall socket or turn the thermostat knob to the ÇOÈ setting. ¥ Leave the door open, place a basin on the top shelf of the refrigerator compartment, under the drain hole, remove the plug as shown in the figure.
Something not Working Problems may be due to causes which can easily be solved before calling the Technical Service. Please follow these instructions: SYMPTOM SOLUTION Doors do not close Level properly the appliances if it is not well levelled. Weight surpasses the storage limit of the door shelf so spread weight more evenly or take some products out. Readjust the doors if they are not properly aligned. It is too warm inside the refrigerator Set a lower temperature.
Installation Take utmost care when handling your appliance so as not to cause any damages to the cooling unit with consequent possible fluid leakages. ¥ During normal operation, the condenser and compressor at the back of the appliance heat up considerably. Always ensure that there is adequate ventilation as a failure to do this will result in component failure and possible food loss. See installation instructions.
Door reversal The applianceÕs door has been locked in position for transport by means of pins on both sides. According to the door opening direction, remove relevant pins at the top and at the bottom. A Warning! If the ambient temperature is cold (i.e. in Winter), the gasket may not fit perfectly to the cabinet. In that case, wait for the natural fitting of the gasket or accelerate this process by heating up the part involved with a normal hairdrier.
1 D 2 C E B D022 1. Fit the appliance in the niche by making sure that it stands against the interior surface of the unit on the side where the door hinges of the appliances are fitted. Insert the appliance until the upper strip butts up against the unit (1) and make sure that the lower hinge is in line with the surface of the unit (2). 4. Snap vent grille (B) and hinge cover (E) into position. Apply covers (C-D) on joint cover lugs and into hinge holes. Hb Ha Hc Hd D132 PR266 2.
Ha Hc Hb PR168 PR33 7. Fix cover (Hc) on guide (Ha) until it clips into place. 10. Place the small square on the guide again and fix it with the screws supplied. Should the lining up of the furniture door be necessary, use the clearance of slots. At the end of operations, it is necessary to check if the door of the furniture closes properly. 8mm Hb Ha Hd PR167 Hb PR167/1 8. Open the appliance door and the furniture door at 90¡. Insert the small square (Hb) into guide (Ha).
ELECTROLUX HOME PRODUCTS OPERATIONS EUROPE