user manual Fridge-Freezer ERN28600
electrolux Electrolux. Thinking of you. Share more of our thinking at www.electrolux.com CONTENTS Safety information First use Daily use Helpful hints and tips Care and cleaning 2 5 5 6 7 What to do if… Technical data Installation Environmental concerns 9 10 11 16 Subject to change without notice SAFETY INFORMATION In the interest of your safety and to ensure the correct use, before installing and first using the appliance, read this user manual carefully, including its hints and warnings.
electrolux 3 damage to the cord may cause a shortcircuit, fire and/or electric shock. Warning! Any electrical component (power cord, plug, compressor) must be replaced by a certified service agent or qualified service personnel to avoid hazard. • • • • 1. Power cord must not be lengthened. 2. Make sure that the power plug is not squashed or damaged by the back of the appliance. A squashed or damaged power plug may overheat and cause a fire. 3.
electrolux • Make sure that the mains plug is accessible after the installation of the appliance. • Connect to potable water supply only. 4) Service • Any electrical work required to do the servicing of the appliance should be carried out by a qualified electrician or competent person. • This product must be serviced by an authorized Service Centre, and only genuine spare parts must be used. in either its refrigerant circuit or insulation materials.
electrolux 5 FIRST USE Cleaning the interior Before using the appliance for the first time, wash the interior and all internal accessories with lukewarm water and some neutral soap so as to remove the typical smell of a brand-new product, then dry thoroughly. Important! Do not use detergents or abrasive powders, as these will damage the finish. DAILY USE Freezing fresh food The freezer compartment is suitable for freezing fresh food and storing frozen and deep-frozen food for a long time.
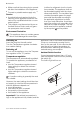
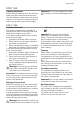
electrolux To make these adjustments proceed as follows: gradually pull the shelf in the direction of the arrows until it comes free, then reposition as required. Positioning the door shelves To permit storage of food packages of various sizes, the door shelves can be placed at different heights. HELPFUL HINTS AND TIPS Hints for energy saving • Do not open the door frequently or leave it open longer than absolutely necessary.
electrolux 7 • • • • • to make it possible subsequently to thaw only the quantity required; wrap up the food in aluminium foil or polythene and make sure that the packages are airtight; do not allow fresh, unfrozen food to touch food which is already frozen, thus avoiding a rise in temperature of the latter; lean foods store better and longer than fatty ones; salt reduces the storage life of food; water ices, if consumed immediately after removal from the freezer compartment, can possibly cause the skin
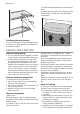
electrolux 3. Leave the door open and insert the plastic scraper in the appropriate seating at the bottom centre, placing a basin underneath to collect the defrost water In order to speed up the defrosting process, place a pot of warm water in the freezer compartment. In addition, remove pieces of ice that break away before defrosting is complete. Defrosting the freezer A certain amount of frost will always form on the freezer shelves and around the top compartment.
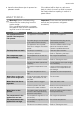
electrolux 9 • leave the door/doors ajar to prevent unpleasant smells. If the cabinet will be kept on, ask somebody to check it once in a while to prevent the food inside from spoiling in case of a power failure. WHAT TO DO IF… Warning! Before troubleshooting, disconnect the mains plug from the mains socket. Only a qualified electrician or competent person must do the troubleshooting that is not in this manual. Problem The appliance does not operate. The lamp does not operate.
electrolux Problem Possible cause Solution The product temperature is too high. Let the product temperature decrease to room temperature before storage. Many products are stored at the same time. Store less products at the same time. The temperature in the refrigerator is too high. There is no cold air circulation in the appliance. Make sure that there is cold air circulation in the appliance. The temperature in the freezer is too high. Products are too near to each other.
electrolux 11 The technical information are situated in the rating plate on the internal left side of the appliance and in the energy label. INSTALLATION Read the "Safety Information" carefully for your safety and correct operation of the appliance before installing the appliance.
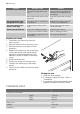
electrolux 5. Make sure the electricity supply voltage is the same as that indicated on the appliance rating plate. 6. Switch on the appliance. The appliance is supplied with a 13 amp plug fitted 2 . In the event of having to change the fuse in the plug supplied, a 13 amp ASTA approved (BS 1362) fuse must be used. Warning! A cut off plug inserted into a 13 amp socket is a serious safety (shock) hazard. Ensure that it is disposed of safely. Door reversibility The door of the appliance opens to the right.
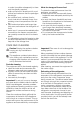
electrolux 13 2. Install the appliance in the niche. Push the appliance in the direction of the arrows (1) until the upper gap cover stops against the kitchen furniture. Push the appliance in the direction of the arrows (2) against the cupboard on the opposite side of the hinge. min. 200 cm2 min. 200 cm2 2 Installing the appliance Caution! Make sure that the mains cable can move freely. Do these steps. 1. If necessary cut the adhesive sealing strip and then apply it to the appliance as shown in figure.
electrolux 3. Adjust the appliance in the niche. Make sure that the distance between the appliance and the cupboard frontedge is 44 mm. The lower hinge cover (in the accessories bag) makes sure that the distance between the appliance and the kitchen furniture is correct. Make sure that the clearance between the appliance and the cupboard is 4 mm. Open the door. Put the lower hinge cover in position. 5. Remove the correct part from the hinge cover (E).
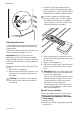
electrolux 15 7. Connect the appliance laterally to the kitchen furniture sidewall: a) Loosen the screws of the part (G) and move the part (G) till the furniture sidewall. b) Tighten the screws of the part (G) again. c) Attach the part (H) to the part (G). 9. Install the part Ha on the inner side of the kitchen furniture. ca. 50 mm 90° 21 mm 90° G H ca. 50 mm 21 mm 10. Push the part Hc on the part Ha. Ha 8.
electrolux 11. Open the appliance door and the kitchen furniture door at an angle of 90°. Insert the small square (Hb) into guide (Ha). Put together the appliance door and the furniture door and mark the holes. 13. Place the small square on the guide again and fix it with the screws supplied. Align the kitchen furniture door and the appliance door by adjusting the part Hb. 8 mm Ha Hb Hb 12.
electrolux 17
electrolux
electrolux 19
www.electrolux.