user manual Fridge-Freezer ERN31801
electrolux Electrolux. Thinking of you. Share more of our thinking at www.electrolux.
electrolux 3 • It is dangerous to alter the specifications or modify this product in any way. Any damage to the cord may cause a short-circuit, fire and/or electric shock. Warning! Any electrical component (power cord, plug, compressor) must be replaced by a certified service agent or qualified service personnel. 1. Power cord must not be lengthened. 2. Make sure that the power plug is not squashed or damaged by the back of the appliance. A squashed or damaged power plug may overheat and cause a fire. 3.
electrolux by a qualified electrician or competent person. • This product must be serviced by an authorized Service Centre, and only genuine spare parts must be used. Environment Protection This appliance does not contain gasses which could damage the ozone layer, in either its refrigerant circuit or insulation materials. The appliance shall not be dis- carded together with the urban refuse and rubbish.
electrolux 5 Important! In the event of accidental defrosting, for example due to a power failure, if the power has been off for longer than the value shown in the technical characteristics chart under "rising time", the defrosted food must be consumed quickly or cooked immediately and then re-frozen (after cooling). Thawing Deep-frozen or frozen food, prior to being used, can be thawed in the refrigerator compartment or at room temperature, depending on the time available for this operation.
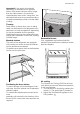
electrolux 2 1 This device allows for rapid cooling of foods and a more uniform temperature in the compartment. Important! Switch on the fan when the ambient temperature exceeds 25°C. Helpful hints and tips Hints for energy saving • Do not open the door frequently or leave it open longer than absolutely necessary.
electrolux 7 • • • • • make it possible subsequently to thaw only the quantity required; wrap up the food in aluminium foil or polythene and make sure that the packages are airtight; do not allow fresh, unfrozen food to touch food which is already frozen, thus avoiding a rise in temperature of the latter; lean foods store better and longer than fatty ones; salt reduces the storage life of food; water ices, if consumed immediately after removal from the freezer compartment, can possibly cause the skin to
electrolux 4. When defrosting is completed, dry the interior thoroughly and refit the plug. 5. Switch on the appliance. 6. Set the temperature regulator to obtain the maximum coldness and run the appliance for two or three hours using this setting. 7. Reload the previously removed food into the compartment. Important! Never use sharp metal tools to scrape off frost from the evaporator as you could damage it.
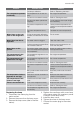
electrolux 9 Problem Possible cause Solution The lamp is defective. Refer to "Replacing the lamp". The temperature is not set correctly. Set a higher temperature. The door is not closed correctly. Refer to "Closing the door". The door has been opened too frequently. Do not keep the door open longer than necessary. The product temperature is too high. Let the product temperature decrease to room temperature before storage. The room temperature is too high. Decrease the room temperature.
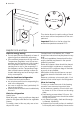
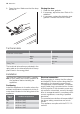
electrolux 8. Open the door. Make sure that the lamp comes on. Closing the door 1. Clean the door gaskets. 2. If necessary, adjust the door. Refer to "Installation". 3. If necessary, replace the defective door gaskets. Contact the Service Center. Technical data Dimension of the recess Height 1780 mm Width 560 mm Depth 550 mm Rising Time 20 h The technical information are situated in the rating plate on the internal left side of the appliance and in the energy label.
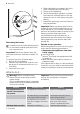
electrolux 11 Door reversibility The door of the appliance opens to the right. If you want to open the door to the left, follow these steps before you install the appliance: 1. Loosen and remove the upper pin. 2. Remove the door. 3. Remove the spacer. 4. With a key, loosen the lower pin. min. 200 cm2 min. 200 cm2 Installing the appliance Caution! Make sure that the mains cable can move freely. Do the following steps: 1. Drill the unit using a Ø 2.5 mm drill (10 mm max. penetration).
electrolux pliance and the cupboard front-edge is 44 mm. Push the appliance in the direction of the arrows (2) against the cupboard on the opposite side of the hinge. Make sure that the clearance between the appliance and the cupboard is 4 mm. I 2 5. Push the sealing strip between the appliance and the adjacent cabinet. 1 3. Adjust the appliance in the niche. The lower hinge cover (in the accessories bag) makes sure that the distance between the appliance and the kitchen furniture is correct.
electrolux 13 Attach the hinge covers (E) to the hinge. 10. Push the part (Hc) on the part (Ha). Ha D C E Hc E B 8. Disconnect the parts (Ha), (Hb), (Hc) and (Hd). Ha Hb 11. Open the appliance door and the kitchen furniture door at an angle of 90°. Insert the small square (Hb) into guide (Ha). Put together the appliance door and the furniture door and mark the holes. Remove the small squares and drill holes with ø 2 mm at 8 mm from the outer edge of the door.
electrolux Hb Hb Hd 13. Press the part (Hd) on the part (Hb). Do a final check to make sure that: • All screws are tightened. • The sealing strip is attached tightly to the cabinet. • The door opens and closes correctly. Reversibility of the freezer door 180˚ Environmental concerns The symbol on the product or on its packaging indicates that this product may not be treated as household waste.
electrolux 15 your household waste disposal service or the shop where you purchased the product.
www.electrolux.