user manual Fridge ERN34800
electrolux Electrolux. Thinking of you. Share more of our thinking at www.electrolux.
electrolux 3 damage to the cord may cause a shortcircuit, fire and/or electric shock. Warning! Any electrical component (power cord, plug, compressor) must be replaced by a certified service agent or qualified service personnel. • • • • 1. Power cord must not be lengthened. 2. Make sure that the power plug is not squashed or damaged by the back of the appliance. A squashed or damaged power plug may overheat and cause a fire. 3. Make sure that you can come to the mains plug of the appliance. 4.
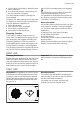
electrolux ance shall be disposed according to the applicable regulations to obtain from your local authorities. Avoid damaging the cooling unit, especially at the rear near the heat exchanger. The materials used on this appliance marked by the symbol are recyclable. Environment Protection This appliance does not contain gasses which could damage the ozone layer, in either its refrigerant circuit or insulation materials. The appliance shall not be discarded together with the urban refuse and rubbish.
electrolux 5 • turn the knob clockwise to obtain the maximum coldness • turn the knob counter- clockwise to obtain the minimum coldness. The intermediate position is usually the most suitable. However, the exact setting should be chosen keeping in mind that the temperature inside the appliance depends on: • room temperature • how often the door is opened • the quantity of food stored • the location of the appliance.
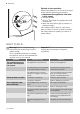
electrolux Air cooling The Dynamic Air Cooling (DAC) fan let food cool quickly and a more uniform temperature in the compartment. 1. You can switch on the fan by pressing the switch (1). The green light (2) comes on. 2. Adjust the Temperature regulator to the FAN position. Positioning the door shelves To permit storage of food packages of various sizes, the door shelves can be placed at different heights.
electrolux 7 • do cover or wrap the food, particularly if it has a strong flavour • position food so that air can circulate freely around it Hints for refrigeration Useful hints: Meat (all types) : wrap in polythene bags and place on the glass shelf above the vegetable drawer. For safety, store in this way only one or two days at the most. Cooked foods, cold dishes, etc..: these should be covered and may be placed on any shelf.
electrolux Periods of non-operation When the appliance is not in use for long periods, take the following precautions: • disconnect the appliance from electricity supply • remove all food • defrost 4)and clean the appliance and all accessories • leave the door/doors ajar to prevent unpleasant smells. If the cabinet will be kept on, ask somebody to check it once in a while to prevent the food inside from spoiling in case of a power failure.
electrolux 9 Problem Possible cause Solution Water flows on the rear plate of the refrigerator. During the automatic defrosting process, frost defrosts on the rear plate. This is correct. Water flows into the refrigerator. The water outlet is clogged. Clean the water outlet. Products prevent that water flows into the water collector. Make sure that products do not touch the rear plate. Water flows on the ground. The melting water outlet does not flow in the evaporative tray above the compressor.
electrolux TECHNICAL DATA Dimension of the recess Height 1780 mm Width 560 mm Depth 550 mm The technical information are situated in the rating plate on the internal left side of the appliance and in the energy label. INSTALLATION Read the "Safety Information" carefully for your safety and correct operation of the appliance before installing the appliance.
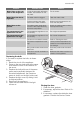
electrolux 11 min. 200 cm2 min. 200 cm2 On the opposite side: 1. Tighten the lower pin. 2. Install the spacer. 3. Install the door. 4. Tighten the upper pin. Installing the appliance Caution! Make sure that the mains cable can move freely. Do the following steps: 1. Drill the unit using a Ø 2.5 mm drill (10 mm max. penetration). Fix the square fitting to the appliance. 13mm 2,5 Ventilation requirements The airflow behind the appliance must be sufficient. 2. Install the appliance in the niche.
electrolux the appliance and the cupboard frontedge is 44 mm. Push the appliance in the direction of the arrows (2) against the cupboard on the opposite side of the hinge. Make sure that the clearance between the appliance and the cupboard is 4 mm. I 2 5. Push the sealing strip between the appliance and the adjacent cabinet. 1 3. Adjust the appliance in the niche. The lower hinge cover (in the accessories bag) makes sure that the distance between the appliance and the kitchen furniture is correct.
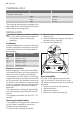
electrolux 13 Attach the hinge covers (E) to the hinge. 10. Push the part (Hc) on the part (Ha). Ha D C E Hc E B 8. Disconnect the parts (Ha), (Hb), (Hc) and (Hd). Ha Hb 11. Open the appliance door and the kitchen furniture door at an angle of 90°. Insert the small square (Hb) into guide (Ha). Put together the appliance door and the furniture door and mark the holes. Remove the small squares and drill holes with ø 2 mm at 8 mm from the outer edge of the door.
electrolux Hb Hb 13. Press the part (Hd) on the part (Hb). Hd Do a final check to make sure that: • All screws are tightened. • The sealing strip is attached tightly to the cabinet. • The door opens and closes correctly. ENVIRONMENTAL CONCERNS The symbol on the product or on its packaging indicates that this product may not be treated as household waste. Instead it should be taken to the appropriate collection point for the recycling of electrical and electronic equipment.
electrolux 15
www.electrolux.