
User manual


24
ANOMALIE DE FONCTIONNEMENT
Si l'appareil marche mal, il faut contr™ler
¥ si la fiche est bien branchŽe ˆ la prise de courant
et si l'interrupteur est Žteint;
¥ s'il n'y a pas de panne de courant;
¥ si les commandes sont bien dans la bonne
position;
¥ s'il y a des traces d'eau au fond du compartiment
et si l'orifice d'Žcoulement de l'eau de dŽgivrage
est bouchŽ (voir chapitre ÒDŽgivrageÓ).
Une fois que tous ces contr™les ont ŽtŽ effectuŽs, si
l'anomalie de fonctionnement continue, adressez-
vous au Service Apr•s-Vente le plus proche.
Pour que l'intervention soit plus rapide, au
moment de l'appel, il vaut mieux indiquer le
code du mod•le et le numŽro d'immatriculation,
qui se trouvent sur le certificat de garantie ou
sur la plaque d'immatriculation placŽe ˆ
l'intŽrieur de l'appareil, ˆ gauche et en bas.
Pendant que l'on effectue cette opŽration, il n'est
pas nŽcessaire de couper le courant ou d'enlever
les denrŽes qui se trouvent dans le compartiment.
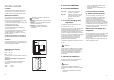
Pour effectuer un dŽgivrage complet procŽdez de la
mani•re suivante:
1. appuyez sur le bouton ON/OFF (I);
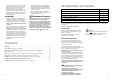
2. maintenez la porte ouverte, utilisez la spatule
comme goutti•re et placez-la dans la partie
centrale, en bas, de lÕappareil, dÕapr•s la Fig. ;
placez au-dessous une cuvette pour recevoir
lieau de dŽgivrage;
3. Žpongez et sŽchez soigneusement les parois;
conservez la spatule pour toute utilisation future;
4. appuyez sur le bouton ON/OFF (I). Au bout dÕune
demi-heure replacez les produits stil y a lieu.
Important:
Pour cette opŽration nÕutilisez jamais dÕobjet
mŽtallique qui risquerait de dŽtŽriorer lÕappareil.
NÕutilisez jamais de dispositifs mŽcaniques ou
autres moyens artificiels pour accŽlŽrer le
dŽgivrage, ˆ part ceux prŽconisŽs.
LÕŽlŽvation de tempŽrature des denrŽes
congelŽes peut diminuer leur durŽe de
conservation.
D068
29
Cleaning the interior
Before using the appliance for the first time, wash
the interior and all internal accessories with luke-
warm water and some neutral soap so as to remove
the typical smell of a brand-new product, then dry
thoroughly.
USE
Do not use detergents or abrasive
powders, as these will damage the finish.
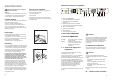
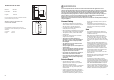
Control Panel
Use of the fridge
A On/OFF light
B Fridge button ON/OFF
C Temperature setting button (warmest)
D Temperature indicator
E Temperature setting button (coldest)
F Super cooling light
G Super cooling button
A. Light ON/OFF
B. Button ON/OFF
ON: Press the button (B). The pilot light (A)
switches on.
OFF: Keep press the button (B) until the pilot light
(A) and the temperautre indicator switched off.
C - E. Temperature setting buttons
The temperature can be adjusted between +2¡C and
+8¡C.
By pressing the button (C or E), the current
temperature setting flashes on the indicator. It is
possible to modify the setting temperature only with
flashed indicator. To set a warmer temperature,
press button (C). To set a colder temperature, press
button (E). The indicator display the newly selected
temperature for a few seconds and then shows
again the inside compartment temperature.
The newly selected-temperature must be reached
after 24 hours.
EA
B
C
D
G
F
Attention!
During the stability period by the first starting the
temperature displayed can not correspond to the
setting temperature. During this time it is possible
that the temperature displayed is lower than the
setting temperature.
D. Temperature indicator
During normal functioning the indicator shows the
temperature inside the fridge.
Attention!
Difference between the temperature displayed and
temperature setting is normal. Especially when:
- a new setting has recently been selected
- the door has been left open for a long time
- warm food has been placed in the compartment
F. Super cooling pilot light
G. Super cooling button
The maximum performance is obtained by setting
the supercooling function. ItÕs recommended when
loading large quantities of food.
Press the supercooling button (G).The relevant pilot
light (F) switches on.
The internal temperature goes down to +2¡C.
After about 6 hours the supercooling function
switches off automatically.