
User manual


18
KÄYTTÖ
Puhdistaminen
Puhdista kaapin sisäosat käyttäen haaleaa vettä,
mietoa pesuainetta ja pehmeää riepua.
ÄLÄ käytä synteettisiä pesuaineita tai
hankauspulveria, joka voi pilata pinnan ja aiheuttaa
naarmuja.
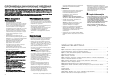
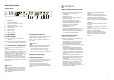
E
A
B
C
D
G
F
Jääkaapin ohjauspaneeli
A. Merkkivalo ON/OFF
B. Jääkaapin ON/OFF -painike
C. Painike “+” (lämpimämpi) jääkaapin lämpötilan
säältämiseen
D. Jääkaapin lämpötilanäyttö
E. Painike “-” (kylmempi) jääkaapin lämpötilan
säätämiseen
F. Merkkivalo Coolmatic
G. Coolmatic-painike
Painikkeet lämpötilan säätämiseen
Lämpötila on säädettävissä painikkeiden “+”
(lämpimämpi) ja “-” (kylmempi) avulla. Painikkeet on
liitetty lämpötilanäyttöön.
• Painamalla painiketta ”+” (lämpimämpi) tai “-”
(kylmempi), lämpötilanäyttö vaihtuu
TODELLISESTA lämpötilasta (= lämpötila palaa
lämpötilanäytössä) NIMELLISEEN lampötilaan
(lämpötila vikkuu lämpötilanäytössä).
• Jokaisen painikkeen painalluksen jälkeen
NIMELLINEN lämpötila muuttuu 1 °C.
Asetettu NIMELLINEN lämpötila saavutetaan 24
tunnin kuluessa.
Painamalla lämpötilan säätöpainiketta
lämpötilanäytössä näkyy TODELLINEN lämpötila 5
sekunnin kuluttua.
NIMELLINEN lämpötila:
asetettu lämpötila, joka pitäisi olla jääkaapissa.
NIMELLINEN lämpötila vilkkuu lämpötilanäytössä.
TODELLINEN lämpötila:
s
en hetkinen jääkaapin lämpötila. TODELLINEN
lämpötila näkyy lämpötilanäytössä.
Lämpötilanäyttö
Lämpötilanäytössä näkyy:
• jääkaapin sen hetkinen lämpötila (TODELLlNEN
lämpötila).
• jääkaappiin asetettava lämpötila (NIMELLINEN
lampötila) vilkkuu Iämpötilanäytössa.
Käyttöönotto - Lämpötilan
säätäminen
1. Työnnä pistoke pistorasiaan.
2. Paina ON/OFF —painiketta. Vihreä merkkivalo
syttyy.
3. Paina painiketta “+” (LÄMPlMÄMPI) TAI “-”
(KYLMEMPI). Lämpötilanäytössä vilkkuu
NIMELLINEN lämpötila.
4. Aseta haluamasi lämpötila painamalla “+”
(LÄMPlMÄMPI) TAI “-” (KYLMEMPI), katso
kappale “Painikkeet lämpötilan säätämiseen”.
Lämpötilanäytössä näkyy asetettamasi lämpötila.
Jokainen painikkeen painallus muuttaa lämpötilaa
1°C:een.
Ravitsemustiedon mukaan, +5 °C jääkaapissa on
riittävä säilytyslämpötila.
39
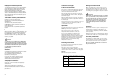
PR01
540
50
3
2
1
50 mm
min.
200 cm
2
200 cm
2
min.
D567
Dimensions of housing
Height (1) 1780 mm
Depth (2) 550 mm
Width (3) 560 mm
For safety reasons, minimum ventilation must be as
shown in Fig.
Attention: keep ventilation openings clear of
obstruction.
It is necessary that the niche is provided with a
conduct of ventilation having the following
dimensions:
Depth 50 mm
Width 540 mm
ATTENTION!
It must be possible to disconnect the appliance from
the mains power supply; the plug must therefore be
easily accessible after installation.
Electrical connection
Before plugging in, ensure that the voltage and
frequency shown on the serial number plate
correspond to your domestic power supply. Voltage
can vary by ±6% of the rated voltage.
For operation with different voltages, a suitably sized
auto-transformer must be used.
The appliance must be earthed.
The power supply cable plug is provided with a
contact for this purpose.
If the domestic power supply socket is not earthed,
connect the appliance to a separate earth in
compliance with current regulations, consulting a
specialist technician.
The Manufacturer declines all responsibility if
the above safety precautions are not observed.
INSTALLATION
Location
The appliance should be installed well away from
sources of heat such as radiators, boilers, direct
sunlight etc. See the enclosed built-in instructions.
This appliance complies with the following
E.E.C. Directives:
- 87/308 EEC of 2/6/87 relative to radio interference
suppression.
- 73/23 EEC of 19.2.73 (Low Voltage Directive) and
subsequent modifications;
- 89/336 EEC of 3.5.89 (Electromagnetic
Compatibility Directive) and subsequent
modifications.
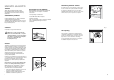
Shelf holders
Your appliance is equipped with shelf retainers that
make it possible to secure the shelves during
transportation.
To remove them proceed as follows:
Raise the shelf from the back, push it in the direction
of the arrow until it is freed and remove the retainers.
B
A