Kühlschrank / refrigerator GEBRAUCHSANWEISUNGEN INSTRUCTION BOOKLET ERP 16500 D GB 2222749-77
D Sicherheitshinweise Bevor Sie Ihr neues KŠltegerŠt in Betrieb nehmen, lesen Sie bitte diese Gebrauchsanweisung aufmerksam durch. Diese sind Sicherheitshinweise. Wir ersuchen Sie daher, die folgenden Punkte vor der Installation des Gerätes und seiner Inbetriebnahme aufmerksam durchzulesen. Es wird empfohlen, diese Gebrauchsanweisung gut aufzubewahren und bei einem eventuellen Verkauf des Gerätes dem neuen Besitzer auszuhändigen.
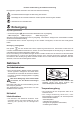
Hinweise zur Benutzung der Gebrauchsanweisung Die folgenden Symbole erleichtern das Lesen der Gebrauchanweisung: Sicherheitshinweise bezŸglich der Benutzung des GerŠtes RatschlŠge fŸr den korrekten Gebrauch und die optimale Ausnutzung des GerŠtes. Informationen zum Umweltschutz Entsorgung Verpackungsmaterialien ¥ die mit dem Symbol gekennzeichneten Materialien sind recyclingfŠhig. >PE<=PolyŠthylen >PS<=Polystyrol >PP<=Polypropylen SŠmtliche Verpackungsmaterialien sind recycling-fŠhig.
¥ Die Temperatur wird automatisch geregelt. ¥ Stellung ã1Ò = wŠrmste Innentemperatur ¥ Stellung ã6Ò = kŠlteste Innentemperatur ¥ Stellung ã0Ò = KŸhlung aus Die mittlere Einstellung ist meistens die geeigneteste. KŸhlabteilausstattung Abstellregale ¥ Zur besseren Reinigung kann die obere Ablage genommen werden. ¥ Zur Einlagerung von Lebensmittel-Packungen verschiedener Grš§e, sind die Abstellregale hšhenverstellbar.
Wartung Vor jeder Reinigungsarbeit immer den Netzstecker aus der Steckdose ziehen. Dieses GerŠt erhŠlt im Kaltekreislauf Kohlenwasserstoff. Aus diesem Grund darf die Wartung und das NachfŸllen ausschlie§lich von autorisierten Fachpersonal durchgefŸhrt werden. Abtauen KŸhlraum ¥ An der RŸckwand des GerŠtes bildet sich im Betrieb eine Reifsicht, die in den Stillstandszeiten des Kompressors von selbst abtaut.
Wenn etwas nicht funktioniert Falls das GerŠt Stšrungen aufweisen sollte, bevor Sie den Kundendienst verstŠndigen, ŸberprŸfen Sie zuerst folgendes: Störung Abhilfe Im GerŠt wird es nicht kalt genug Der Drehknopf auf kŠltere Temperatur drehen. Die Lebensmittel mŸssen so eingelagert werden, dass die KŠlte um sie frei zirkulieren kann. TŸr richtig schlie§en. Die Umgebungstemperatur ist zu warm. GerŠt kŸhlt zu stark. Der Drehknopf auf wŠrmere Temperatur drehen.
Installation Aufstellung Elektrischer Anschluss ¥ Vor der Installation sicherstellen, dass das GerŠt nicht beschŠdigt ist. Mšgliche TransportschŠden sind dem HŠndler unverzŸglich mitzuteilen. ¥ Das GerŠt darf nicht in unmittelbarer NŠhe von Heizkšrpern oder sonstigen WŠrmequelle aufgestellt werden. ¥ Ein Standort mit direkter Sonneneinstrahlung sollte vermieden werden. ¥ Eine ausreichende Luftzirkulation an der GerŠterŸckseite mu§ gewŠhrleistet sein.
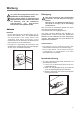
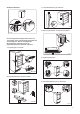
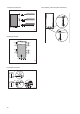
TŸranschlag wechseln Gehen Sie wie folgt vor: 1 2 TAW1MERA TAW2MERA 3 †berprŸfen Sie nach dem TŸranschlagwechsel unbedingt, da§ die TŸrmagnetdichtungen einwandfrei am GehŠuse anliegen und alle Schrauben kraftschlŸssig angezogen sind.
GerŠtetŸr abnehmen 3. Fugenabdeckleisten (E) ankleben. FAL3MERA 4. Gitter (N) aufstecken und GerŠt einschieben. 1BL80R Die nachfolgenden Montageschritte sind nur fŸr TŸranschlag rechts (Lieferzustand) dargestellt. Bei TŸranschlag links, bitte die nachfolgenden Montageschritte entsprechend auf der gegenŸberliegenden GerŠteseite ausfŸhren. 1. Anpassungen vornehmen. PL09 5. GerŠt festschrauben. FAL1MERA 2. Fugenabdeckleisten (E) abschneiden. GF1MERA 6. Schraubenabdeckungen (L) anbringen.
7. Dekorsatz anbringen. 10. GerŠtetŸr ausrichten (falls erforderlich). PL12 8. Montage TŸrgriff PL13 9. GerŠtetŸr einsetzen.
Instructions for the use of the instructions booklet t Notes which are important for your safety or for the proper functioning of the appliance Supplementary information regarding operation and practical applications of the appliance. Tips and notes concerning economical and environmentally sound use of the appliance Safety Instructions Please read these operating instructions carefully before installing the appliance. These warnings are provided in the interests of your safety.
Index Safety Instructions . . . . . . . . . . . . . . . . . . . . . . . . . . . . . . . . . . . . . . . . . . . . . . . . . . . . . . . . . . . . . . . . . . . . . .11 Use and Control Before Use / Refrigerator compartment - Starting the appliance . . . . . . . . . . . . . . . . . . . . .12 Temperature control / Internal parts . . . . . . . . . . . . . . . . . . . . . . . . . . . . . . . . . . . . . . . . . . . . . . . . . . . . . . . . .12 Hints . . . . . . . . . . . . . . . . . . . . . . . . . . . . . . .
¥ For more thorough cleaning, the top and bottom door sheves can be removed by pulling them in the direction of the arrows, then refitting them in position. Hints Saving Energy ¥ Pay careful attention to where the cabinet is placed. See the section ÒInstallationÓ. When installed correctly the cabinet will consume less energy.
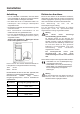
Cleaning Changing the light bulb Never use metal objects for cleaning your appliance as it may get damaged. NEVER use detergents, abrasive powders, highly perfumed cleaning products or wax polishes to clean the interior as these will damage the surface and leave a strong odour. Clean the inside with warm water and bicarbonate of soda. Rinse and dry thoroughly.
Customer service and spare parts If you cannot find the remedy for a malfunction in these operating instructions, please contact your dealer or our customer service department and consult the Guarantee card. Selective ordering of replacement parts can save unnecessary travel and costs. For this reason always provide the following appliance information: - Model Name - Model Number (PNC) - Serial Number (S-No.) This information can be found on the rating plate inside the cabenit on the left hand wall.
Electrical connection Before plugging in, ensure that the voltage and frequency shown on the serial number plate correspond to your domestic power supply. Voltage can vary by ±6% of the rated voltage. For operation with different voltages, a suitably sized auto-transformer must be used. This appliance complies with the following E.E.C. Directives: - 87/308 EEC of 2/6/87 relative to radio interference suppression. - 73/23 EEC of 19.2.73 (Low Voltage Directive) and subsequent modifications.
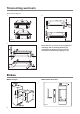
Building-in Dimensions of the recess The following installation steps are illustrated only when the door is hinged on the left, please carry out the following installation steps on the opposite side as appropriate. 1. Performing adjustments Aligning the furniture housing FAL1MERA 100 2. Cut joint cover fillets (E) 90° 90° MAU2ME Detaching the appliance door FAL2MERA 3. Apply joint cover fillets (E).
4. Fit ventilation grill (N) and push appliance into place 8. Apply door handle. PL09 PL13 5. Screw the appliance into place. 9. Inserting the appliance door. GF1MERA 6. Install screw-head caps (L) TE1MERA 10. Aligning the appliance door (where necessary). SAB1ME 7. Attach door panel.
ELECTROLUX HOME PRODUCTS OPERATIONS EUROPE