EOD5410A .................................................. ...............................................
www.electrolux.com CONTENTS SAFETY INFORMATION . . . . . . . . . . . . . . . . . . . . . . . . . . . . . . . . . . . . . . . . . . . . . . . . . . . . . . . . . 3 PRODUCT DESCRIPTION . . . . . . . . . . . . . . . . . . . . . . . . . . . . . . . . . . . . . . . . . . . . . . . . . . . . . . . 6 BEFORE FIRST USE . . . . . . . . . . . . . . . . . . . . . . . . . . . . . . . . . . . . . . . . . . . . . . . . . . . . . . . . . . . 7 DAILY USE . . . . . . . . . . . . . . . . . . . . . . . . . . . . . . . . .
ENGLISH 3 SAFETY INFORMATION Before the installation and use of the appliance, carefully read the supplied instructions. The manufacturer is not responsible if an incorrect installation and use causes injuries and damages. Always keep the instructions with the appliance for future reference. CHILDREN AND VULNERABLE PEOPLE SAFETY WARNING! Risk of suffocation, injury or permanent disability.
www.electrolux.com USE WARNING! Risk of injury, burns or electric shock or explosion. • Use this appliance in a household environment. • Do not change the specification of this appliance. • Make sure that the ventilation openings are not blocked. • Do not let the appliance stay unattended during operation. • Deactivate the appliance after each use. • Internally the appliance becomes hot when in operation. Do not touch the heating elements that are in the appliance.
ENGLISH DISPOSAL WARNING! Risk of injury or suffocation. • Disconnect the appliance from the mains supply. • Cut off the mains cable and discard it. • Remove the door catch to prevent children and pets to get closed in the appliance.
www.electrolux.com PRODUCT DESCRIPTION GENERAL OVERVIEW 1 2 3 4 5 1 Knob for the top oven functions 2 6 4 7 2 Power indicator 3 Knob for the top oven temperature 8 11 6 5 4 3 2 1 9 4 Temperature indicator 5 Electronic programmer 6 Knob for the main oven functions 7 Knob for the main oven temperature 8 Heating element 11 6 5 4 3 2 1 8 9 9 Oven lamp 10 Fan and heating element 10 11 Shelf positions ACCESSORIES • Oven shelf For cookware, cake tins, roasts.
ENGLISH 7 BEFORE FIRST USE WARNING! Refer to "Safety information" chapter. INITIAL CLEANING • Remove all accessories and removable shelf supports (if applicable). • Clean the appliance before first use. Refer to the chapter "Care and cleaning". SETTING THE TIME You must set the time before you operate the oven. When you connect the appliance to the electrical supply or after a power cut, the indicator for the Time of Day function flashes. Press the + or - button to set the correct time.
www.electrolux.com DAILY USE WARNING! Refer to "Safety information" chapter. COOLING FAN When the appliance operates, the cooling fan switches on automatically. If you switch off the appliance, the cooling fan continues to operate until the appliance cools down. ACTIVATING AND DEACTIVATING THE TOP OVEN 1. 2. Turn the knob for the top oven functions to an oven function. Turn the knob for the top oven temperature to a temperature. The power indicator comes on while the appliance operates.
ENGLISH 9 MAIN OVEN FUNCTIONS Oven function OFF position Light Application The appliance is OFF. Use this function to light up the oven interior. Ultra Fan To bake and roast on two oven levels at the same time. Decrease the oven temperatures (20-40 °C) compared with Conventional. Pizza Setting To bake on one oven level food with a more intensive browning and a crispy base.
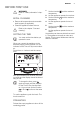
www.electrolux.com CLOCK FUNCTIONS ELECTRONIC PROGRAMMER 1 2 1 1 Function indicators 2 Time display 3 Button + 4 Selection button hr min 5 5 Button - 4 3 Clock function Time of day Minute Minder Duration End Application To set, change or check the time of day. To set a countdown time. This function has no effect on the operation of the oven. To set how long the appliance must operate. To set when the appliance must be deactivated.
ENGLISH CANCELLING THE CLOCK FUNCTIONS 1. 2. Press the Selection button again and again until the necessary function indicator flashes. Press and hold the button -. The clock function goes out after some seconds.
www.electrolux.com USING THE ACCESSORIES WARNING! Refer to "Safety information" chapter. INSERTING THE OVEN ACCESSORIES Put in the slide-in accessories so that the double side edges are at the back of the oven and point down to the bottom. Push the slide-in accessories between the guidebars of one of the oven levels. GRILLING SET The grilling set includes the roasting pan grid and the deep roasting pan. You can use the roasting pan grid in two positions: turned up or down.
ENGLISH 13 HELPFUL HINTS AND TIPS WARNING! Refer to "Safety information" chapter. The temperature and baking times in the tables are guidelines only. They depend on the recipes, quality and quantity of the ingredients used. CAUTION! Use a deep baking tray for very moist cakes. Fruit juices can cause permanent stains on the enamel. TOP OVEN The top oven is the smaller of the two ovens. It has 6 shelf levels. Use is to cook smaller quantities of food.
www.electrolux.
ENGLISH Temperature [°C] Approx Cook Time (mins) Shelf Position Fish Pie (Potato Topped) 190 - 200 20 - 30 1 Fruit Pies, Crumbles 190 - 200 30 - 50 1 Milk Puddings 150 - 170 90 - 120 1 Pasta Lasagne etc.
www.electrolux.
ENGLISH Temperature [°C] Approx Cook Time (mins) Shelf Position Fruit Pies, Crumbles 180 - 200 30 - 50 3 Milk Puddings 150 - 170 60 - 90 3 - Choux 180 - 190 30 - 40 3 - Shortcrust 190 - 200 25 - 35 3 - Flaky 190 - 210 30 - 40 3 Food 17 Pastry: - Puff Follow manufacturer´s instructions Plate Tarts 190 - 200 25 - 45 3 Quiches/Flans 200 - 210 25 - 45 3 Scones 220 - 230 8 - 12 3 Roasting: Meat and Poultry 170 - 190 see Roasting Chart 3 Shelf Position Temperature [°C
www.electrolux.
ENGLISH Food Fillets - Plaice/Cod Grill Time (mins in total) 4-6 Kebabs 12 - 18 Kidneys - Lamb/Pig 6 - 10 Sausages 20 - 30 Steaks - Rare 4-6 - Medium 6-8 - Well Done 12 - 15 Toasted Sandwiches 3-4 MAIN OVEN GRILLING Adjust shelf position and grill pan grid to suit different thicknesses of food Food Bacon Rashers Grill Time (mins in total) 5- 6 Beefburgers 10 - 20 Chicken Joints 20 - 40 Chops - Lamb 15 - 25 - Pork 20 - 25 Fish - Whole Trout/ Makarel 10 -12 Fillets - Plaice/Cod K
www.electrolux.com GRILLING Beef Type of meat Quantity Level Temperature (°C) Topside beef or fillet Time (h:min) per cm of thickness - rare1) per cm of thickness 3 190 - 200 0:05 - 0:06 - medium per cm of thickness 3 180 - 190 0:06 - 0:08 - well done per cm of thickness 3 170 - 180 0:08 - 0:10 Quantity Level Temperature (°C) Time (h:min) Shoulder, neck, ham 1 - 1.5 kg 3 160 - 180 1:30 - 2:00 Pork chop 1 - 1.
ENGLISH Type of meat Quantity Level Temperature (°C) Time (h:min) 1.5 - 2 kg 1 200 - 210 1:30 - 2:15 Quantity Level Temperature (°C) Time (h:min) Poultry pieces per 3 200-250g 200 - 220 0:35 - 0:50 Half chicken per 3 400-500g 190 - 210 0:35 - 0:50 Poultry 1 - 1.5 kg 1 190 - 210 0:45 - 1:15 Duck 1.5 - 2 kg 1 180 - 200 1:15 - 1:45 Goose 3.5 - 5 kg 1 160 - 180 2:30 - 3:30 Turkey 2.5 - 3.
www.electrolux.com CARE AND CLEANING WARNING! Refer to "Safety information" chapter. • Clean the front of the appliance with a soft cloth with warm water and cleaning agent. • To clean metal surfaces use a usual cleaning agent • Clean the oven interior after each use. Thus you can remove dirt more easily and it does not burn on. • Clean stubborn dirt with a special oven cleaner. • Clean all oven accessories (with a soft cloth with warm water and cleaning agent) after each use and let them dry.
ENGLISH 2. 23 Pull the rear end of the shelf support away from the side wall and remove it. 2 1 Installing the shelf supports Install the shelf supports in the opposite sequence. number of glass panels is different for different models. CAUTION! Be careful when you remove the door from the appliance. The door is heavy.
www.electrolux.com 8. 9. Installing the door and the glass panels When the cleaning is completed, install the glass panels and the oven door. Do the above steps in the opposite sequence. Install the smaller panel first, then the larger. OVEN LAMP WARNING! There is a danger of electrical shock! Before you change the oven lamp: • Switch off the oven. • Remove the fuses in the fuse box or switch off the circuit breaker.
ENGLISH 25 WHAT TO DO IF… WARNING! Refer to "Safety information" chapter. Problem Possible cause Remedy The oven does not heat up. The appliance is deactivated. Activate the appliance. The oven does not heat up. The clock is not set. Set the clock. The oven does not heat up. The necessary settings are Make sure that the setnot set. tings are correct. The oven does not heat up. The fuse in the fuse box is released. Do a check of the fuse.
www.electrolux.com INSTALLATION WARNING! Refer to "Safety information" chapter. The built-in unit must meet the stability requirements of DIN 68930. min. 600 min. 550 538 min. 560 max. 570 min. 2000 min. 907 20 888 866 min.
ENGLISH 90 0 2x 3,5x25 27
www.electrolux.
ENGLISH 29 ENVIRONMENT CONCERNS Recycle the materials with the symbol . Put the packaging in applicable containers to recycle it. Help protect the environment and human health and to recycle waste of electrical and electronic appliances. Do not dispose appliances marked with the symbol with the household waste. Return the product to your local recycling facility or contact your municipal office.
www.electrolux.
ENGLISH 31
www.electrolux.