User Manual EN - English Refrigerator ESE5401A-BPH,ESE5401A-BID ESE5401A-BTH,ESE5401A-BVN ESE6101A-BMY,ESE6101A-BSG ESE5441A-BID,ESE6141A-BPH ESE6141A-BID,ESE6141A-BMY ESE6141A-BVN,ESE6141A-BTH ESE6645A-BPH,ESE6645A-BTH ESE6645A-BVN,ESE6645A-BID ESE6645A-BMY
Congratulations Congratulations and thank you for choosing our refrigerator. We are sure you will find your new refrigerator a pleasure to use. Before you use the refrigerator, we recommend that you read through the entire user manual, which provides the description of the refrigerator and its functions.
Important safety instructions Please read the user manual carefully and store in a handy place for later reference. warning The symbols you will see in this booklet have these meanings: The appliance must be plugged into its own dedicated 220-240V, 50/60Hz AC electrical outlet. warning This symbol indicates information concerning your personal safety Ensure that the electric outlet is properly earthed to ground. Consult a qualified electrician if you are unsure.
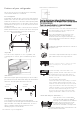
Installing your new refrigerator Clearance around your refrigerator Installing your refrigerator Your Side by Side Refrigerator can be installed between cupboards or fixtures but you must consider the following spaces around the cabinet: The appliance should arrive with the stability foot wound fully up so it will not interfere with the operation of the rollers (see diagram in Step 3 below). 1. Allow a minimum of 10mm clearance on both sides. 2. Allow 30mm clearance at the back of the refrigerator.
. If the refrigerator rocks from one corner to the Make sure you fully close the freezer door after you load or opposite rear corner, this means that the fl oor is uneven; remove food. If the door is left partly open, a heavy frost will you will need to put some packing under one of the coat the inside of the freezer. If a frost develops, remove it. rear rollers. You could use thin pieces of solid material, Ensure to properly close the door, so the frost will not reoccur.
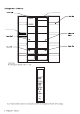
Refrigerator Light Ice Twist Serve fridge
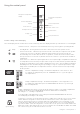
Using the control panel Refrigerator temperature display Freezer temperature display Quick Chill Icon Refrigerator temperature control Freezer temperature control Quick Freeze Icon Holiday mode Icon Feature Button Display lock Icon Lock/Unlock Button Function setting of the LED display Note: the display will turn off after 20 seconds of inactivity, while the display will wake up if the button is touched again. Feature Selection - each press of the “MODE” button will cycle through the operating modes.
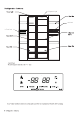
Refrigerator Light water tank Ice Twist Serve fridge 8
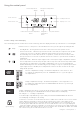
Using the control panel Freezer temperature display Refrigerator temperature display Quick Chill Icon Holiday mode Icon Display lock Icon Quick Freeze Icon Feature Button Freezer temperature Refrigerator Lock/Unlock Button Button temperature Button Function setting of the LED display Note: the display will turn off after 20 seconds of inactivity, while the display will wake up if the button is touched again. Feature Selection - each press of the “MODE” button will cycle through the operating modes.
Features of your refrigerator Instructions for child lock lever This section tells you how to make the most of the many useful features and how to clean them. Door storage bins Disassembly: Hold both sides of the bottle shelf with both hands. Push it from the side without the boss and push it inward as the direction of the arrow. When pushing hard, please note that the buckle on the edge of bottle shelf is separated from the groove of the liner. Then bottle shelf can be removed.
Cleaning your refrigerator warning Before cleaning: Turn appliance off at the power point, then remove power cord from socket. This will make sure there is no chance of getting an electric shock. Energy consumption The following guide will help you reduce the running cost of your new refrigerator. This will save you money and help conserve our valuable energy resources. 1. Do not block air vents. Doing so may cause the refrigerator to run longer and use more energy. 2.
Food storage guide Category Product Refrigerator Freezer Storage tips Meat Sausages and mince 1-2 Days 2-3 Months Chops and steak 3-4 Days 4-6 Months Keep cold meat at the back of the refrigerator where it is coldest. Cold meats 3-5 Days 4-6 Months Roasts 3-5 Days 12 Months Chicken 1-2 Days 2 Months Roast Chicken 3-5 Days 12 Months Eggs 6 Weeks Not Suitable Poultry Plastic can cause meat to sweat if stored in refrigerator for more than a day.
Troubleshooting If you think something may be wrong with your refrigerator, you can carry out some easy checks before calling for service. You may locate the problem, sparing yourself from inconvenience and saving time and money. Problem Solution When your appliance is not operating • Make sure that the power cord is plugged into the power outlet properly and that the outlet is switched ‘ON’. • Try running another appliance from the power outlet.
electrolux.com/shop CONTACT DETAILS ELECTROLUX CUSTOMER CARE Thailand Call Center Tel: (+66 2) 725 9000 Electrolux Thailand Co., Ltd Electrolux Building 14th Floor 1910 New Petchburi Road Bangkapi, Huay Kwang, Bangkok 10310 O ce Tel: (+66 2) 725 9100 O ce Fax: (+66 2) 725 9299 Email: customercare@electrolux.co.th Indonesia CUSTOMER CARE CENTRE: Plaza Kuningan Menara Utara 2nd Floor Suite 201 JI. H.R. Rasana Said Kaz C 11-14 Kuningan, Jakarta Selatan Tel: (021) 522 7180 SMS 0812.8088.
ESE5401A-BPH,ESE5401A-BID ESE5401A-BTH,ESE5401A-BVN ESE6101A-BMY,ESE6101A-BSG ESE5441A-BID,ESE6141A-BPH ESE6141A-BID,ESE6141A-BMY ESE6141A-BVN,ESE6141A-BTH ESE6645A-BPH,ESE6645A-BTH ESE6645A-BVN,ESE6645A-BID ESE6645A-BMY Nomor MKG: IMKG.459.03.
Selamat Daftar Isi Selamat dan terima kasih telah memilih kulkas Electrolux. Kami yakin Anda akan senang menggunakan kulkas baru Anda. Sebelum menggunakan kulkas, dianjurkan untuk membaca keseluruhan buku panduan ini yang memberikan penjelasan mengenai kulkas dan fungsi-fungsinya.
Petunjuk keselamatan yang penting peringatan Harap baca manual bagi pengguna ini dengan saksama dan simpanlah di tempat yang mudah dijangkau untuk rujukan di waktu mendatang. Kulkas ini harus dipasang pada stopkontak listrik 220-240V, 50/60 Hz AC yang tidak dipakai bersama dengan alat lain. Pastikan stopkontak listrik tersebut diardekan dengan baik. Hubungilah teknisi listrik berkualifikasi bila Anda ragu.
Pemasangan kulkas baru Anda Ruang bebas di sekeliling kulkas Kulkas side by side Anda bisa dipasang antara lemari atau furnitur tapi harus mempertimbangkan ruang bebas berikut di sekitar kabinet: 1. Pemasangan kulkas Kulkas dikirimkan dengan kaki pengaman pada posisi paling masuk agar tidak mengganggu kerja rol (lihat gambar pada Langkah 3 berikut). perhatian Terdapat celah minimum 10 mm pada kedua sisi. 2. Terdapat celah 30 mm di belakang kulkas. Rol dirancang hanya untuk bergerak maju dan mundur.
5. Bila kulkas berdiri goyah, berarti lantai tidak rata; Anda perlu mengganjal salah satu rol belakang. Anda dapat menggunakan bahan lembaran tipis padat, seperti papan tipis, ubin atau lembaran vinil. Letakkan bahan tersebut di bawah salah satu rol belakang saat kulkas didorong ke posisi akhirnya. Pastikan pintu freezer ditutup rapat setelah memasukkan atau mengeluarkan makanan. Bila pintu terbuka sebagian, akan terbentuk bunga es tebal di dalam freezer. Bila ini terjadi, singkirkan bunga tersebut.
Fitur-fitur kulkas lampu freezer lampu kompartemen pendingin kantong pintu ice twist serve rak freezer laci freezer Panel Kontrol Panel kontrol terdapat pada pintu kulkas Catatan: Ilustrasi menunjukkan beragam fitur, tapi mungkin tidak benar-benar pas dengan kulkas Anda.
Penggunaan panel kontrol indikator temperatur kompartemen pendingin indikator temperatur freezer ikon Quick Chill ikon mode Holiday pengatur temperatur kompartemen pendingin pengatur temperatur freezer ikon Quick Freeze tombol pemilih fitur (mode) ikon Display Lock tombol pengunci /pembebas kunci Pengaturan fungsi pada layar LED Catatan: layar akan padam setelah 20 detik tanpa aktivitas, dan akan menyala kembali bila ada tombol yang disentuh.
Fitur-fitur kulkas lampu freezer lampu kompartemen pendingin kantong pintu tangki air ice twist serve rak freezer laci freezer Panel Kontrol Panel kontrol terdapat pada pintu kulkas Catatan: Ilustrasi menunjukkan beragam fitur, tapi mungkin tidak benar-benar pas dengan kulkas Anda.
Penggunaan panel kontrol indikator temperatur freezer indikator temperatur kompartemen pendingin ikon mode Holiday ikon Quick Chill ikon Display Lock ikon Quick Freeze tombol fitur tombol pemilih temperatur freezer tombol pemilih temperatur kompartemen pendingin tombol pengunci /pembebas kunci Pengaturan fungsi pada layar LED Catatan: layar akan padam setelah 20 detik tanpa aktivitas, dan akan menyala kembali bila ada tombol yang disentuh.
Fitur-fitur kulkas Anda Petunjuk untuk tuas pengaman anak. Bagian ini menjelaskan tentang cara terbaik menggunakan berbagai fitur bermanfaat dan cara membersihkannya. Kantong penyimpan di pintu Cara melepas: Tahan kedua sisi rak botol dengan kedua tangan. Tekan dari samping tanpa bos dan tekan ke arah dalam sesuai arah panah. Saat menekan kuat-kuat, perhatikan bahwa pengait di pinggir rak botol terlepas dari alur pada liner. Kemudian rak botol bisa dilepas.
Pembersihan kulkas Anda peringatan Sebelum membersihkan: Matikan aliran listrik ke stopkontak kulkas dan cabut steker kulkas untuk menghindari sengatan listrik. Pintu dan bagian luar Pintu kulkas hendaknya hanya dibersihkan dengan air sabun hangat dan lap lembut. Bilas dengan air bersih dan lap permukaannya dengan air bersih dan lap lembu bersih untuk membuang sisa sabun. perhatian Jangan menggunakan obat pembersih baja tahan karat, sabut abrasif, atau zat pembersih lain karena dapat menggores permukaan.
Panduan Penyimpanan Makanan Kategori Produk Kompartemen Pendingin Freezer Saran penyimpanan Daging Sosis dan daging cincang 1-2 hari 2-3 bulan Potongan daging dan steak 3-4 hari 4-6 bulan Letakkan daging dingin di sisi belakang kompartemen pendingin di mana temperatur paling rendah.
Pembersihan kulkas Anda Bila menurut Anda ada masalah dengan kulkas, Anda dapat melakukan beberapa pemeriksaan sederhana sebelum menghubungi teknisi servis. Anda dapat menemukan masalahnya sendiri yang akan menghindari kerepotan, menghemat waktu dan uang Anda. Masalah Solusi Kulkas tidak bisa bekerja. • Pastikan steker telah terpasang pada stopkontak berarus listrik dengan baik dan stopkontak telah dinyalakan. • Coba gunakan alat lain pada stopkontak yang sama.
electrolux.com/shop PERINCIAN KONTAK LAYANAN KONSUMEN ELECTROLUX Thailand Telepon Pusat Layanan Konsumen: (+66 2) 725 9000 Electrolux Thailand Co., Ltd Electrolux Building 14th Floor 1910 New Petchburi Road Bangkapi, Huay Kwang, Bangkok 10310 Telepon Kantor: (+66 2) 725 9100 Faks Kantor: (+66 2) 725 9299 Email: customercare@electrolux.co.th Malaysia Telepon. Bebas Biaya Domestik: 1300-88-11-22 Electrolux Home Appliances Sdn. Bhd 7th Floor, Tower 2, Jaya 33, No.
Hướng dẫn sử dụng VN - Việt Nam Tủ lạnh ESE5401A-BPH,ESE5401A-BID ESE5401A-BTH,ESE5401A-BVN ESE6101A-BMY,ESE6101A-BSG ESE5441A-BID,ESE6141A-BPH ESE6141A-BID,ESE6141A-BMY ESE6141A-BVN,ESE6141A-BTH ESE6645A-BPH,ESE6645A-BTH ESE6645A-BVN,ESE6645A-BID ESE6645A-BMY
Lời chào mừng Nội dung Xin chúc mừng và cảm ơn quý khách hàng đã lựa chọn tủ lạnh Electrolux của chúng tôi. Chúng tôi tin rằng quý khách sẽ hài lòng với chiếc tủ lạnh mới này. Trước khi sử dụng thiết bị, chúng tôi đề nghị quý khách hàng đọc qua toàn bộ sách hướng dẫn sử dụng trong đó mô tả rõ về sản phẩm cũng như các chức năng sử dụng.
Những chỉ dẫn an toàn quan trọng Vui lòng đọc kỹ hướng dẫn sử dụng và cất giữ ở vị trí tiện dụng để tham khảo về sau. Các biểu tượng sẽ xuất hiện trong sách hướng dẫn sử dụng có ý nghĩa như sau: Cảnh báo Biểu tượng này biểu thị những thông tin liên quan tới sự an toàn của quý khách. Chú ý Biểu tượng này biểu thị những thông tin liên quan tới việc tránh gây hư hỏng cho thiết bị. Lời khuyên sử dụng và thông tin Biểu tượng này cho biết các lời khuyên và thông tin về sử dụng thiết bị.
Lắp đặt thiết bị mới Khoảng trống xung quanh tủ lạnh của quý khách: Tủ lạnh Side by Side của quý khách có thể được lắp đặt nằm giữa các tủ bếp hoặc các đồ đạc cố định khác với điều kiện quý khách phải chừa lại các khoảng trống như sau xung quanh thân tủ: Lắp đặt tủ lạnh của quý khách Thiết bị phải được di chuyển khi chân ổn định được cuộn lại hoàn toàn khỏi sàn để không ảnh hưởng đến hoạt động của các con lăn (xem sơ đồ ở Bước 3 bên dưới). 1. Chừa khoảng thông hơi tối thiểu 10mm ở cả hai bên của tủ lạnh.
5. Nếu tủ lạnh rung lắc, sàn nhà có thể không bằng phẳng. Quý khách cần đệm tấm đệm ở chân bánh lăn phía sau. Quý khách có thể sử dụng những miếng đệm mỏng làm từ các chất liệu cứng như miếng bảng mỏng, miếng lát sàn làm từ nhựa vinyl hoặc nhựa laminate. Đặt miếng đệm phía dưới chân bánh lăn phía sau khi tủ lạnh được đẩy tới vị trí lắp đặt. 6. Quý khách có thể cần điều chỉnh vị trí lắp đặt tủ lạnh bằng cách lặp lại các bước 3, 4 và 5. 7.
Tính năng của tủ lạnh Đèn ngăn đông Đèn tủ lạnh Ngăn đựng ở cửa Khay làm đá xoay Các kệ tủ lạnh Kệ ngăn đông Ngăn đựng của ngăn đông Ngăn đựng của ngăn lạnh Bảng điều khiển Bảng điều khiển được đặt trên cửa tủ lạnh. Chú ý: Các mô tả của sản phẩm sử dụng cho nhiều các sản phẩm khác nhau, có thể không hoàn toàn trùng khớp với sản phẩm hiện tại.
Sử dụng bảng điều khiển Hiển thị nhiệt độ ngăn lạnh Điều chỉnh nhiệt độ ngăn lạnh Hiển thị nhiệt độ ngăn đông Biểu tượng Chế độ làm lạnh nhanh Biểu tượng Chế độ Kỳ nghỉ Điều chỉnh nhiệt độ ngăn đông Biểu tượng Chế độ Làm đông nhanh Nút Tính năng Hiển thị biểu tượng Khóa Nút khoá/mở khoá Cài đặt chức năng của màn hình LED Lưu ý: màn hình sẽ tắt sau 20 giây không hoạt động, màn hình sẽ hoạt động nếu bạn chạm lại lần nữa. Lựa chọn tính năng - mỗi lần nhấn nút “MODE” sẽ chuyển qua các chế độ hoạt động.
Các bộ phận của tủ lạnh Hướng dẫn cho cần gạt khóa trẻ em Phần này sẽ hướng dẫn quý khách biết cách tận dụng tối đa các bộ phận hữu ích của tủ lạnh và cách vệ sinh chúng. Ngăn đựng ở cửa tủ Tháo lắp: Dùng hai tay giữ hai bên kệ đựng chai. Đẩy nó từ phía không có gờ nổi lên và đẩy vào trong theo hướng của mũi tên. Khi đẩy mạnh, xin lưu ý rằng khóa trên mép của kệ đựng chai được tách ra khỏi rãnh của miếng lót. Sau đó, kệ đựng chai có thể được tháo ra.
Vệ sinh tủ lạnh Cảnh báo Trước khi vệ sinh: Ngắt điện và rút phích cắm trước khi vệ sinh tủ lạnh để tránh không xảy ra bất kỳ nguy cơ điện giật nào. Các cánh cửa và phần bên ngoài tủ lạnh Chỉ sử dụng khăn mềm và nước xà phòng ấm để lau cánh cửa. Rửa lại bằng nước sạch và sau đó lau bề mặt bằng nước sạch và với khăn mềm để loại bỏ cặn xà phòng. Thận trọng Không sử dụng chất tẩy rửa dành cho thép không gỉ, miếng cọ rửa có tính bào mòn cao hoặc các loại chất tẩy rửa khác có khả năng làm xước bề mặt tủ.
Hướng dẫn bảo quản thực phẩm PHÂN LOẠI SẢN PHẨM Thịt Thịt gia cầm Hải sản Sản phẩm từ sữa Trái cây và rau củ TỦ LẠNH TỦ ĐÔNG MẸO BẢO QUẢN Xúc xích và thịt bằm 1-2 ngày 2-3 tháng Sườn và bít tết 3-4 ngày 4-6 tháng Bảo quản thịt nguội ở phía sau tủ lạnh là nơi lạnh nhất. Thịt nguội 3-5 ngày 4-6 tháng Thịt nướng 3-5 ngày 12 tháng Thịt nướng có thể mất đến 48 giờ để rã đông hiệu quả, đưa thịt nướng đông lạnh vào ngăn lạnh 2 ngày trước khi sử dụng.
Khắc phục sự cố Nếu bạn thấy có vấn đề với tủ lạnh, bạn có thể tiến hành một số bước kiểm tra dễ dàng trước khi gọi bộ phận bảo trì. Bạn có thể khắc phục vấn đề tránh bất tiện và tiết kiệm thời gian cùng tiền bạc. SỰ CỐ Khi thiết bị của bạn không hoạt động KHẮC PHỤC SỰ CỐ Đảm bảo rằng dây nguồn được cắm đúng cách vào ổ cắm điện và ổ cắm đã được “BẬT” Thử chạy một thiết bị khác từ cùng một ổ cắm điện. Nếu không có điện cấp từ ổ cắm, bạn có thể bị nổ cầu chì hoặc chập mạch điện trong nhà.
electrolux.com/shop LIÊN HỆ CHI TIẾT DỊCH VỤ CHĂM SÓC KHÁCH HÀNG CỦA ELECTROLUX Thailand Call Center Tel: (+66 2) 725 9000 Electrolux Thailand Co., Ltd Electrolux Building 14th Floor 1910 New Petchburi Road Bangkapi, Huay Kwang, Bangkok 10310 O ce Tel: (+66 2) 725 9100 O ce Fax: (+66 2) 725 9299 Email: customercare@electrolux.co.th Indonesia CUSTOMER CARE CENTRE: Plaza Kuningan Menara Utara 2nd Floor Suite 201 JI. H.R. Rasana Said Kaz C 11-14 Kuningan, Jakarta Selatan Tel: (021) 522 7180 SMS 0812.8088.
คูมือการใชงาน TH - ภาษาไทย ตูเย็น ESE5401A-BPH,ESE5401A-BID ESE5401A-BTH,ESE5401A-BVN ESE6101A-BMY,ESE6101A-BSG ESE5441A-BID,ESE6141A-BPH ESE6141A-BID,ESE6141A-BMY ESE6141A-BVN,ESE6141A-BTH ESE6645A-BPH,ESE6645A-BTH ESE6645A-BVN,ESE6645A-BID ESE6645A-BMY
ขอแสดงความยินดี ขอแสดงความยินดีและขอขอบคุณที่เลือกใชตูเย็นของเรา เรามั่นใจวาทานจะไดพบกับ ความสุขจากการใชตูเย็นเครื1องใหม กอนที่ทานจะเริ่มตนการใชงาน เราขอแนะนําใหทาน อานเนื้อหาทั้งหมดในคูมือการใชงานนี้อยางละเอียด ซึ่งจะมีการอธิบายสวนตางๆ และการใชงานตางๆ ของตูเย็น เพื1อหลีกเลี่ยงความเสี่ยง การใชงานผิดวิธี และอันตรายตางๆ ที่อาจเกิดขึ้นไดเสมอ จากการใชงานเครื1องใชไฟฟา การติดตั้งตูเย็นอยางถูกตองและการอานคูมือ ความปลอดภัยโดยละเอียดกอนเริ่มใชงานจึงมีความสําคัญเปนอยางมาก เราแนะน
ขอแนะนําเพื1อความปลอดภัยที่สําคัญ กรุณาอานคูมือการใชงานนี้อยางละเอียดและเก็บไวในที่ๆ หยิบมาใชงานไดอยางสะดวก เพื1อใชอางอิงในภายหลัง สัญลักษณที่ทานจะเห็นในคูมือนี้มีความหมายดังตอไปนี้: คําเตือน สัญลักษณนี้แสดงขอมูลที่เกี่ยวของกับความปลอดภัยของทาน ขอควรระวัง สัญลักษณนี้แสดงขอมูลวิธีการหลีกเลี่ยงความเสียหายที่อาจเกิดขึ้นกับผลิตภัณฑนี้ ขอแนะนําและขอมูล สัญลักษณนี้แสดงขอแนะนําและขอมูลเกี่ยวกับการใชงานผลิตภัณฑนี้ ขอแนะนําดานสิ่งแวดลอม สัญลักษณนี้แสดงขอแนะนําและขอมูลเกี่ยวกับ
การติดตั้งตูเย็นใหมของทาน ระยะหางรอบตูเย็นของทาน ทานสามารถติดตั้งตูเย็นแบบประตูเปดซายขวา (side-by-side) นี้ไวระหวางตูเก็บของ หรือชั้นวาง ทั้งนี้ตองคํานึงถึงระยะหางรอบๆ ตูเย็น: 1. เวนระยะหางดานขางทั้งสองดานอยางนอย 10 มม. 2. เวนระยะหางดานหลังตูเย็น 30 มม. 3. เวนระยะหางเหนือฝาครอบบานพับ 10 มม. ระยะหางที่แนะนํา ตูเย็น 10 มม. 10 มม. 30 มม.
5. หากทานพบวาตูเย็นของทานโยกไปมา แสดงวาพื้นของทานไมเสมอกัน ทานตองใช วัสดุวางรองดานใดดานหนึ่งของลูกกลิ้งดานหลัง ควรใชวัสดุของแข็งที่บาง เชน แผนกระดาน กระเบื้องไวนิล หรือพื้นลามิเนตที่มีขนาดบาง วางวัสดุรองดานใด ดานหนึ่งของลูกกลิ้งดานหลังหลังจากเคลื1อนยายตูเย็นไปยังตําแหนงที่ตองการ 6. ทานอาจตองทําการปรับการติดตั้งตูเย็นอยางละเอียดโดยการทําซํ้าขั้นตอนที่ 3, 4 และ 5 7.
สวนประกอบตางๆ ของตูเย็น ไฟชองแชแข็ง ไฟชองแชเย็น ชองวางของที่ประตู ถาดทํานํ้าแข็งแบบบิด ชั้นวางภายในชองแชเย็น ชั้นวางภายในชองแชแข็ง ลิ้นชักภายในชองแชแข็ง แผงควบคุม แผงควบคุมจะอยูบนประตูตูแชเย็น หมายเหตุ: คุณสมบัติที่แสดงในภาพประกอบอาจแตกตางไปจากผลิตภัณฑปจจุบัน 6 สวนประกอบตางๆ ของตูเย็น ชองแชผักผลไม
การใชงานแผงควบคุม สวนแสดงผลอุณหภูมิชองแชเย็น ตัวควบคุมอุณหภูมิชองแชเย็น สวนแสดงผลอุณหภูมิชองแชแข็ง สัญลักษณเรงความเย็นชองแชเย็น สัญลักษณโหมด Holiday ตัวควบคุมอุณหภูมิชองแชแข็ง สัญลักษณเรงความเย็นชองแชแข็ง ปุมฟงกชั่น สัญลักษณล็อกหนาจอ ปุมล็อก/ปลดล็อก การตั้งคาฟงกชั่นการทํางานของจอ LED หมายเหตุ: หนาจอแสดงผลจะดับลงหากไมมีการใชงานใดๆ ภายใน 20 วินาที และจะกลับมาทํางานอีกครั้งหากแตะปุมใดปุมหนึ่ง การเลือกฟงกชั่น - ทุกครั้งที่กดปุม “MODE” โหมดการทํางานจะเปลี่ยนแปลงไป Holida
สวนประกอบตางๆ ของตูเย็น ไฟชองแชแข็ง ไฟชองแชเย็น ชองวางของที่ประตู ถังเก็บนํ้า ถาดทํานํ้าแข็งแบบบิด ชั้นวางภายในชองแชเย็น ชั้นวางภายในชองแชแข็ง ลิ้นชักภายในชองแชแข็ง แผงควบคุม แผงควบคุมจะอยูบนประตูตูแชเย็น หมายเหตุ: คุณสมบัติที่แสดงในภาพประกอบอาจแตกตางกันในแตละรุน 8 สวนประกอบตางๆ ของตูเย็น ชองแชผักผลไม
การใชงานแผงควบคุม สวนแสดงผลอุณหภูมิชองแชแข็ง สวนแสดงผลอุณหภูมิชองแชเย็น สัญลักษณเรงความเย็นชองแชเย็น สัญลักษณโหมด Holiday (วันหยุด) สัญลักษณเรงความเย็นชองแชแข็ง สัญลักษณล็อกหนาจอ ปุมฟงกชั่น ปุมควบคุมอุณหภูมิ ชองแชแข็ง ปุมควบคุมอุณหภูมิ ปุมล็อก/ปลดล็อก ชองแชเย็น การตั้งคาฟงกชั่นการทํางานของจอ LED หมายเหตุ: หนาจอแสดงผลจะดับลงหากไมมีการใชงานใดๆ ภายใน 20 วินาที และจะกลับมาทํางานอีกครั้งหากแตะปุมใดปุมหนึ่ง การเลือกฟงกช่นั - ทุกครั้งที่กดปุม “MODE” โหมดการทํางานจะเปล
คําแนะนําในการใชกานล็อกปองกันเด็ก สวนประกอบตางๆ ของตูเย็น หัวขอนี้จะอธิบายรายละเอียดเกี่ยวกับสวนประกอบตางๆ ของตูเย็นและขั้นตอนการ ทําความสะอาด ชองวางของที่ประตู การถอดแยกชิ้นสวน: ใชมือทั้งสองขางจับชั้นวางขวดทั้งสองดานไว เลื1อนชั้นวางขวด ตามทิศทางลูกศรจากนั้นดันเขาดานใน เมื1อดันเขาดานใน ตัวล็อกที่อยูตรงขอบชั้นวาง ขวดจะแยกออกจากรอง จากนั้นทานจะสามารถถอดชั้นวางขวดออกมาได การประกอบ: ใชมือทั้งสองขางจับชั้นวางขวดทั้งสองดานไว ประกอบตัวล็อกเขากับดาน ที่มีสวนนูนกอน จากนั้นดันชั้นวางข
การทําความสะอาดตูเย็นของทาน คําเตือน กอนทําความสะอาด: ปดจุดจายไฟตูเย็น และถอดปลั๊กออก ทั้งนี้เพื1อปองกันไมใหถูก ไฟฟาช็อต ประตูตูเย็นและพื้นผิวภายนอก ทานควรทําความสะอาดประตูตูเย็นดวยนํ้าสบูอุนๆ และผานุมเทานั้น ลางทําความสะอาด พื้นผิวตูเย็นดวยนํ้าสะอาดและเช็ดใหแหงดวยผานุมเพื1อกําจัดคราบสบู ขอควรระวัง หามใชนํ้ายาทําความสะอาดสเตนเลส แผนขัด หรือนํ้ายาอื1นๆ ที่จะทําใหพื้นผิว เปนรอยขีดขวน ความเสียหายที่เกิดกับตูเย็นหลังการจัดสงจะไมอยูภายใต การรับประกัน ภายใน ควรทําความพื้นผ
คําแนะนําในการเก็บถนอมอาหาร ประเภท ผลิตภัณฑ ตูเย็น ชองแชแข็ง ขอแนะนําในการเก็บ เนื้อสัตว ไสกรอกและเนื้อบด 1-2 วัน 2-3 เดือน เนื้อชิ้นและสเตก 3-4 วัน 4-6 เดือน เก็บโคลดคัทไวที่ดานหลังสุดของตูเย็นซึ่งเปนบริเวณ ที่เย็นที่สุด โคลดคัท 3-5 วัน 4-6 เดือน พลาสติกอาจทําใหเนื้อสัตวคายนํ้าออกมาหากเก็บ ในตูเย็นมากกวาหนึ่งวัน เนื้อสัตวอบ 3-5 วัน 12 เดือน เนื้ออบอาจใชเวลานานถึง 48 ชั่วโมงในการละลายนํ้าแข็ง ทั้งหมด ควรยายเนื้ออบแชแข็งออกมาพักไวในตูเย็นกอน ใชงาน 2 วัน เนื้อไก
การแกไขปญหา หากทานสงสัยวาเกิดความผิดปกติขึ้นกับตูเย็นของทาน โปรดปฏิบัติตามขั้นตอนดังตอไปนี้เพื1อตรวจสอบเบื้องตนดวยตนเองกอนติดตอฝายบริการ ดวยขั้นตอนปฏิบัติดังกลาว ทานอาจบงชี้และแกไขปญหาไดดวยตนเองซึ่งจะชวยประหยัดทั้งเวลาและคาใชจาย ปญหา วิธีแกไข เมื1อตูเย็นของทานไมทํางาน ตรวจสอบใหแน ใจวาปลั๊กไฟเสียบที่เตารับอยางสนิทดี และสวิตชไฟอยูที่ตําแหนงเปด • ลองเสียบปลั๊กเครื1องใชไฟฟาอื1นๆ เขากับเตารับเดียวกันนี้ แลวใชงาน หากไมมีกระแสไฟฟามาจากเตารับดังกลาวแสดงวาฟวสอาจข
electrolux.com/shop รายละเอียดการติดตอศูนยบริการลูกคาอีเลคโทรลักซ Thailand Call Center Tel: (+66 2) 725 9000 Electrolux Thailand Co., Ltd Electrolux Building 14th Floor 1910 New Petchburi Road Bangkapi, Huay Kwang, Bangkok 10310 O ce Tel: (+66 2) 725 9100 O ce Fax: (+66 2) 725 9299 Email: customercare@electrolux.co.th Indonesia CUSTOMER CARE CENTRE: Plaza Kuningan Menara Utara 2nd Floor Suite 201 JI. H.R. Rasana Said Kaz C 11-14 Kuningan, Jakarta Selatan Tel: (021) 522 7180 SMS 0812.8088.