ESF4510LOX EN DISHWASHER USER MANUAL
www.electrolux.com CONTENTS 1. SAFETY INFORMATION...................................................................................... 2 2. SAFETY INSTRUCTIONS.....................................................................................4 3. PRODUCT DESCRIPTION................................................................................... 5 4. CONTROL PANEL .............................................................................................. 6 5. PROGRAMMES..........................
ENGLISH 3 responsible if an incorrect installation and use causes injuries and damages. Always keep the instructions with the appliance for future reference. 1.
www.electrolux.com • • • • Before maintenance, deactivate the appliance and disconnect the mains plug from the mains socket. Do not use water spray and steam to clean the appliance. The ventilation openings in the base (if applicable) must not be obstructed by a carpet. The appliance is to be connected to the water mains using the new supplied hose-sets. Old hose sets must not be reused. 2. SAFETY INSTRUCTIONS 2.1 Installation • Remove all the packaging. • Do not install or use a damaged appliance.
ENGLISH • If the water inlet hose is damaged, immediately disconnect the mains plug from the mains socket. Contact the Authorised Service Centre to replace the water inlet hose. recommend only the use of original spare parts. • When you contact the Authorised Service Centre, ensure that you have the following information that is available on the rating plate. Model : PNC : Serial Number : 2.4 Use • Do not sit or stand on the open door. • Dishwasher detergents are dangerous.
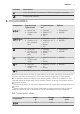
www.electrolux.com 5 6 7 8 9 Rating plate Salt container Air vent Rinse aid dispenser Detergent dispenser 10 Cutlery basket 11 Lower basket 12 Upper basket 4.
ENGLISH Indicator Description Rinse aid indicator. It is always off while the programme operates. EnergySaver indicator. 5.
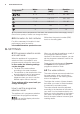
www.electrolux.com Programme 1) Water (l) Energy (kWh) Duration (min) 6 - 11 0.5 - 1.2 40 - 140 11 - 13 1.0 - 1.2 130 - 150 7-8 0.9 - 1.0 50 - 60 8 0.8 30 4 0.1 14 1) The pressure and the temperature of the water, the variations of the mains supply, the options and the quantity of dishes can change the values. 5.2 Information for test institutes For all the necessary information for test performance, send an email to: Write down the product number (PNC) that is on the rating plate.
ENGLISH Water hardness German degrees (°dH) French degrees (°fH) mmol/l Clarke degrees Water softener level 47 - 50 84 - 90 8.4 - 9.0 58 - 63 10 43 - 46 76 - 83 7.6 - 8.3 53 - 57 9 37 - 42 65 - 75 6.5 - 7.5 46 - 52 8 29 - 36 51 - 64 5.1 - 6.4 36 - 45 7 23 - 28 40 - 50 4.0 - 5.0 28 - 35 6 19 - 22 33 - 39 3.3 - 3.9 23 - 27 5 1) 15 - 18 26 - 32 2.6 - 3.2 18 - 22 4 11 - 14 19 - 25 1.9 - 2.5 13 - 17 3 4 - 10 7 - 18 0.7 - 1.8 5 - 12 2 <4 <7 <0.
www.electrolux.com – = rinse aid dispenser activated. – • The display shows the current setting: – = Acoustic signal off. = rinse aid dispenser deactivated. 3. Press Option to change the setting. 4. Press the on/off button to confirm the setting. – = Acoustic signal on. 3. Press Delay to change the setting. 4. Press the on/off button to confirm the setting. 6.4 Acoustic signals 6.5 MyFavourite Acoustic signals sound when a malfunction of the appliance occurs.
ENGLISH detergent functions. They can also contain other cleaning or rinsing agents. also the energy consumption (approximately -25%). This option deactivates the release of salt. The salt indicator does not come on. Dishes can still be wet once the programme is completed. With the use of this option the programme duration is prolonged to increase the cleaning and drying results with the use of multi-tablets. The duration of the programme will be shorter.
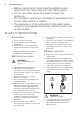
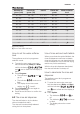
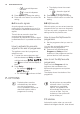
www.electrolux.com B A M AX 4 1 3 2 + - 5. Turn the cap of the salt container clockwise to close the salt container. Water and salt can come out from the salt container when you fill it. Risk of corrosion. To prevent it, after you fill the salt container, start a programme. 8.2 How to fill the rinse aid dispenser A D C D CAUTION! Only use rinse aid specifically designed for dishwashers. 1. Press the release button (D) to open the lid (C). 2.
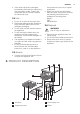
ENGLISH A 30 B 13 4. Set the applicable options. 5. Press Start to start the programme. • The washing phase indicator comes on . • The programme duration starts to decrease with steps of 1 minute. D 20 C 1. Press the release button (B) to open the lid (C). 2. Put the detergent, in powder or tablets, in the compartment (A). 3. If the programme has a prewash phase, put a small quantity of detergent in the compartment (D). 4. Close the lid. Make sure that the release button locks into position. 9.
www.electrolux.com Make sure that there is detergent in the detergent dispenser before you start a new programme. End of the programme When the programme is completed the display shows 0:00. The phase indicators are off. All buttons are inactive except for the on/off button. 1. Press the on/off button or wait for the Auto Off function to automatically deactivate the appliance. If you open the door before the activation of Auto Off, the appliance is automatically deactivated. 2. Close the water tap.
ENGLISH 10.4 Loading the baskets • Only use the appliance to wash items that are dishwasher-safe. • Do not put in the appliance items made of wood, horn, aluminium, pewter and copper. • Do not put in the appliance items that can absorb water (sponges, household cloths). • Remove larger residues of food from the dishes into the waste bin. • Make soft the remaining burned food on the items. • Put hollow items (cups, glasses and pans) with the opening down. • Make sure that glasses do not touch other glasses.
www.electrolux.com 7. Reassemble the filters (B) and (C). 8. Put back the filter (B) in the flat filter (A). Turn it clockwise until it locks. 2. Remove the filter (C) out of filter (B). 3. Remove the flat filter (A). 4. Wash the filters. CAUTION! An incorrect position of the filters can cause bad washing results and damage to the appliance. 11.2 Cleaning the spray arms Do not remove the spray arms. If the holes in the spray arms are clogged, remove remaining parts of soil with a thin pointed object.
ENGLISH • If you regularly use short duration programmes, these can leave deposits of grease and limescale inside the appliance. To prevent this, we 17 recommend to run long duration programmes at least 2 times per month. 12. TROUBLESHOOTING If the appliance does not start or it stops during operation. Before you contact an Authorised Service Centre, check if you can solve the problem by yourself with the help of the information in the table.
www.electrolux.com 12.1 The washing and drying results are not satisfactory Problem Possible solution There are whitish streaks or bluish layers on glasses and dishes. • The release quantity of rinse aid is too much. Adjust the rinse aid selector to a lower position. • The quantity of detergent is too much. There are stains and dry water drops on glasses and dishes. • The released quantity of rinse aid is not sufficient. Adjust the rinse aid selector to a higher position.
ENGLISH 19
100005320-A-442014 www.electrolux.