user manual Dishwasher ESF 47005
electrolux Electrolux. Thinking of you. Share more of our thinking at www.electrolux.
electrolux 3 • Dishwasher detergents can cause chemical burns to eyes, mouth and throat. Could endanger life! Comply with the safety instructions of the dishwasher detergent manufacturer. • Water in the dishwasher is not for drinking purposes. Detergent residue may still be present in your machine. • Ensure that the door of the dishwasher is always closed when it is not being loaded or unloaded. In this way you will avoid anybody tripping over the open door and hurting themselves.
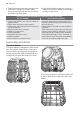
electrolux Product description 1 2 3 4 5 Upper basket Water hardness dial Salt container Detergent dispenser Rinse aid dispenser 6 7 8 9 10 Rating plate Filters Lower spray arm Upper spray arm Worktop
electrolux 5 Control panel 7 8 1 2 3 4 5 6 7 8 9 10 On/off button Cancel button (Cancel) Programme selection buttons Multitab button (Multitab) Save energy button (Save) Delay start button (Delay) Digital display Function buttons Indicator lights Programme indicator lights Indicator lights Comes on when the multitab function is set. Comes on when the save energy function is set. Comes on when the rinse aid has run out. 1) Comes on when the special salt has run out.
electrolux The digital display The digital display indicates: • the level of hardness to which the water softener is set, • the approximate remaining time of the running programme, • activation/deactivation of the rinse aid dispenser ( ONLY with multitab function active), • the end of a washing programme (a zero will appear in the digital display), • the countdown for the delay start, • fault codes concerning malfunction of the dishwasher.
electrolux 7 Set the water softener The dishwasher is equipped with a water softener designed to remove minerals and salts from the water supply, which would have a detrimental or adverse effect on the operation of the appliance. The higher the content of these minerals and salts, the harder your water is. Water hardness is measured in equivalent scales, German degrees (dH°), French degrees (°TH) and mmol/l (millimol per litre - international unit for the hardness of water).
electrolux 5. To memorize the operation, switch off the appliance. Use of dishwasher salt Warning! Only use salt specifically designed for use in dishwashers. All other types of salt not specifically designed for use in a dishwasher, especially table salt, will damage the water softener. Only fill with salt just before starting one of the complete washing programmes.
electrolux 9 40 washing cycles, depending upon the dosage setting. 3. Ensure that the lid is closed after every refill. Clean up any rinse aid spilt during filling with an absorbent cloth to avoid excess foaming during the next wash. 2. Add the rinse aid in the container. The maximum level for filling is indicated by "max". According to the finish and drying results obtained, adjust the dose of rinse aid by means of the 6 position selector (position 1 minimum dosage, position 6 maximum dosage).
electrolux • Plastic items and pans with non stick coatings have a tendency to retain water drops; these items will not dry as well as porcelain and steel items. • Light items (plastic bowls etc.) must be loaded in the upper basket and arranged so they do not move. For washing in the dishwasher the following cutlery and dishes are not suitable: are of limited suitability: • Cutlery with wooden, horn, china or mother-of- • Only wash stoneware in the dishwasher if it is pearls handles.
electrolux 11 The cutlery basket Long bladed knives stored in an upright position are a potential hazard. Long and/or sharp items of cutlery such as carving knives must be positioned horizontally in the upper basket. Take care when loading or unloading sharp items such as knives. If the size and dimensions of the cutlery do not allow the use of the grid, it can be easily hidden.
electrolux Mini cutlery basket The upper basket is supplied with a mini cutlery basket. Caution! NEVER PUT KNIVES IN THE MINI CUTLERY BASKET. THIS WILL PREVENT DAMAGE TO THE APPLIANCE. Place the mini cutlery basket in the front part of the upper basket, only on the left-hand side. The dimensions of the cutlery depend on the position of the upper basket. Refer to the following table.
electrolux 13 Caution! BEFORE CLOSING THE DOOR, MAKE SURE THAT THE SPRAY ARMS CAN ROTATE FREELY. Adjusting the height of the upper basket If washing very large plates you can load them in the lower basket after moving the upper basket to the higher position. Maximum height of the dishes in: the upper basket the lower basket With upper basket raised 20 cm 31 cm With upper basket lowered 24 cm 27 cm To move to the higher position proceed as follows: 1. Pull out the basket until it stops. 2.
electrolux 2. Fill the detergent dispenser (1) with detergent. The marking indicates the dosing levels: 20 = approximately 20 g of detergent 30 = approximately 30 g of detergent. 1 2 4. Close the lid and press until it locks in place. 3. All programmes with prewash need an additional detergent dose (5/10 g) that must be placed in the prewash detergent chamber (2). This detergent will be used during the prewash phase.
electrolux 15 If the drying results are not satisfactory we suggest that you: 1. Fill up the rinse aid dispenser with rinse aid. 2. Activate the rinse aid dispenser. 3. Set the rinse aid dosage to position 2. • The activation/deactivation of the rinse aid is only possible with the Multitab function active. Activation/deactivation of the rinse aid dispenser 1. Switch on the appliance. It must be in setting mode. 2. Press and hold, at the same time, the function buttons B and C.
electrolux Warning! Interrupt or cancel a washing programme in progress ONLY if it's absolutely necessary. Attention! Hot steam may escape when the door is opened. Open the door carefully. Interrupt a washing programme in progress • Open the dishwasher door; the programme will stop. Close the door; the programme will start from the point at which it was interrupted. • Press the On/Off, all indicator lights will go off.
electrolux 17 Programme Type of load Programme description Energy save function 1) Heavy soil Crockery, cutlery, pots and pans Prewash Main wash up to 70°C 2 intermediate rinses Final rinse Drying Effect on the washing programme. Normal or light soil Crockery and cutlery Main wash up to 60°C Final rinse No effect on the washing programme. Eco 4) Normal soil Crockery and cutlery Prewash Main wash up to 50°C 1 intermediate rinse Final rinse Drying Effect on the washing programme.
electrolux the stop. During this process ensure that the flat filter does not protrude above the base of the washing compartment. NEVER use the dishwasher without filters. Incorrect repositioning and fitting of the filters will produce poor washing results and will result in damage to the appliance. 3. Turn the handle about 1/4 a turn anticlockwise and remove the filter system NEVER try to remove the spray arms.
electrolux 19 Avoid over tilting the machine during transportation. What to do if… The appliance will not start or stops during operation. Certain problems can be due to the lack of simple maintenance or oversights, which can Fault codes and malfunction be solved with the help of the hints described in the chart, without calling out an engineer. Switch off the appliance and carry out the following suggested corrective actions.
electrolux The wash results are not satisfactory The dishes are not clean • The wrong programme has been selected. • The dishes are arranged in such a way as to stop water reaching all parts of a surface. The baskets must not be overloaded. • The spray arms do not rotate freely due to incorrect arrangement of the load. • The filters in the base of the washing compartment are dirty or incorrectly positioned. • Too little or no detergent has been used.
electrolux 21 Arrangement upper basket without salad-bow Arrangement upper basket with saladbowl Cup racks: position A Installation Warning! Any electrical and/or plumbing work required to install this appliance should be carried out by a qualified electrician and/or plumber or competent person. Fitting under a counter (kitchen worktop or sink) Remove all packaging before positioning the machine. If possible, position the machine next to a water tap and a drain.
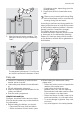
electrolux By removing the machine's worktop, you can install it under a close fitting sink unit or a preexisting top, providing the dimensions of the recess correspond to those shown in the picture. Proceed as follows: • Remove the machine’s worktop by unscrewing the two rear retaining screws (1), pull the worktop from the back of the machine (2) and slide out the front slots, lifting the worktop (3). Insert the machine after adjusting the levelling with the adjustable feet.
electrolux 23 Attention! NOT all dishwasher models of have inlet and drain hoses provided with a locknut. In this case, this facility is not available. If the appliance is connected to new pipes or pipes which have not been used for a long time, you should run the water for a few minutes before connecting the inlet hose. DO NOT use connection hoses which have previously been used on an old appliance.
electrolux Our appliances are supplied with a security device to protect against the return of dirty water back into the machine. If the spigot of your sink has a "no return valve" incorporated this can prevent the correct draining of your dishwasher. We therefore advise you to remove it. To avoid water leakage after installation make sure that the water couplings are tight. Electrical connection Warning! Safety standards require the appliance to be earthed.
electrolux 25
electrolux
electrolux 27
www.electrolux.