ESF5512LOW EN IT TR Dishwasher Lavastoviglie Bulaşık Makinesi User Manual Istruzioni per l’uso Kullanma Kılavuzu 2 23 46
www.electrolux.com CONTENTS 1. SAFETY INFORMATION....................................................................................3 2. SAFETY INSTRUCTIONS..................................................................................4 3. PRODUCT DESCRIPTION................................................................................ 6 4. CONTROL PANEL ............................................................................................ 7 5. PROGRAMMES.....................................
ENGLISH 1. 3 SAFETY INFORMATION Before the installation and use of the appliance, carefully read the supplied instructions. The manufacturer is not responsible for any injuries or damages that are the result of incorrect installation or usage. Always keep the instructions in a safe and accessible location for future reference. 1.
www.electrolux.com • • • • • • Put the cutlery in the cutlery basket with the sharp ends pointing down or put them in the cutlery drawer in a horizontal position with the sharp edges down. Do not leave the appliance with the open door unattended to avoid stepping accidentally onto it. Before any maintenance operation, deactivate the appliance and disconnect the mains plug from the socket. Do not use high pressure water sprays and/or steam to clean the appliance.
ENGLISH • • devices fitted (water meters, etc.), let the water flow until it is clean and clear. Ensure that there are no visible water leaks during and after the first use of the appliance. The water inlet hose has a safety valve and a sheath with an inner mains cable. • • • • • 5 Dishwasher detergents are dangerous. Obey the safety instructions on the detergent packaging. Do not drink and play with the water in the appliance.
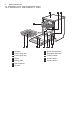
www.electrolux.com 3.
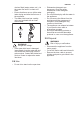
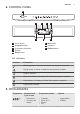
ENGLISH 4. CONTROL PANEL 1 2 3 8 1 2 3 4 5 4 7 On/off button Programs button Programme indicators Display Delay button 5 6 6 Start button 7 Indicators 8 Options button 4.1 Indicators Indicator Description Washing phase. It comes on when the washing phase operates. Drying phase. It comes on when the drying phase operates. XtraDry indicator. Rinse aid indicator. It is always off while the programme operates. Salt indicator. It is always off while the programme operates. HygienePlus indicator. 5.
www.electrolux.
ENGLISH 5.2 Information for test institutes 9 info.test@dishwasher-production.com For all the necessary information for test performance, send an email to: Write down the product number (PNC) that is on the rating plate. 6. SETTINGS 6.1 Programme selection mode and user mode When the appliance is in programme selection mode it is possible to set a programme and to enter the user mode. Settings available in the user mode: • The level of water softener according to the water hardness.
www.electrolux.com German de‐ grees (°dH) French de‐ grees (°fH) mmol/l Clarke de‐ grees Water softener level 19 - 22 33 - 39 3.3 - 3.9 23 - 27 5 1) 15 - 18 26 - 32 2.6 - 3.2 18 - 22 4 11 - 14 19 - 25 1.9 - 2.5 13 - 17 3 4 - 10 7 - 18 0.7 - 1.8 5 - 12 2 <4 <7 <0.7 <5 1 2) 1) Factory setting. 2) Do not use salt at this level.
ENGLISH 11 To improve the drying performance refer to the XtraDry option or activate AirDry. CAUTION! If children have access to the appliance, it is advised to deactivate AirDry as opening the door may pose a danger. How to deactivate AirDry Make sure the appliance is in user mode. During the drying phase, the door opens automatically and remains ajar. CAUTION! Do not try to close the appliance door within 2 minutes after automatic opening. This can cause damage to the appliance. 1. Press Delay.
www.electrolux.com automatically used in next cycles. This configuration can be changed at any time. Every time is activated, XtraDry is off and needs to be chosen manually. If the option is not applicable to the program, the related indicator does not come on or it flashes quickly for a few seconds and then goes off. The display shows the updated program duration. How to activate XtraDry Press Options until the indicator comes on. 8. BEFORE FIRST USE 1.
ENGLISH 8.2 How to fill the rinse aid dispenser A D CAUTION! Only use rinse aid specifically designed for dishwashers. B C M AX 4 1 3 2 + 1. Press the release button (D) to open the lid (C). 2. Pour the rinse aid in the dispenser (A) until the liquid reaches the fill level 'max'. 3. Remove the spilled rinse aid with an absorbent cloth to prevent too much foam. 4. Close the lid. Make sure that the release button locks into position.
www.electrolux.com A B • D • 30 The washing phase indicator comes on . The programme duration starts to decrease with steps of 1 minute. 20 Starting a programme with delay start C 1. Press the release button (B) to open the lid (C). 2. Put the detergent, in powder or tablets, in the compartment (A). 3. If the programme has a prewash phase, put a small quantity of detergent in the compartment (D). 4. Close the lid. Make sure that the release button locks into position. 9.
ENGLISH Cancelling the delay start while the countdown operates When you cancel the delay start you have to set the programme and options again. Press and hold simultaneously Programs and Options until the appliance is in programme selection mode. Cancelling the programme Press and hold simultaneously Programs and Options until the appliance is in program selection mode. Make sure that there is detergent in the detergent dispenser before you start a new program.
www.electrolux.com 10.3 What to do if you want to stop using multi-tablets Before you start to use separately detergent, salt and rinse aid do the following procedure. 1. Set the highest level of the water softener. 2. Make sure that the salt and rinse aid containers are full. 3. Start the shortest programme with a rinsing phase. Do not add detergent and do not load the baskets. 4. When the programme is completed, adjust the water softener according to the water hardness in your area. 5.
ENGLISH 17 C B A 1. Turn the filter (B) counterclockwise and remove it. 2. Remove the filter (C) out of filter (B). 3. Remove the flat filter (A). 5. Make sure that there are no residues of food or soil in or around the edge of the sump. 6. Put back in place the flat filter (A). Make sure that it is correctly positioned under the 2 guides. 7. Reassemble the filters (B) and (C). 8. Put back the filter (B) in the flat filter (A). Turn it clockwise until it locks. 4. Wash the filters.
www.electrolux.com 11.2 Cleaning the spray arms • Do not remove the spray arms. If the holes in the spray arms are clogged, remove remaining parts of soil with a thin pointed object. 11.3 External cleaning • • • • Clean the appliance with a moist soft cloth. Only use neutral detergents. Do not use abrasive products, abrasive cleaning pads or solvents. If you regularly use short duration programmes, these can leave deposits of grease and limescale inside the appliance.
ENGLISH Problem and alarm code Possible cause and solution The appliance does not fill with water. • • The display shows or . • • • The appliance does not drain the water. The display shows . • • • • The anti-flood device is on. • The display shows . 19 Make sure that the water tap is open. Make sure that the pressure of the water supply is not too low. For this information, contact your local water authority. Make sure that the water tap is not clogged.
www.electrolux.com Refer to "Before first use", "Daily use", or "Hints and tips" for other possible causes. Once you have checked the appliance, deactivate and activate the appliance. If the problem occurs again, contact an Authorised Service Centre. For alarm codes not described in the table, contact an Authorised Service Centre. 12.1 The washing and drying results are not satisfactory Problem Possible cause and solution Poor washing results. • • • Poor drying results.
ENGLISH Problem Possible cause and solution Traces of rust on cutlery. • • There are residues of deter‐ gent in the dispenser at the end of the programme. • • • 21 There is too much salt in the water used for wash‐ ing. Refer to "The water softener". Silver and stainless steel cutlery were placed to‐ gether. Avoid to put silver and stainless steel items close together. The detergent tablet got stuck in the dispenser and therefore was not completely washed away by wa‐ ter.
www.electrolux.com Water supply Cold water or hot water 2) max 60 °C Capacity Place settings 13 Power consumption Left-on mode (W) 5.0 Power consumption Off-mode (W) 0.50 1) Refer to the rating plate for other values. 2) If the hot water comes from alternative source of energy, (e.g. solar panels, aeolian ener‐ gy), use the hot water supply to decrease energy consumption. 14. ENVIRONMENTAL CONCERNS Recycle materials with the symbol . Put the packaging in relevant containers to recycle it.
ITALIANO 23 INDICE 1. INFORMAZIONI DI SICUREZZA......................................................................24 2. ISTRUZIONI DI SICUREZZA........................................................................... 25 3. DESCRIZIONE DEL PRODOTTO....................................................................27 4. PANNELLO COMANDI ....................................................................................28 5. PROGRAMMI....................................................................
1. www.electrolux.com INFORMAZIONI DI SICUREZZA Leggere attentamente le istruzioni fornite prima di installare e utilizzare l'apparecchiatura. I produttori non sono responsabili di eventuali lesioni o danni derivanti da un'installazione o un uso scorretti. Conservare sempre le istruzioni in un luogo sicuro e accessibile per poterle consultare in futuro. 1.
ITALIANO • • • • • • • • • 25 La pressione di esercizio dell'acqua (minima e massima) deve essere compresa tra 0.5 (0.05) / 8 (0.8) bar (MPa) Rispettare il numero massimo di 13 coperti. Se il cavo di alimentazione è danneggiato, deve essere sostituito dal produttore, dal Centro di Assistenza Autorizzato o da una persona qualificata per evitare situazioni di pericolo.
www.electrolux.com 2.2 Collegamento elettrico AVVERTENZA! Rischio di incendio e scossa elettrica. • • • • • • • • • L'apparecchiatura deve disporre di una messa a terra. Verificare che i parametri sulla targhetta siano compatibili con le indicazioni elettriche dell'alimentazione. Utilizzare sempre una presa elettrica con contatto di protezione correttamente installata. Non utilizzare prese multiple e prolunghe. Accertarsi di non danneggiare la spina e il cavo.
ITALIANO rimangano chiusi all'interno dell'apparecchiatura. 3.
www.electrolux.com 4. PANNELLO COMANDI 1 2 8 1 2 3 4 5 Tasto On/Off Tasto Programs Spie del programma Display Tasto Delay 3 4 7 5 6 6 Tasto Start 7 Spie 8 Tasto Options 4.1 Spie Spia Descrizione Fase di lavaggio. Si accende quando è in corso la fase di lavaggio. Fase di asciugatura. Si accende quando è in corso la fase di asciuga‐ tura. Spia XtraDry. Spia del brillantante. La spia è spenta durante l'esecuzione del pro‐ gramma. Spia del sale.
ITALIANO 29 5.
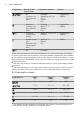
www.electrolux.com Programma 1) Acqua (l) Energia elettrica (kWh) Durata (min.) 14-15 1.5 - 1.7 155 - 170 10 0.8 30 13 - 14 1.0 - 1.1 75 - 85 5 0.1 14 1) I valori possono variare a seconda della pressione e della temperatura dell'acqua, delle variazioni dell'alimentazione elettrica, delle opzioni selezionate e della quantità di stoviglie. 5.2 Informazioni per gli istituti di prova Per le informazioni necessarie, relative alle prestazioni inviare una mail a: info.
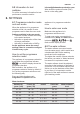
ITALIANO Il decalcificatore dell'acqua deve essere regolato in base alla durezza dell’acqua locale. Per informazioni sulla durezza dell’acqua nella propria zona è possibile rivolgersi all’ente erogatore locale. È 31 importante impostare il livello corretto del decalcificatore dell'acqua per garantire buoni risultati di lavaggio. Durezza dell'acqua Gradi tedeschi Gradi francesi (°dH) (°fH) mmol/l Gradi Clar‐ ke Livello del decal‐ cificatore dell’ac‐ qua 47 - 50 84 - 90 8.4 - 9.
www.electrolux.com soddisfacenti quando vengono usate solo pastiglie multifunzione, sarà possibile disattivare la notifica per il rifornimento del brillantante. Per prestazioni di asciugatura eccellenti, consigliamo tuttavia di usare sempre il brillantante. Durante la fase di asciugatura l'oblò si apre automaticamente e rimane socchiuso. ATTENZIONE! Non cercare di chiudere l'apparecchiatura 2 minuti dopo l'apertura automatica. Ciò potrebbe danneggiare l'apparecchio.
ITALIANO 33 7. OPZIONI Le opzioni desiderate devono essere attivate ogni volta prima dell'avvio di un programma. Non è possibile attivare o disattivare le opzioni durante l'esecuzione di un programma. Non tutte le opzioni sono compatibili tra loro. Se vengono selezionate opzioni non compatibili, l'apparecchiatura ne disattiva automaticamente una o diverse. Solo le spie delle opzioni ancora attive rimangono accese. 7.
www.electrolux.com avvia soltanto al termine di tale procedura. La procedura viene ripetuta a intervalli periodici. 8.1 Contenitore del sale ATTENZIONE! Usare sale grosso specifico per lavastoviglie. Il sale fino aumenta il rischio di corrosione. Il sale viene utilizzato per rigenerare la resina nel decalcificatore e per assicurare buoni risultati di lavaggio nell'uso quotidiano. ATTENZIONE! Acqua e sale potrebbero fuoriuscire dal contenitore del sale durante il riempimento.
ITALIANO per evitare che si formi troppa schiuma. 4. Chiudere il coperchio. Assicurarsi che il pulsante di sgancio si blocchi in posizione. 35 È possibile ruotare il selettore del dosaggio (B) tra la posizione 1 (quantità minima) e la posizione 4 o 6 (quantità massima). 9. UTILIZZO QUOTIDIANO 1. Aprire il rubinetto dell’acqua. 2. Premere il tasto On/Off per accendere l’apparecchiatura. Verificare che l'apparecchiatura sia in modalità di selezione programma.
www.electrolux.com • • La spia della fase di lavaggio si accende. La durata del programma inizia a diminuire ad intervalli di 1 minuto. Avvio del programma con partenza ritardata 1. Impostare un programma. 2. Premere ripetutamente Delay finché il display indica l'intervallo desiderato per la partenza ritardata (da 1 a 24 ore). La spia del programma selezionato lampeggia. 3. Premere Start. 4. Chiudere la porta dell'apparecchiatura per avviare il conto alla rovescia.
ITALIANO 37 10. CONSIGLI E SUGGERIMENTI UTILI 10.1 Informazioni generali I seguenti suggerimenti garantiranno una pulizia e risultati di asciugatura quotidiani ottimali ed aiuteranno a salvaguardare l'ambiente. • • • • • • Gettare i residui di cibo più grandi nella spazzatura. Non prelavare le stoviglie a mano. Se necessario, utilizzare il programma prelavaggio (se disponibile) o selezionare un programma con fase di prelavaggio. Utilizzare sempre tutto lo spazio presente nei cestelli.
www.electrolux.com • • • • Verificare che i bicchieri non si tocchino l’un l’altro. Sistemare le posate e i piccoli oggetti nel cestello portaposate. Sistemare gli oggetti leggeri nel cestello superiore. In modo tale che non possano muoversi. Prima di avviare un programma, assicurarsi che i mulinelli possano ruotare liberamente. 10.5 Prima di avviare il programma Verificare che: • • • • • • • Le stoviglie siano riposte correttamente nei cestelli.
ITALIANO 39 2. Estrarre il filtro (C) dal filtro (B). 3. Rimuovere il filtro piatto (A). 7. Rimontare i filtri (B) e (C). 8. Posizionare nuovamente il filtro (B) nel filtro piatto (A). Ruotarlo in senso orario finché non si blocca in posizione. 4. Lavare i filtri. 5. Assicurarsi che non vi siano residui di cibo o di sporco all'interno o attorno al bordo della vasca di raccolta. 6. Posizionare nuovamente il filtro piatto (A). Assicurarsi che sia posizionato correttamente al di sotto delle due guide.
www.electrolux.com • guarnizione in gomma della porta, con un panno morbido umido. Se si usano regolarmente programmi di breve durata, è possibile riscontrare depositi di grasso e calcare all'interno dell'apparecchiatura. Per evitarlo, si consiglia di avviare programmi lunghi almeno 2 volte al mese. • Per ottenere le migliori prestazioni dall'apparecchiatura, si consiglia di utilizzare mensilmente un prodotto specifico per la pulizia della lavastoviglie.
ITALIANO Problema e codice allar‐ me Possibile causa e soluzione L'apparecchiatura non ca‐ rica acqua. • • Il display mostra o . • • • L'apparecchiatura non sca‐ • rica l'acqua. • Il display visualizza . • • Il dispositivo antiallaga‐ mento è attivo. 41 Controllare che il rubinetto dell'acqua sia aperto. Controllare che la pressione dell'acqua di alimenta‐ zione non sia troppo bassa. Per ottenere informazio‐ ni a questo proposito, contattare l'ente erogatore lo‐ cale.
www.electrolux.com Problema e codice allar‐ me Possibile causa e soluzione L'apparecchiatura fa scat‐ tare l'interruttore principa‐ le. • L'amperaggio è insufficiente per sopportare l'uso di più apparecchiature contemporaneamente. Verificare l'amperaggio della presa e la capacità del contatore o spegnere una delle apparecchiature in uso. Guasto elettrico interno all'apparecchiatura. Contat‐ tare un Centro di Assistenza Autorizzato.
ITALIANO Problema Possibile causa e soluzione Le stoviglie sono bagnate. • • • • • 43 Per ottenere le migliori prestazioni di asciugatura, attivare l'opzione XtraDry e impostare AirDry. Il programma non dispone di una fase di asciugatu‐ ra oppure questa fase viene eseguita a bassa tem‐ peratura. Il contenitore del brillantante è vuoto. La causa potrebbe essere la qualità del brillantan‐ te. La causa potrebbe essere la qualità del detersivo in pastiglie multifunzione.
www.electrolux.com Problema Possibile causa e soluzione Il calcare può depositarsi su pentole e stoviglie, nella va‐ sca o all'interno della porta. • • • • • • • Pentole e stoviglie opache, scolorite o incrinate. • • • Il livello di sale è basso, controllare l'indicatore di riempimento. Il tappo del contenitore del sale è lento. L'acqua di rubinetto è dura. Fare riferimento a "De‐ calcificatore dell'acqua".
ITALIANO 45 14. CONSIDERAZIONI SULL'AMBIENTE Riciclare i materiali con il simbolo . Buttare l'imballaggio negli appositi contenitori per il riciclaggio. Aiutare a proteggere l’ambiente e la salute umana e a riciclare rifiuti derivanti da apparecchiature elettriche ed elettroniche. Non smaltire le apparecchiature che riportano il simbolo insieme ai normali rifiuti domestici. Portare il prodotto al punto di riciclaggio più vicino o contattare il comune di residenza.
www.electrolux.com İÇİNDEKİLER 1. GÜVENLIK BILGILERI..................................................................................... 47 2. GÜVENLIK TALIMATLARI............................................................................... 48 3. ÜRÜN TANIMI.................................................................................................. 50 4. KONTROL PANELI ..........................................................................................51 5. PROGRAMLAR....................
TÜRKÇE 1. 47 GÜVENLIK BILGILERI Cihazın montaj ve kullanımından önce, verilen talimatları dikkatlice okuyun. Üretici, yalnız kurulum veya kullanımdan kaynaklanan yaralanma ya da hasarlardan sorumlu değildir. Talimatları, ileride kullanabilmeniz için her zaman güvenli ve kolay ulaşılabilir bir yerde tutun. 1.
www.electrolux.com • • • • • • Çatal bıçak takımını keskin uçları aşağı bakacak şekilde çatal-bıçak sepetine koyun veya keskin kenarları aşağıda yatay konumda çatal bıçak çekmcesine koyun. Kazara basmayı önlemek için cihazın kapısını açık şekilde gözetimsiz bırakmayın. Bakım işleminden önce, cihazı devre dışı bırakın ve elektrik fişini bağlantısını kesin. Cihazı temizlemek için yüksek basınçlı su spreyi ve/ veya buhar kullanmayın.
TÜRKÇE • • işlemi gerçekleştirirken veya yeni cihazlar takarken (su metreleri vb.) temiz su gelene dek suyu akıtın. Cihaz ilk kez kullanıldığında veya ilk kez kullanıldıktan sonra görülebilir su kaçağı olmadığından emin olun. Su giriş hortumu bir emniyet valfine ve içinden elektrik kablosunun geçtiği bir kılıfa sahiptir. • 49 Cihazın içine, üzerine veya yakınına yanıcı ürünler ya da yanıcı ürünlerle ıslanmış eşyalar koymayın. 2.5 Elden çıkarma UYARI! Yaralanma ya da boğulma riski.
www.electrolux.com 3.
TÜRKÇE 51 4. KONTROL PANELI 1 2 8 1 2 3 4 5 Açma/kapama tuşu Programs tuşu Program göstergeleri Ekran Delay tuşu 3 4 7 5 6 6 Start tuşu 7 Göstergeler 8 Options tuşu 4.1 Göstergeler Gösterge Açıklama Yıkama aşaması. Yıkama aşaması çalışırken yanar. Kurutma aşaması. Kurutma aşamasına geçildiğinde yanar. XtraDry göstergesi. Parlatıcı uyarı göstergesi. Program çalışırken bu gösterge daima ka‐ palıdır. Tuz uyarı göstergesi. Program çalışırken bu gösterge daima kapalıdır. HygienePlus göstergesi.
www.electrolux.com 5.
TÜRKÇE Program 1) Su (l) Tüketim (kWs) Süre (dak.) 7 - 12 0.7 - 1.4 45 - 156 14-15 1.5 - 1.7 155 - 170 10 0.8 30 13 - 14 1.0 - 1.1 75 - 85 5 0.1 14 53 1) Su basıncı ve sıcaklığı, elektrik beslemesindeki dalgalanmalar, seçenekler ve bulaşıkların miktarı, değerlerde değişikliğe neden olabilir. 5.2 Test enstitüleri için bilgiler Test performansı hakkında tüm gerekli bilgiler için şu adrese e-posta gönderin: Bilgi etiketinde bulunan ürün numarasını (PNC) not edin. info.
www.electrolux.com Yerel su idareniz, bölgenizdeki suyun sertliği hakkında size bilgi verebilir. Yıkamadan memnun edici sonuçlar almak için, su yumuşatma düzeneğinin doğru seviyede ayarlanması önemlidir. Su sertliği Alman derece‐ si (°dH) Fransız dere‐ cesi (°fH) mmol / l Clarke de‐ Su yumuşatma recesi düzeneği seviyesi 47 - 50 84 - 90 8.4 - 9.0 58 - 63 10 43 - 46 76 - 83 7.6 - 8.3 53 - 57 9 37 - 42 65 - 75 6.5 - 7.5 46 - 52 8 29 - 36 51 - 64 5.1 - 6.
TÜRKÇE Parlatıcı gözü boş bildiriminin devre dışı bırakılması DİKKAT! Otomatik olarak açıldıktan sonra cihazın kapağını 2 dakika kapatmayın. Aksi halde cihazınız zarar görebilir. Cihazın kullanıcı modunda olduğundan emin olun. 1. Options öğesine basın. • ve kapalıdır. • göstergesi hala yanıp söner. Gösterge ekranında geçerli ayar gösterilir. • – göstergeleri AirDry, hariç tüm programları otomatik olarak aktive eder.
www.electrolux.com 7. OPSIYONLAR Bir program başlatmadan önce istediğiniz seçenekleri etkinleştirmelisiniz. Bir program çalışırken bu seçeneklerin etkinleştirilmesi ya da devre dışı bırakılması mümkün değildir. Tüm seçenekler birbiri ile uyumlu değildir. Uyumlu olmayan seçenekleri seçtiyseniz, cihaz bir ya da birden fazla seçeneği otomatik olarak devre dışı bırakır. Yalnızca hala etkin seçeneklerin göstergeleri açık kalacaktır. 7.
TÜRKÇE 8.1 Tuz haznesi DİKKAT! Sadece bulaşık makinelerine uygun kaba tuz kullanın. İnce tuz korozyon riskini artırır. Su yumuşatıcı içine reçineyi yeniden doldurmak ve günlük kullanımda yıkamadan memnun edici sonuçların alınmasını sağlamak için tuz kullanılır. Tuz haznesinin doldurulması DİKKAT! Tuz doldururken, hazneden tuz ve su taşabilir. Tuz haznesini doldurduktan sonra, dökülen tuzların çelik tabana zarar vermemesi için derhal durula& beklet programını çalıştırın. 8.
www.electrolux.com Bırakılan miktar seçicisini (B), konum 1 (en düşük miktar) ile konum 4 veya 6 (en yüksek miktar) arasında ayarlayabilirsiniz. 9. GÜNLÜK KULLANIM 1. Musluğu açın. 2. Cihazı çalıştırmak için açma/kapama tuşuna basın. Cihazın program seçme modunda olduğundan emin olun. • Tuz göstergesi yanıyorsa, tuz haznesini doldurun. • Parlatıcı göstergesi yanıyorsa, parlatıcı gözünü doldurun. 3. Bulaşıkları sepetlere yerleştirin. 4. Deterjanı ekleyin. 5.
TÜRKÇE 59 Gecikmeli başlatma ile bir programın başlatılması Geri sayım sırasında gecikmeli başlatmanın iptal edilmesi 1. Bir program ayarlayın. 2. Gösterge ekranında ayarlamak istediğiniz gecikme süresi (1 ila 24 saat) görünene dek Delay tuşuna arka arkaya basın. Seçilen programın göstergesi yanıp söner. 3. Start öğesine basın. 4. Geri sayımı başlatmak için cihazın kapağını kapatın. Geri sayım sona erdiğinde, program başlar ve yıkama aşaması göstergesi yanmaya başlar.
www.electrolux.com • • • • Daima bulaşık sepetindeki tüm alanı kullanın. Bulaşıkları makineye yerleştirirken, püskürtme kolundaki deliklerden püskürtülen suyun tüm bulaşıklara ulaşabilir ve bulaşıkların yıkanabilir olmasına dikkat edin. Bulaşıkların birbirine temas etmemesi ya da birbirlerinin üzerini kapatmamasına dikkat edin. Bulaşık makinesi deterjanı, parlatıcı ve tuzunu ayrı ayrı kullanabilir veya multi-tablet kullanabilirsiniz (örn; "3'ü 1 arada", "4'ü 1 arada", "Hepsi 1 arada").
TÜRKÇE 10.5 Bir programa başlamadan önce • Şunlardan emin olun: 10.6 Bulaşıkların sepetlerden boşaltılması • • • • • • Filtreler temiz olmalıdır ve doğru şekilde yerleştirilmelidir. Tuz haznesinin kapağı sıkı olmalıdır. Püskürtme kolları tıkanmamış olmalıdır. Bulaşık makinesi tuzu ve parlatıcısı (multi tablet kullanmadığınız takdirde) kullanılmalıdır. Bulaşıklar sepete doğru yerleştirilmelidir. Program, bulaşık tipine ve kirlilik derecesine uygun olmalıdır. 1.
www.electrolux.com DİKKAT! Filtrelerin yanlış konumlanması, tatmin edici olmayan yıkama sonuçlarına ve cihazın zarar görmesine neden olabilir. 11.2 Püskürtme kollarının temizlenmesi Püskürtme kollarını çıkartmayın. Püskürtme kollarındaki delikler tıkanırsa, kalan kir parçalarını ince uçlu bir cisim ile çıkarın. 5. Haznenin içinde veya kenarlarında yiyecek veya kir kalıntısı olmadığından emin olun. 6. Yassı filtreyi (A) yerine takın.
TÜRKÇE 63 12. ARIZALAR VE ÇÖZÜMLERI Cihaz başlamaz ya da çalışma sırasında durursa, öncelikle tablodaki bilgiler yardımıyla sorunu kendi kendinize çözüp çözemeyeceğinizi kontrol edebilir veya Yetkili Servis Merkezini arayabilirsiniz. Bazı arızalarda, gösterge ekranında bir alarm kodu gösterilir. Oluşan sorunların büyük bir kısmı, Yetkili Servis Merkezi ile iletişime geçmeye gerek kalmadan çözülebilir.
www.electrolux.com Sorun ve alarm kodu Olası sebep ve çözümü Program çok uzun sürüyor. • Gecikmeli başlatma ayarlanmış ise, gecikme ayarını iptal edin ya da geri sayımın bitmesini bekleyin. Ekranda gösterilen kalan süre, program sonuna doğru uzuyor. Bu bir arıza değildir. Cihaz sorunsuz çalışıyordur. • Cihaz kapağında küçük sı‐ • zıntı var. • Cihaz dengelenerek kurulmamıştır. Ayarlanabilir ayakları (varsa) gevşetin veya sıkın. Cihazın kapağı kasadaki yuvasına tam oturmadan kapanıyordur.
TÜRKÇE Problem Olası sebep ve çözümü Kötü kurutma sonuçları. • • • • • Bardak ve tabaklarda beya‐ zımsı çizikler ve lekeler ya da mavimsi katmanlar var. • • 65 Bulaşıklar yıkandıktan sonra çok uzun bir süre ka‐ pağı kapalı cihazın içinde kaldı. Parlatıcı yok veya parlatıcı miktarı yeterli değil. Par‐ latıcı seviye ayarını daha yüksek bir konuma geti‐ rin. Plastik parçaların havlu ile ilaveten kurulanması ge‐ rekebilir.
www.electrolux.com Problem Olası sebep ve çözümü Cihazın içinde koku mevcut. • "İç temizlik" bölümüne bakın. Bulaşıklar, iç hazne ve ka‐ pağın içinde kireç kalıntıları var. • Tuz seviye ayarı düşük, tuz doldurma uyarı göster‐ gesini kontrol edin. Tuz haznesinin kapağı gevşek bırakılmıştır. Musluk suyunuz çok sert. "Su yumuşatıcısı" bölü‐ müne bakın.
TÜRKÇE 14. ÇEVREYLE İLGİLİ BİLGİLER Şu sembole sahip malzemeler geri dönüştürülebilir . Ambalajı geri dönüşüm için uygun konteynerlere koyun. Elektrikli ve elektronik cihaz atıklarının geri dönüşümüne ve çevre ve insan sağlığının korunmasına yardımcı * olun. Ev atığı sembolü bulunan cihazları atmayın. Ürünü yerel geri dönüşüm tesislerinize gönderin ya da belediye ile irtibata geçin.
156924411-A-412017 www.electrolux.