B u l a fl › k M a k i n e s › KULLANIM EL K‹TABI Model ESF 610 152989 76/1 TR
‹çindekiler Kullan›c› için Teknisyenin dikkatine Talimat kitab›n› kullanma k›lavuzu 2 Önemli emniyet bilgileri 3 Cihaz›n tan›m› 4 Kumanda paneli 5 Kullanmadan önce Su yumuflat›c›s›n›n ayarlanmas› Parlat›c› Deterjan kullan›m› 6 6 8 9 Cihaz›n›z›n kullan›lmas› Cihaz›n›z›n doldurulmas› Üst sepet yüksekli¤inin ayarlanmas› 10 10 11 Önemli tavsiyeler ve ipuçlar› 12 Y›kama programlar› 13 Çal›flt›rma s›ras› 14 Bak›m ve temizleme ‹çinin temizlenmesi Merkezi filtrenin temizlenmesi Büyük filtrenin t
Önemli emniyet bilgileri Bu talimat kitab›n›n ileride baflvurmak üzere cihazla birlikte tutulmas› gerekir. Cihaz baflka birisine sat›ld›¤›nda ya da devredildi¤inde veya cihaz› evde b›rakarak tafl›n›rsan›z, yeni sahibinin cihaz›n çal›flmas›n› ve ilgili emniyet bilgileri ö¤renebilmesi için daima kitab›n cihaz ile birlikte b›rak›lmas›n› sa¤lay›n›z. Bu bilgi, emniyet bak›m›ndan verilmifltir. Cihaz› monte etmeden veya kullanmadan önce dikkatle OKUMALISINIZ. Montaj› ■ ■ ■ ■ ■ ■ Bu cihaz a¤›rd›r.
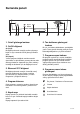
Cihaz›n tan›m› 14 1 2 3 13 12 11 4 10 5 6 9 8 7 IN68 1. Su sertli¤i ayar› 9. Parlat›c› gözü 2. Seviyeleme ara parçalar› 10. Merkezi filtre 3. Üst sepet durdurucusu 11. Alt püskürtücü kolu 4. Tuz bölmesi 12. Üst püskürtücü kolu 5. Genifl filtre 13. Üst sepet 6. Deterjan gözü 14. Üst tezgah 7. Kumanda paneli 8.
Kumanda paneli 1 2 3 4 5 1. On/off gösterge lambas› 6 7 8 6. Tuz doldurma göstergesi lambas› 2. On/Off dü¤mesi Bu ›fl›k, tuz kab›n›n doldurulmas› gerekti¤inde yanar. Tuzun gerekli olmad›¤› yumuflak suyun bulundu¤u bölgede bu ›fl›k yan›k kalacakt›r. On (Aç›k) Bu dü¤meye basmak suretiyle makina çal›flmaya bafllar ve ayn› zamanda On/Off gösterge lambas› yanar. 7. Program seçme kadran› Off (Kapal›) Y›kama program› bitti¤inde, makina otomatik olarak durur ve pilot lambas› yanmaya devam eder.
Kullanmadan önce Bulafl›k y›kama makinan›z› ilk defa kullanmadan önce: ☞ elektrik ve su ba¤lant›lar›n›n montaj talimatlar›na uygun oldu¤undan emin olunuz ☞ bütün ambalajlar› cihaz›n içinden ç›kar›n›z ☞ su yumuflat›c›s›n› koyunuz ☞ tuz bölmesini doldurunuz ☞ parlat›c› gözünü doldurunuz. Su yumuflat›c›s›n›n ayarlanmas› Bulafl›k makinas›, cihaz›n çal›flmas›na zarar veren ya da olumsuz etkide bulunan sudaki mineralleri ve tuzlar› gidermek için tasarlanm›fl olan bir su yumuflat›c›s› ile donat›lm›flt›r.
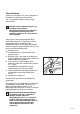
Tuzu doldurma Suyunuz “0 seviyesinde” ise, zaten yumuflakt›r ve bu nedenle tuz kullanmaya gerek yoktur. Tuz, 1 seviyesinden itibaren, yukar›ya do¤ru kullan›lmal›d›r. Özellikle yaln›zca bulafl›k makinas› için haz›rlanm›fl tuz kullan›n›z. Bulafl›k makinas›nda kullan›lmak üzere haz›rlanmam›fl tüm di¤er tip tuzlar, özellikle yemek tuzu, su yumuflat›c›s›na zarar verecektir. Yaln›zca tam y›kama programlar›ndan birine bafllamadan hemen önce (Durulama ve Tutma program›nda de¤il) tuz doldurunuz.
Parlat›c› Durulama vas›tas›yla leke ve ince çizgiler oluflmaks›z›n kurumas›n› sa¤lamak üzere, parlat›c› son durulama esnas›nda otomatik olarak ilave edilir. Kapa¤›n içine yerlefltirilmifl bulunan göz, dozaj ayar›na ba¤l› olarak 16 - 40 y›kama program› için yeterli olan 110 ml parlat›c› al›r. Parlat›c› doldurma: 1. (A) kapa¤›n› saat dönüfl yönünün tersine çevirerek gözü aç›n›z. A 2. Göz tamamen doluncaya kadar parlat›c›y› ilave ediniz (yaklafl›k 110 ml). (B) göstergesi tamamen kararacakt›r. BR01 3.
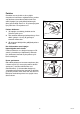
Deterjan kullan›m› Özellikle yaln›zca bulafl›k makinalar›nda kullan›lmak için haz›rlanm›fl deterjanlar› kullan›n›z. Bulafl›k y›kama makinas›n› deterjanla doldurmak için afla¤›daki flekilde hareket ediniz: 1. (D) mandal›n› çekerek gözün kapa¤›n› aç›n›z. D 2. Program çizelgesindeki tavsiyelere göre deterjan ilave ediniz. Bütün deterjanlar ayn› olmad›¤›ndan, özellikle tabletler için paket üzerindeki talimatlara da bakmal›s›n›z.
Cihaz›n›z›n Kullan›m› Cihaz›n›z›n doldurulmas› Bulafl›klar› makinaya yerlefltirmeden önce, filtrelerin t›karmas›n› ve buna ba¤l› olarak performans›n düflmesini önlemek için, yiyecek kal›nt›lar›n› temizleyiniz. Sepetlerin içinden düflebilecek kadar küçük parçalar› makinaya koymay›n›z. Kapa¤› aç›n›z ve bulafl›klar› doldurmak için sepetleri kayd›rarak d›flar› çekiniz.
Üst sepet Üst sepet tabaklar (24 cm çapa kadar yemek tabaklar›, tatl› tabaklar›, çay tabaklar›), salata kaseleri, fincan ve bardaklar için tasarlanm›flt›r; Uzun sapl› bardaklar kalk›k vaziyetteki kadeh raflar›na ters çevrilerek yerlefltirelebilirler. Daha büyük tabaklar (24 cm çapa kadar yemek tabaklar›) üst sepetin ön k›sm›na yerlefltirilmelidirler. Hafif maddeler (plastik kaseler vs.) üst sepete konmal› ve hareket etmeyecek flekilde düzenlenmelidirler.
Önemli tavsiyeler ve ipuçlar› Enerji tasarrufu Bulafl›k y›kama makinalar› için uygun olmayan eflyalar Her yemekten sonra bulafl›klar› derhal makinaya yerlefltiriniz ve y›kamadan önce bulafl›k makinas›n› tam doluncaya kadar bekleyiniz.
Y›kama programlar› Program kirlilik derecesi ve koyma tipi (ön y›kamal›) Normal kirli. Çanak çömlek, çatal-b›çak tak›m› tencereler ve tavalar A Normal 65°C Hafif kirli Çanak çömlek ve çatal-b›çak tak›m› B * Normal 65°C Gerekli dü¤meler Programlay›c› n›n bafllama konumu On/Off On/Off Ekonomik 55°C (ön y›kamal›) Normal kirli. Çanak çömlek ve tabak tak›m› A 55° On/Off ** Çabuk 55°C Hafif kirli.
Çal›flt›rma s›ras› 1. Filtreleri kontrol ediniz 9. Temiz ve uygun flekilde yerlefltirildiklerinden emin olunuz (temizleme talimatlar›na bak›n›z). 2. Parlat›c› ve tuz bulundu¤unu kontrol ediniz 3. Bulafl›klar› doldurunuz On/Off dü¤mesine bas›n›z. On/Off gösterge lambas› yanacakt›r ve makina çal›flmaya bafllayacakt›r. Herhangi bir anda y›kama program›n› kesmek isterseniz, tekrar dü¤meye bas›n›z. 10. Y›kama program›n›n sonunda Y›kama program›n›n sonunda makina otomatik olarak durur.
Bak›m ve temizleme Makinan›n ‹çinin temizlenmesi Kapak etraf›ndaki contalar›, deterjan ve parlat›c› da¤›t›c›lar›n› düzenli olarak ›slak bir bezle temizlemeye dikkat ediniz. Her 3 ayda bir deterjan kullanarak bulafl›ks›z olarak 65°C y›kama program›n› çal›flt›rman›z› öneririz. Merkezi filtrenin temizlenmesi (Her y›kamadan sonra) Yiyecek k›r›nt›lar› boflaltma filtresinde (A) birikebilirler ve filtrenin musluk suyu alt›nda durulanarak temizlenmesi gerekir.
D›fl k›sm›n temizlenmesi Makinan›n d›fl k›sm›n› ve kumanda panelini ›slak yumuflak bir bezle temizleyiniz. Gerekirse yaln›zca nötr deterjanlar kullan›n›z. Hiçbir zaman afl›nd›r›c› ürünler, ovma maddeleri ve çözücüler (aseton, trikloretilen v.s...) kulanmay›n›z. Çal›flmadan uzun süre bekletilmesi Herhangi bir süre makinay› kullanmayacaksan›z, afla¤›dakileri yapman›z tavsiye edilir: 1. Cihaz›n elektrik fiflini çekiniz ve sonra suyu kapat›n›z; 2. Parlat›c› gözünü doldurunuz; 3.
Teknisyenin dikkatine Baz› ar›zalar günlük bak›mlar›n ve gözetimin yap›lmamas›ndan kaynaklan›r ve bir mühendis ça¤›rmaks›z›n kolayca giderilebilirler. Yerel Servis Merkeziniz ile temasa geçmeden önce, lütfen afla¤›da listelenmifl olan kontrolleri yap›n›z. Ar›za Belirtisi Çözüm Makina çal›flm›yor ■ ■ ■ ■ Bulafl›k makinas› su ile dolmuyor ■ Su muslu¤unun aç›k oldu¤undan emin olunuz. ■ Ana flebeke suyunun kesik olmad›¤›ndan emin olunuz ■ Girifl hortumu ezilmifl, s›k›flm›fl veya bükülmüfltür.
Bütün bu kontrollerden sonra problem devam ediyorsa, model ve seri numaras›n› belirterek, yerel Servis Merkezinize baflvurunuz. Bu bilgiler, bulafl›k makinas› kapa¤›n›n sa¤ taraf›nda bulunan tan›m etiketi üzerinde bulunabilir (resme bak›n›z). Servis ve yedek parçalar Prod.No. ........ Ser. No. ......... RA01 Bu ürüne yetkili Servis mühendisi taraf›ndan servis yap›lmal›d›r ve yaln›z orijinal yedek parçalar kullan›lmal›d›r. Hiçbir koflulda makinay› kendiniz onarmaya teflebbüs etmeyiniz.
Montaj talimat› Bu cihaz› monte etmek için gerekli elektrik ifli, bir teknisyen veya uzman bir kifli taraf›ndan yap›lmal›d›r. Bu cihaz› monte etmek için gerekli tesisat ifli, yetkili tesisatç› veya uzman bir kifli taraf›ndan yap›lmal›d›r.
Su besleme ba¤lant›lar› Bu bulafl›k y›kama makinas› ya s›cak (maksimum 60°C) ya da so¤uk su ile beslenebilir. Herfleye ra¤men so¤uk su beslemesini tavsiye ediyoruz. Y›kama program›n› çok k›saltt›¤›ndan, s›cak su beslemesi çok kirli kap kacakla her zaman verimli de¤ildir. Su bas›nc› teknik özelliklerde verilen s›n›rlar içinde olmal›d›r. Yerel Su Müdürlü¤ü bölgenizdeki ortalama ana flebeke bas›nc› hakk›nda bilgi verecektir.
Su ç›k›fl hortumu ba¤lant›s› 1 3 18 min 30 cm max 100 cm max 100 cm Ø Ø 21 1. Gerekiyorsa bir klipsle lavabo ç›k›fl sifonuna tespit ederek. 2. Verilmifl olan özel k›vr›ml› plastik k›lavuzu kullanarak lavabonun kenar›na as›l›r. 3. Minimum 4 cm iç çap›nda menfez deli¤i ile verilen bir stand borusuna At›k ba¤lant›s›, bulafl›k makinas›n›n alt›nda 30 cm (minimum) ile 100 cm (maksimum) aras›nda bir yükseklikte olmal›d›r. Boflaltma hortumu, bulafl›k makinas›n›n sa¤›na ya da soluna bakabilir.
Üst tezgah›n ayarlanmas› Makinay› di¤er mutfak üniteleri ile hizalamak için üst tezgah› 25 mm ileri veya geri hareket ettirebilirsiniz. iki adet arka tutma vidas›n› kolayca ç›kar›n›z, üstü istenen konuma getiriniz ve sonra vidalar› tekrar s›k›n›z. Bir Tezgah›n alt›na tak›lmas› IN26 (mutfak tezgah› veya lavabo) Makinan›n üst tezgah›n› ç›kararak, lavabo ünitesinin ya da önceden mevcut bir tezgah›n alt›na, resimde gösterilen karfl›l›k gelen girinti boyutlar›n› sa¤layarak, takabilirsiniz.
Electrolux’ün mamülleri için verdi¤i garanti, afla¤›da yazl›l› hususlar› kapsamaz.
1. Garanti süresi mal›n teslim tarihinden itibaren bafllar ve (3) Üç bir y›ld›r. 2. Mal›n bütün parçalar› dahil olmak üzere tamam› firmam›z›n garantisi kapsam›ndad›r. 3. Mal›n garanti süresi içerisinde ar›zalanmas› durumunda, tamirde geçen süre garanti süresine eklenir. Mal›n tamir süresi en fazla 30 ifl günüdür.