D i s h w a s h e r User Instructions ESF 6220 ANC 822 961 691- 00 - 0205 EN
Dear customer, Please read these user instructions carefully. Above all please observe the safety instructions on the first few pages ofthese user instructions! Please keep these user instructions for later reference. Pass them on to any subsequent owner of the appliance. 1 The warning triangle and/or specific words (Warning!, Caution!, Important!) are used to highlight instructions that are important for your safety or for the function of the appliance.
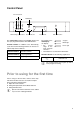
Contents Safety Instructions . . . . . . . . . . . . . . . . . . . . . . . . . . . . . . . . . . . . . . . . . . . . . . . . . . . . . . . . . . . . . . . . . . . . . . 5 Dishwasher door safety catch . . . . . . . . . . . . . . . . . . . . . . . . . . . . . . . . . . . . . . . . . . . . . . . . . . . . . . . . . . . . . . 6 Disposal . . . . . . . . . . . . . . . . . . . . . . . . . . . . . . . . . . . . . . . . . . . . . . . . . . . . . . . . . . . . . . . . . . . . . . . . . . . . . .
Contents Installation and Connection Instructions . . . . . . . . . . . . . . . . . . . . . . . . . . . . . . . . . . . . . . . . . . . . . . . . . . . 30 Installing the Dishwasher . . . . . . . . . . . . . . . . . . . . . . . . . . . . . . . . . . . . . . . . . . . . . . . . . . . . . . . . . . . . . . . 30 Dishwashers That Can Be Integrated . . . . . . . . . . . . . . . . . . . . . . . . . . . . . . . . . . . . . . . . . . . . . . . . . . . . . 30 Built-In Dishwasher . . . . . . . . . . . . . . . . . . .
1 Safety Instructions The safety aspects of ELECTROLUX electrical appliances comply with accepted technical standards and the German Appliance Safety Law. Nevertheless, as a manufacturer we consider it our obligation to make you aware of the following safety information: Installation, Connection and Placing into Operation • • • • The dishwasher may only be transported upright. Check the dishwasher for transport damage. Do not in any circumstances connect an appliance that is damaged.
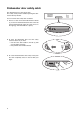
Dishwasher door safety catch The dishwasher has a door safety catch. This safety catch prevents children opening the dishwasher door by mistake. You can set the door safety catch as follows: 1. There is a catch on the left inside the door handle (1). To ensure that the dishwasher door cannot be opened unintentionally, push this catch across to the right (eg. with the handle of a spoon). 2.
Disposal Packaging material 2 The packaging materials are environmentally friendly and can be recycled. The plastic components are identified by markings, e.g. >PE<, >PS<, etc. Please dispose of the packaging materials in the appropriate container at the community waste disposal facilities. Old appliance W 2 The symbol on the product or on its packaging indicates that this product may not be treated as household waste.
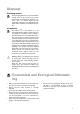
Appliance Features and Control Panel Top Spray Nozzle Rubber Seal for Connecting the Water Feed to the Upper Spray Arm Spray Arms Container for Special Salt Container for Rinse Aid Container for Detergent Rating Plate 8 Filters
Control Panel Function buttons Multidisplay 1 2 3 Dishwashing cycle buttons Control indicator The control field comprises the ON/OFF button and the cycle programme buttons with LED indicators.
Water softener To avoid scale deposits on the dishes and in the dishwasher, the dishes must be washed with soft water, i.e. water with a low lime content. The dishwasher therefore has a built-in water softener, in which tap water with a hardness of 4°d (German degree) and harder is softened with the aid of special salt. Water hardness in °d1 in mmol/l2 Your water supplier will be able to inform you about the hardness and hardness range of the water in your area.
3. Press function button 1 again. The LED indicator for function button 1 and the LED indicator for the end of the dishwashing cycle will flash: – The number of flashes of the LED indicator for the end of the dishwashing cycle corresponds to the hardness setting. – This sequence of flashes is repeated many times, with a 3 second pause in between. 4. Pressing function button 1 increases the hardness setting by 1 degree. (Exception: hardness setting 1 follows hardness setting 10). 5.
Filling with Special Salt for the Water Softener 1 Use only special salt for dishwashers. Never fill the salt container with any another type of salt (e.g. culinary salt) or dishwasher detergent. This would irreparably damage the water softener. Prior to filling with salt, please check each time that you really do have a packet of special salt in your hand. Fill with special salt: • • Prior to using the dishwasher for the first time on the control When the SALT indicator panel is illuminated.
Filling with Rinse Aid Rinse aid ensures that your dishes gleam and are free from spots, and that you glasses are clear. 1 Use only branded rinse aid for dishwashers. Never fill the rinse aid container with any another substance (e.g. concentrated vinegar). This would damage the appliance. Fill with rinse aid: • • Prior to using the dishwasher for the first time. When a dark point surrounded by a light ring is to be seen in the indicator window on the container.
In Daily Use • • • • • Is it necessary to refill with special salt or rinse aid? Load cutlery and dishes into the dishwasher Fill with dishwasher detergent Select a wash programme suitable for the cutlery and dishes Start the wash programme Loading cutlery and dishes 1 Sponges, household cloths and any object that can absorb water may not be washed in the dishwasher.
Loading Cutlery 1 If they are placed in the cutlery basket, long, pointed items of cutlery are a hazard, particularly to children (see Safety Instructions). They must therefore be laid horizontally in the upper basket. To ensure that all cutlery is efficiently washed and reached by the water you should: 1. position the two chopstick holders in the corners of the cutlery basket, 2. place the latticed insert on the cutlery basket, 3.
Loading Pans, Frying Pans and Large Plates Load large and heavily soiled dishes in the lower rack (Plates up to 29cm in diameter). Your dishwasher has one of the following two types of lower rack: Type 1: The rear plate insert in the lower rack can be removed 3 To make it easier to load large dishes, it is possible - to remove the plate inserts from the lower rack. - to move the cutlery basket sideways.
Loading Cups, Glasses and Coffee Services Load small, delicate items and long pointed cutlery in the upper rack. • Arrange plates and dishes offset on and under the folding cup racks so that washing water can reach all items. • The cup racks can be folded up out of the way for tall items. • Lay or hang wine, champagne, and brandy glasses in the cut outs on the cup racks. • Glasses, beakers, etc. can also be placed on the two rows of prongs on the left of the upper rack.
Filling with Detergent 1 Only use dishwasher detergent. Fill with detergent: Prior to the start of a wash programme (not for the pre wash programme). The detergent is released into the wash water during the programme. 2 Please observe the manufacturer's dosing and storage recommendations as stated on the detergent packaging. The detergent compartment is on the inside of the dishwasher door. 1. If the lid is closed: press release button (1). The lid springs open. 2.
Use of "3 in 1"/ Combi Detergent Tablets General Advice These products are tablets with combined detergent/ rinse-aid and salt functions. 1. Before using these products you should first check that the water hardness in your supply is compatible with the use of these products as per the detergent manufacturers instructions (on the product packaging). 2. These products should be strictly used according to the detergent manufacturers instructions.
Selecting the Wash Programme (Programme Table) Choose the most suitable wash programme with the aid of this table: Type of Dishes: in addition: Type of Soiling: Coffee and Party Dishes Dinner service and Pans – normal soiling; dried onleft-overs with dishes that are sensitive to changes in temperature normal soiling normal soiling slight soiling particularly suitable when concentrated detergents are used.
Selecting a programme When your dishes look like this, select: an intensive programme. a normal or energy-saving programme. a short programme (e.g. 30 minute programme).
Starting a dishwashing cycle 1. Check that the dishes and cutlery are stacked in the dishwasher in such a way that the spray arms are free to rotate. 2. Turn on the tap fully. 3. Close the door. 4. Press the ON/OFF button. The LED in the ON/OFF button will become illuminated. 5. Press the relevant button for the cycle required (see “Cycle Table”). The cycle indicator will become illuminated and the respective cycle stages in the cycle progress display will flash.
Care and Cleaning Do not under any circumstances use furniture care products or aggressive cleaners. If necessary, clean the controls only with a soft cloth and pure warm water. Occasionally check the internal containers, door seal, and water inlet for soiling, clean if necessary. 1 • • Cleaning the filters 3 The filters must be regularly checked and cleaned. Dirty filters will spoil the wash results. 1. Open the door and remove the lower basket. 2.
Cleaning the spray arm jets Regularly check the jets in the spray arms for blockages. When cleaning is necessary, remove spray arm from the fixture and clean jets with a pointed object (wire or needle). Then rinse out the spray arm using a strong jet of water. 3 Do not damage the jet opening. Upper basket spray arm 1. To remove upper basket spray arm, tilt it down hard. 2. Clean spray arms jets. 3.
What to do, when ... Try to rectify minor faults on the dishwasher with the aid of the instructions given here. If you call in customer service to resolve one of the malfunctions listed here, or rectify an error made in the operation of the appliance, the customer service engineer’s visit is not free of charge, even during the period of guarantee. ...Error messages are displayed.
...there are problems operating the dishwasher. Symptom The program does not start. Possible Cause Solution The dishwasher door has not been closed properly. Shut the door. The mains plug is not plugged in. Insert mains plug. House fuse is faulty. Replace fuse. For dishwasher models with delay start timer: Delay start has been selected. If dishes are to be washed immediately cancel delay start timer.
Technical Data Capacity: 12 place settings including serving dishes Permitted Water Pressure: 1-10 bar (=10-100 N/cm2 = 0.1-1.0 MPa) Electrical Connection: Information on the electrical connection is given on the rating plate on the inner edge of the dishwasher door on the right. Dishwasher: Free-Standing Appliances Dimensions: 850 x 598 x 598 (H x B x D in mm) Max. Weight: 54 Kg Dishwashers that Can Be Integrated, Built-In Dishwashers Dimensions: 820 – 880 x 596 x 570 (H x W x D in mm) Max.
Notes for Test Institutes Testing in accordance with EN 60704 must be carried out with the appliance fully loaded and using the test programme (see Programme Table). Tests in accordance with EN 50242 must be carried out when the salt dispenser and rinse aid container have been filled with salt and rinse aid respectively and using the test programme (see Programme Table). Full Load: 12 place settings incl. serving dishes Half Load: 6 place settings incl.
Sample loading arrangement: Lower basket Sample loading arrangement: Cutlery basket Some dishwasher models have cutlery baskets without a grid insert.
INSTALLATION AND CONNECTION INSTRUCTIONS Installing the Dishwasher • • • • • The dishwasher must be installed on a firm floor and adjusted to ensure that it is stable and level. To compensate for unevenness in the floor and to match the height of the appliance to that of surrounding units extend the threaded feet by unscrewing : – use a screwdriver. For built-in, integrated and fully integrated dishwashers, the rear feet should be adjusted from the front of the appliance using a screwdriver.
Built-In Dishwasher (see enclosed installation instructions) Free-Standing Appliances 1 can be set up as stand-alone without additional installation. If the dishwasher is set up next to a cooker, a heat-insulating, non-flammable plate must be mounted between the dishwasher and the cooker, flush to the top edge of the work surface (depth 57.5 cm). The plate should have aluminium foil on the side facing the cooker.
Connecting the Dishwasher Water Connection The dishwasher is fitted with safety devices that prevent the wash water returning into the drinking water system and comply with the applicable plumbing regulations. • The dishwasher can be connected to cold and hot water supplies up to max. 60 °C. • The dishwasher must not be connected to open hot water appliances or instantaneous water heaters.
3 The following section is only applicable to dishwashers that have a safety valve on the threaded hose fitting for the tap: Water inlet hose with safety valve After connecting the double-walled water inlet hose, the safety valve is next to the tap. Therefore the water inlet hose is only under pressure while the water is running. If the water inlet hose starts to leak during this operation, the safety valve cuts off the running water and the draining pump in the dishwasher is switched on.
Water drain Drain hose The drain hose must not be kinked, crushed or entangled. Connecting the drain hose: – Maximum permitted height: 1 metre. – Minimum required height 40 cm above the lower edge of the machine. 1 • Extension hoses • • Extension hoses are available from your dealer or customer service. The internal diameter of the extension hoses must be 19 mm to ensure that the function of the appliance is not impeded.
Leak Prevention System For protection from damage due to water leaks, the dishwasher is equipped with a leak prevention system. In the event of a fault, the safety valve in the water inlet hose immediately interrupts the supply of water to the appliance and the drain pump is activated. The remaining water in the appliance is automatically pumped out.
Connections The water inlet and drain hoses, as well as the mains cable must be connected beside the dishwasher because there is no space for them behind the appliance. The example plumbing and electrical installation given below can only be regarded as a recommendation; the actual situation where the dishwasher is to be installed will define the exact installation (available connections, local electricity and water board regulations for connecting up appliances, etc.).
SERVICE In the section "What to do, if..." the most important sources of faults that you can rectify yourself are summarised. If, nevertheless, you call in customer service to resolve a problem listed in these instruction, or because of an error made in operating the appliance, the customer service engineer’s visit is not free of charge, even during the warranty period. If you can not find any information on a specific malfunction in these operating instructions, please contact customer service.
822 961 691 - 00 - 0205 Subject to change without notice The Electrolux Group. The world´s No.1 choice. The Electrolux Group is the world´s largest producer of powered appliances for kitchen, cleaning and outdoor use. More than 55 million Electrolux Group products (such as refrigerators, cookers, washing machines, vacuum cleaners, chain saws and lawn mowers) are sold each year to a value of approx. USD 14 billion in more than 150 countries around the world.