D i s h w a s h e r User information ESF 6250 822 961 926-00-120704-01 g
Dear Customer, Please read these user instructions carefully and keep them to refer to later. Please pass the user instructions on to any future owner of the appliance. The following symbols are used in the text: 1 Safety instructions Warning! Information that affects your personal safety. Important! Information that prevents damage to the appliance. 3 Useful tips and hints 2 Environmental information 2 3 Your dishwasher is fitted with the new “PULSE WASH” dishwashing system.
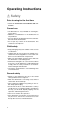
Contents Operating Instructions . . . . . . . . . . . . . . . . . . . . . . . . . . . . . . . . . . . . . . . . . . . . . . . . . . . . . . . . . . . . . 4 Safety . . . . . . . . . . . . . . . . . . . . . . . . . . . . . . . . . . . . . . . . . . . . . . . . . . . . . . . . . . . . . . . . . . . . . . . . . . . . . . . 4 Diagram of appliance . . . . . . . . . . . . . . . . . . . . . . . . . . . . . . . . . . . . . . . . . . . . . . . . . . . . . . . . . . . . . . . . . . 6 Control panel . . . . . . .
Operating Instructions 1 Safety Prior to using for the first time • Follow the ”Instructions for installation and connection”. Correct use • The dishwasher is only intended for washing domestic dishes. • Additions or modifications to the dishwasher are not permitted. • Use only special salt, detergent and rinse aid suitable for domestic dishwashers. • Do not put any solvents in the dishwasher. This could cause an explosion. Child safety • Keep packaging away from children. There is a risk of suffocation.
Dishwasher door safety catch The dishwasher door has a safety catch which prevents children opening the dishwasher door by mistake. The door safety catch is set as follows: 1. There is a plate (1) on the lefthand side of the door handle. You can secure the dishwasher against accidental opening by turning this plate clockwise (for example, with the handle of a spoon). 2.
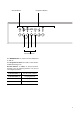
Diagram of appliance Top Spray Nozzle Upper basket spray arm and floor spray arm Water hardness dial Dispenser for special salt Dispenser for detergent Dispenser for rinse aid Rating plate Filters Interior lighting Control panel 6
ON/OFF button Programme buttons 1 2 3 4 Function buttons The ON/OFF button is used to turn the dishwasher on and off. The Programme buttons are used to select the desired dishwashing cycle.
Set delay timer Multi-display The multi-display can indicate: – the level of hardness to which the water softener is set. – the start delay that has been set. – the estimated time remaining for the current dishwashing cycle. – what type of error has occurred with the dishwasher. The control indicators have the following meanings: 1) 1) Refill with special salt Refill with rinse aid 1) These control indicators are never illuminated while a dishwashing cycle is running.
Prior to using for the first time 1. Set the water softener 2. Fill up with special salt for water softeners 3. Fill up with rinse aid 3 If you wish to use 3in1 detergent, do the fol- lowing: First read the section “Using 3in1 detergents”. Fill the salt container with dishwasher salt. Set the softener unit to its lowest setting. Deactivate the rinse aid inflow. For dishwashers where the rinse aid inflow cannot be deactivated, set the rinse aid dosage to “I”.
Setting electronically: 1. Press the ON/OFF button. 3 Ifa indicators for the programme buttons are lit, dishwashing cycle is activated. The dishwashing cycle must be deselected: Press function buttons 1 and 2 simultaneously for approx. 2 seconds. All additional wash programme button indicators will go out. 2. Press function buttons 1 and 2 simultaneously and keep them pressed. The LED indicators for function buttons 1 to 3 will flash. 3. Press function button 1.
Adding special salt To decalcify the water softener, it must be filled up with special salt. Use only special salt suitable for domestic dishwashers. If you do not use 3 in1 detergent, fill up with special salt: – Before using the dishwasher for the first time. – When the control indicator for special salt is illuminated on the control panel. 1. Open the door and remove the lower basket. 2. Screw open the lid on the salt dispenser by turning it anti-clockwise. 3.
Filling up with rinse aid With rinse aid the rinsing water drains away better and so you get smear-free, gleaming dishes and clear glasses. If you do not use 3in1 detergent, fill up with rinse aid: – Before using the dishwasher for the first time. – When the control indicator for rinse aid is illuminated on the control panel. Use only special rinse aid for dishwashers and no other liquid detergents. 1. Open the door. The rinse aid compartment is located on the inside of the dishwasher door. 2.
In daily use Loading cutlery and dishes 1 Sponges, cleaning cloths and any other objects that can absorb water must not be washed in the dishwasher. Plastic and Tefloncoated dishes and pans tend to retain water droplets. These dishes and pans therefore do not dry as well as those made of china and stainless steel.
Loading cutlery 1 Warning: Sharp knives and other items of cut- lery with sharp edges must be laid in the cutlery rack or in the upper basket because of the risk of injury. To ensure that all items of cutlery in the cutlery basket can be reached by the water, you should: 1. Place the grid insert on the cutlery basket 2. Place forks and spoons in the cutlery basket's grid insert with their handles pointing downwards.
Cups, Glasses, Coffee Service Load smaller, fragile crockery and long, sharp cutlery in the knife drawer. • Arrange items of crockery on and under the folding cup racks so that they are offset from each other and water can reach all items. • The cup racks can be folded up out of the way for tall crockery items. • Lay or hang wine and brandy glasses in the slots in the cup racks.
Adjusting the height of the upper basket Maximum height of dishes in the Upper basket Lower basket with upper basket raised 22 cm 30 cm with upper basket lowered 24 cm 29 cm 3 The height of the baskets can also be adjusted when they are loaded. Raising / Lowering the upper basket 1. Pull out the upper basket completely. 2. Holding the upper basket by the handle, raise it as far as it will go and then lower it vertically. The upper basket will latch into the lower or the upper position.
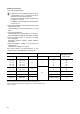
Selecting the dishwashing cycle (Cycle Table) • • • • • • • - • - 30 0,8 9 • • • - 37 0,7 12 • • Dishes, excluding saucepans just used, lightly to normally soiled - Dessert dishes and coffee service, delicate glassware lightly soiled - 20 - 22 normally soiled 23 - 25 Dinner service and cookware, temperaturesensitive crockery 13 - 25 • 13 - 15 • 1,75 - 1,95 normally soiled, dried-on food remains 1,75 - 1,95 Dinner service and cookware 1,0 - 1,5 • 0,95 - 1,05 • 110
Starting a dishwashing cycle 1. Check that the spray arms can turn freely. 2. Turn the water tap on fully. 3. Close the door. 4. Press the ON/OFF button. 5. Select the desired cycle. The programme indicator comes on. The remaining time expected for the cycle will be shown in the multi-display. The selected cycle will begin after approximately 3 seconds. 3 During the dishwashing cycle, the remaining time shown in the multi-display may be adjusted according to the size of the load, degree of soiling, etc.
Care and cleaning 1 Do not use furniture care products or aggressive cleaners. • When necessary, clean the dishwasher’s controls with a soft cloth and clean warm water. • Occasionally check the internal dispensers, door seal and water inlet filter (if fitted) for dirt and clean them, if necessary. Cleaning the filters 3 The filters must be regularly checked and cleaned. Dirty filters will spoil the wash results. 1. Open the door and remove the lower basket. 2.
What to do if... Remedying small malfunctions If one of the following fault codes is displayed in the multi-display during operation: – Fault codeÅ 10 (Problems with water inlet), – Fault codeÅ 20 (Problems with water drainage), please have a look at the following table. When the fault is remedied, press the button for the cycle that has started. The cycle will continue. With other fault codes (“Å ” followed by a number): – Abort the dishwashing cycle. – Switch the appliance off and on again.
Malfunction Possible cause Remedy Rust spots are visible in the dishwashing compartment. The dishwashing compartment is made from rust-free stainless steel. Rust spots in the dishwashing compartment are due to rust particles Only wash cutlery, dishes and pans from external sources (rust particles that are suitable for dishwasher use. from water pipes, pans, cutlery, etc.). Remove such spots with a commercially-available stainless steel cleaning product.
Disposal 2 Packaging material 2 Old appliance The packaging materials are environmentally friendly and can be recycled. The plastic components are identified by markings, e.g. >PE<, >PS<, etc. Please dispose of the packaging materials in the appropriate container at the community waste disposal facilities. Please dispose of your old appliance in line with the guidelines for disposal in your community. 1 Warning! When your appliance has finished its working life, remove the plug from the socket.
Notes for Test Institutes Testing in accordance with EN 60704 must be carried out with the appliance fully loaded and using the test cycle (see “Cycle Table”). Tests in accordance with EN 50242 must be carried out when the salt dispenser in the water softener and the rinse aid dispenser have been filled with salt and rinse aid respectively, and using the test cycle (see “Cycle Table”).
Installation and connection instructions 1 Safety information for the installation • Only transport the dishwasher in an upright position, otherwise salt water may run out. • Before using the dishwasher for the first time, check for any damage caused in transport. Do not under any circumstances connect an appliance that is damaged. In the case of damage, please contact your supplier.
Installing the dishwasher • The dishwasher must be installed on a firm floor and adjusted to ensure that it is stable and level in all directions. • To compensate for unevenness in the floor and to match the height of the appliance to that of surrounding units, extend the threaded feet using a screwdriver. • The drain hose, inlet hose and mains cable must be laid so that they are able to move freely within the plinth area, and so that they are not kinked or crushed when the dishwasher is in position.
Connecting the dishwasher Connecting to the water supply • The dishwasher can be connected to cold and hot water supplies up to max. 60°C. • The dishwasher must not be connected to open hot water appliances or instantaneous water heaters. Permitted water pressure Lowest permitted water pressure: 1 bar (=10 N/cm2 =100 kPa) Consult your plumber if the water pressure is less than 1 bar.
Water drainage Drain hose 1 The drain hose must not be kinked, crushed or entangled. Connecting the drain hose: – Maximum permitted height: 1 metre. – Minimum required height: 40 cm above the bottom edge of the appliance. Extension hoses • Extension hoses are available from your dealer or from our Customer Care Department. To ensure that the function of the appliance is not impeded, the internal diameter of extension hoses must be 19 mm.
Anti-flood system For protection from water damage, the dishwasher is equipped with a anti-flood system. In the event of a fault, the safety valve immediately interrupts the supply of water to the appliance and the drain pump is activated. In this way water can neither escape nor overflow. The remaining water in the appliance is automatically pumped out. Electrical connection Details about the voltage, type of supply and the fuses required are to be found on the rating plate.
Connecting systems The water inlet hose, drain hose and the mains cable must all be connected to the side of the dishwasher as there is no space for them behind the appliance.
Service In the event of technical faults, please first check whether you can remedy the problem yourself with the help of the operating instructions (section “What to do if…”). If you were not able to remedy the problem yourself, please contact the Customer Care Department or one of our service partners. In order to be able to assist you quickly, we require the following information: – Model description – Product number (PNC) – Serial number (S No.
822 961 926-00-120704-01 Subject to change without notice The Electrolux Group. The world´s No.1 choice. The Electrolux Group is the world´s largest producer of powered appliances for kitchen, cleaning and outdoor use. More than 55 million Electrolux Group products (such as refrigerators, cookers, washing machines, vacuum cleaners, chain saws and lawn mowers) are sold each year to a value of approx. USD 14 billion in more than 150 countries around the world.