user manual Dishwasher ESF 63020
We were thinking of you when we made this product
electrolux 3 Welcome to the world of Electrolux 156991070-00-31102007 You’ve chosen a first class product from Electrolux, which hopefully will provide you with lots of pleasure in the future. Electrolux ambition is to offer a wide variety of quality products that would make your life even more comfortable. You can look at some examples on the cover in this manual. But now it’s time to study this manual and start using and enjoying the benefits from your new machine.
electrolux Contents Safety information 5 Product description 6 Control panel 7 First use 9 Set the water softener 10 Filling with dishwasher salt 12 Use of rinse aid 13 Adjusting the dosage of rinse aid 14 Daily use 14 Loading cutlery and dishes 15 Use of detergent 18 Select and start a washing programme 20 Unloading the dishwasher Washing programmes Care and cleaning Something not working Technical data Consumption values Hints for test institutes Installation Environment concerns European Guarantee www
safety information electrolux 5 Safety information In the interest of your safety and to ensure the correct use, before installing and first using the appliance, read this user manual carefully, including its hints and warnings. To avoid unnecessary mistakes and accidents, it is important to ensure that all people using the appliance are thoroughly familiar with its operation and safety features.
electrolux product description Child safety • This appliance is designed to be operated by adults. Don’t allow children to use the dishwasher unsupervised. • Keep all packaging well away from children. There is risk of suffocation. • Keep all detergents in a safe place out of children’s reach. • Keep children well away from the dishwasher when the door is open. Installation • Check your dishwasher for any transport damage. Never connect a damaged machine.
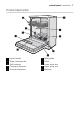
control panel electrolux 7 Product description 1 2 3 4 5 Upper basket Water hardness dial Salt container Detergent dispenser Rinse aid dispenser 6 7 8 9 10 Rating plate Filters Lower spray arm Upper spray arm Worktop
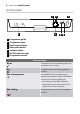
electrolux control panel Control panel 7 6 1 1 2 3 4 5 6 7 5 2 Programme guide Programme knob Start/cancel button Delay start button Indicator lights On/Off indicator light Programme marker Indicator lights Wash Illuminates when the washing and rinsing phases are running. Dry Illuminates when the drying phase is running. End of programme Illuminates when the washing programme has ended.
first use electrolux 9 Indicator lights Rinse aid 1) Illuminates when rinse aid needs to be filled. 1) The salt and rinse aid indicator lights are never illuminated while a washing programme is running even if filling with salt and rinse aid is necessary. The salt indicator light on the control panel can remain illuminated for 2-6 hours after the salt has been replenished, assuming the dishwasher remains switched on. If you are using salts that take longer to dissolve then this can take longer.
electrolux set the water softener If you want to use combi detergent tablets ("3 in 1", "4 in 1", "5 in 1" etc... ) follow the instructions given in "Use of detergent". Set the water softener The dishwasher is equipped with a water softener designed to remove minerals and salts from the water supply, which would have a detrimental or adverse effect on the operation of the appliance. The higher the content of these minerals and salts, the harder your water is.
set the water softener electrolux 11 Adjusting the water hardness setting Water hardness °dH °TH mmol/l manually electronic ally <4 <7 < 0,7 1 level 1 Use of salt no Setting manually The dishwasher is factory set at position 2. 1. Open the dishwasher door. 2. Remove the lower basket from the dishwasher. 3. Turn the water hardness dial to position 1 or 2 (see table). 4. Replace the lower basket. Setting electronically The dishwasher is factory set at level 5. 1.
electrolux filling with dishwasher salt if the current level is 10, by pressing start/cancel button once, level 1 is selected. 5. To memorize the operation, switch off the dishwasher by returning the programme knob to the Off position. Filling with dishwasher salt Only use salt specifically designed for use in dishwashers. All other types of salt not specifically designed for use in a dishwasher, especially table salt, will damage the water softener.
use of rinse aid electrolux 13 The salt indicator light on the control panel can remain illuminated for 2-6 hours after the salt has been replenished, assuming the dishwasher remains switched on. If you are using salts that take longer to dissolve then this can take longer. The function of the machine is not affected. Use of rinse aid Only use branded rinse aid for dishwashers. Never fill the rinse aid dispenser with any other substances (e.g. dishwasher cleaning agent, liquid detergent).
electrolux adjusting the dosage of rinse aid The dispenser holds about 110 ml of rinse aid, which is sufficient for between 16 and 40 dishwashing cycles, depending upon the dosage setting. 3. Ensure that the lid is closed after every refill. Clean up any rinse aid spilt during filling with an absorbent cloth to avoid excess foaming during the next wash.
loading cutlery and dishes electrolux 15 Loading cutlery and dishes Sponges, household cloths and any object that can absorb water may not be washed in the dishwasher. • Before loading the dishes, you should: – Remove all left over food and debris. – Soften remnants of burnt food in pans • When loading the dishes and cutlery, please note: – Dishes and cutlery must not impede the rotation of the spray arms. – Load hollow items such as cups, glasses, pans, etc.
electrolux loading cutlery and dishes The lower basket The lower basket is designed to take saucepan, lids, plates, salad bowls, cutlery ect. Service dishes and large lids should be arranged around the edge of the basket, ensuring that the spray arms can turn freely. The cutlery basket Long bladed knives stored in an upright position are a potential hazard. Long and/or sharp items of cutlery such as carving knives must be positioned horizontally in the upper basket.
loading cutlery and dishes electrolux 17 Glasses with long stems can be placed upside down in the cup racks. For taller items, the cup racks can be folded upwards. The upper basket The upper basket is designed for plates (dessert plates, saucers, dinner plates of up to 24 cm in diameter), salad bowls, cups and glasses Arrange items on and underneath the cup racks so that water can reach all surfaces. Before closing the door, ensured that the spray arms can rotate freely.
electrolux use of detergent 2. Refit the basket in the higher position and replace the stops (A) in their original position. When the upper basket is raised you will not be able to use the cup racks. After loading your machine always close the door, as an open door can be a hazard. Use of detergent Only use detergents specifically designed for use in dishwashers. Please observe the manufacturer’s dosing and storage recommendations as stated on the detergent packaging.
use of detergent electrolux 19 1 2 Detergent tablets from different manufactures dissolve at different rates. For this reason, some detergent tablets do not attain their full cleaning power during short washing programmes. Therefore, please use long washing programmes when using detergent tablets, to ensure the complete removal of detergent residuals. Use of combi detergent tablets 3.
electrolux select and start a washing programme If the drying results are not satisfactory we recommend that you: 1. Fill up the rinse aid dispenser with rinse aid. 2. Set the rinse aid dosage to position 2. 1. Fill up the dispensers for salt and rinse aid again. 2. Adjust the water hardness setting to the highest setting and perform washing programme without loading any dishes. 3. Adjust the water hardness setting according to the hardness of the water in your area. 4. Adjust the rinse aid dosage.
select and start a washing programme electrolux 21 1. After having selected the washing programme, press the delay start button. – The corresponding indicator light illuminates. 2. Press the start/cancel button, the countdown of the delay start begins automatically. – The phase indicator lights turn off. – The opening of the door will not modify or interrupt the countdown.
electrolux unloading the dishwasher will be cooler and the drying will be improved. Unloading the dishwasher • Hot dishes are sensitive to knocks. The dishes should therefore be allowed to cool down before removing from the appliance. • Empty the lower basket first and then the upper one; this will avoid water dripping from the upper basket onto the dishes in the lower one.
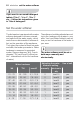
care and cleaning electrolux 23 Programme C Quick Degree of soil Type of load Programme description Normal or light soil Crockery and cut- Main wash up to lery 60°C Final rinse 1) D Normal soil Eco 50° 2) E Rinse and Hold Crockery and cut- Prewash lery Main wash up to 50°C 1 intermediate rinse Final rinse Drying Any. 1 cold rinse (to Partial load (to be completed later in the avoid food scraps day). from sticking together). This programme does not require the use of detergent.
electrolux care and cleaning 7. 3. Turn the handle about 1/4 a turn anticlockwise and remove the filter system. 4. Take hold of the coarse filter (A) by the handle with the hole and remove from the microfilter (B). 5. Clean all filters thoroughly under running water. 6. Remove the flat filter from the base of the washing compartment and clean both faces thoroughly. Put the flat filter back in the base of the washing compartment and ensure that it fits perfectly under the two guides (C). 8.
care and cleaning electrolux 25 Prolonged periods of nonoperation NEVER use the dishwasher without filters. Incorrect repositioning and fitting of the filters will produce poor washing results and may result in damage to the appliance. Cleaning the spray arms If you are not using the machine for any prolonged period of time you are advised to: 1. Unplug the appliance and then turn off the water. 2. Leave the door ajar to prevent the formation of any unpleasant smells. 3.
electrolux something not working Something not working The dishwasher will not start or stops during operation. Certain problems are due to the lack of simple maintenance or oversights, which can be solved with the help of the indications described in the chart, without calling out an engineer. Switch off the dishwasher, open the door and carry out the following suggested corrective actions.
something not working electrolux 27 Fault code and malfunction • The programme does not start Once these checks have been carried out, switch on the appliance: the programme will continue from the point at which it was interrupted. If the malfunction or fault code reappears contact the Service Force Centre. For other fault codes not described in the above chart, please contact your local Service Force Centre, quoting the model (Mod.), product number (PNC) and serial number (S.N.).
electrolux something not working The wash results are not satisfactory The dishes are not clean • The wrong washing programme has been selected. • The dishes are arranged in such a way as to stop water reaching all parts of the surface. The baskets must not be overloaded. • The spray arms do not rotate freely due to incorrect arrangement of the load. • The filters in the base of the washing compartment are dirty or incorrectly positioned. • Too little or no detergent has been used.
technical data electrolux 29 Technical data Dimensions Width x Height x Depth (cm) 60,0 x 85,0 x 61,0 Electrical connection Voltage - Overall power Fuse Information on the electrical connection is given on the rating plate on the inner edge of the dishwasher’s door. Water supply pressure Minimum - Maximum (MPa) 0,05 - 0,8 Capacity place settings 12 Max.
electrolux hints for test institutes Hints for test institutes Testing in accordance with EN 60704 must be carried out with appliance fully loaded and using the test programme (see "Consumption values"). Test in accordance with EN 50242 must be carried out when the salt container and rinse aid dispenser have been filled with salt and rinse aid respectively and using the test programme (see "Consumption values").
installation electrolux 31 cup racks: position A Upper basket Installation Any electrical and/or plumbing work required to install this appliance should be carried out by a qualified electrician and/or plumber or competent person. Remove all packaging before positioning the machine. If possible, position the machine next to a water tap and a drain.
electrolux installation • Remove the machine’s worktop by unscrewing the two rear retaining screws, pull the worktop from the back of the machine and slide out the front slots, lifting the worktop. • Insert the machine after adjusting the levelling with the adjustable feet. When inserting the machine, ensure that the water inlet and drain hoses are not kinked or squashed. During all operations that involve accessibility to internal components the dishwasher has to be unplugged.
installation electrolux 33 This appliance has been fitted with safety features which will prevent the water used in the appliance from returning back into the drinking water system. This appliance complies with the applicable plumbing regulations. Water outlet hose connection The end of the drain hose can be con- Water inlet hose with safety valve nected in the following ways: After connecting the double-walled water inlet hose, the safety valve is next to the tap.
electrolux installation draining of your dishwasher. We therefore advise you to remove it. Electrical connection Likewise the internal diameter of the couplings used for connections to the waste outlet must be no smaller than the diameter of the hose provided. When connecting the drain hose to an under sink trap spigot, the entire plastic membrane (A) must be removed.
environment concerns electrolux 35 Environment concerns The symbol on the product or on its packaging indicates that this product may not be treated as household waste. Instead it should be taken to the appropriate collection point for the recycling of electrical and electronic equipment.
electrolux www.electrolux.com • The appliance guarantee is for the same period and to the same extent for labour and parts as exists in your new country of residence for this particular model or range of appliances. • The appliance guarantee is personal to the original purchaser of the appliance and cannot be transferred to another user. • The appliance is installed and used in accordance with instructions issued by Electrolux and is only used within the home, i.e. is not used for commercial purposes.
www.electrolux.com electrolux 37 Hellas +30 23 10 56 19 70 4, Limnou Str., 54627 Thessaloniki Hrvatska +385 1 63 23 338 Slavonska avenija 3, 10000 Zagreb Ireland +353 1 40 90 753 Long Mile Road Dublin 12 Italia +39 (0) 434 558500 C.so Lino Zanussi, 26 33080 Porcia (PN) Latvija +37 17 84 59 34 Kr.
electrolux www.electrolux.com Slovensko +421 2 43 33 43 22 Electrolux Slovakia s.r.o., Electrolux Domáce spotrebiče SK, Seberíniho 1, 821 03 Bratislava Suomi www.electrolux.fi Sverige +46 (0)771 76 76 76 Electrolux Service, S:t Göransgatan 143, S-105 45 Stockholm Türkiye +90 21 22 93 10 25 Tarlabaşı caddesi no : 35 Taksim İstanbul Россия +7 495 937 7837 129090 Москва, Олимпийский проспект, 16, БЦ "Олимпик" Україна +380 44 586 20 60 04074 Київ, вул.
www.electrolux.