D i s h w a s h e r User Instructions ESF 642 ANC 822 945 920 - 00 - 0700 EN
Dear customer, Please read these user instructions carefully. Above all please observe the safety instructions on the first few pages ofthese user instructions! Please keep these user instructions for later reference. Pass them on to any subsequent owner of the appliance. 1 The warning triangle and/or specific words (Warning!, Caution!, Important!) are used to highlight instructions that are important for your safety or for the function of the appliance.
Contents Safety Instructions . . . . . . . . . . . . . . . . . . . . . . . . . . . . . . . . . . . . . . . . . . . . . . . . . . . . . . . . . . . . . . . . . . . . . . 4 Securing the door of the dishwasher . . . . . . . . . . . . . . . . . . . . . . . . . . . . . . . . . . . . . . . . . . . . . . . . . . . . . . . . . 5 Disposal . . . . . . . . . . . . . . . . . . . . . . . . . . . . . . . . . . . . . . . . . . . . . . . . . . . . . . . . . . . . . . . . . . . . . . . . . . . . . .
1 Safety Instructions The safety aspects of ELECTROLUX electrical appliances comply with accepted technical standards and the German Appliance Safety Law. Nevertheless, as a manufacturer we consider it our obligation to make you aware of the following safety information: Installation, Connection and Placing into Operation • • • • The dishwasher may only be transported upright. Check the dishwasher for transport damage. Do not in any circumstances connect an appliance that is damaged.
Securing the door of the dishwasher This way you can ensure that children cannot open the door of the dishwasher: 1. There is a lever (1) on the left side of the door handle. You can secure the door against being opened unintentionally by pressing this lever to the back using a small screwdriver or the handle of a spoon. 2. Once the lever has been pushed back, you must first push the door handle to the left (2) and then push it upwards (3) in order to open the door. 3.
2 Economical and Ecological Dishwashing • • • • • 6 Only connect the dishwasher to the hot water supply if your hot water is not electrically heated. Ensure that the water softener is correctly adjusted. Do not pre-rinse dishes under running water. Select the wash programme to suit the nature and degree of the soiling on the dishes. Do not use more detergent, special salt or rinse aid than is recommended in these operating instructions and by the manufacturer of the respective product.
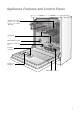
Appliance Features and Control Panel Rubber Seal for Connecting the Water Feed to the Upper Spray Arm Spray Arms Water Hardness Switch Container for Special Salt Container for Rinse Aid Container for Detergent Rating Plate Filters 7
Control panel Power Indicator light Programme Selector Door Handle Switch on the dishwasher and start a wash programme using the programme selector. 8 Programme Switch Set the point at which the wash programme is to start using the programme switch. The programme switch rotates during the wash programme and indicates the position that has been reached in the programme.
Prior to using for the first time Prior to using for the first time, remove all the clips with which the dish racks are secured for transport. Then perform the following steps: 1. Adjust the water softener 2. Filling with Special Salt for the Water Softener 3. Filling with Rinse Aid Adjusting the Water Softener To prevent the build up of scale on dishes and in the dishwasher, the dishes must be washed with soft, i.e. low lime content water.
Filling with Special Salt for the Water Softener 1 Use only special salt for dishwashers. Never fill the salt container with any another type of salt (e.g. culinary salt) or dishwasher detergent. This would irreparably damage the water softener. Prior to filling with salt, please check each time that you really do have a packet of special salt in your hand.
Filling with Rinse Aid Rinse aid ensures that your dishes gleam and are free from spots, and that you glasses are clear. 1 Use only branded rinse aid for dishwashers. Never fill the rinse aid container with any another substance (e.g. concentrated vinegar). This would damage the appliance. Fill with rinse aid: • • Prior to using the dishwasher for the first time. When a dark point surrounded by a light ring is to be seen in the indicator window on the container.
In Daily Use • • • • • Is it necessary to refill with special salt or rinse aid? Load cutlery and dishes into the dishwasher Fill with dishwasher detergent Select a wash programme suitable for the cutlery and dishes Start the wash programme Loading cutlery and dishes 1 Sponges, household cloths and any object that can absorb water may not be washed in the dishwasher.
Loading Cutlery 1 If they are placed in the cutlery basket, long, pointed items of cutlery are a hazard, particularly to children (see Safety Instructions). They must therefore be laid horizontally in the upper basket. To ensure that all cutlery is efficiently washed and reached by the water you should: 1. position the two chopstick holders in the corners of the cutlery basket, 2. place the latticed insert on the cutlery basket, 3.
Loading Cups, Glasses and Coffee Services Load small, delicate items and long pointed cutlery in the upper rack. • Arrange plates and dishes offset on and under the folding cup racks so that washing water can reach all items. • The cup racks can be folded up out of the way for tall items. • Lay or hang wine, champagne, and brandy glasses in the cut outs on the cup racks. • Glasses, beakers, etc. can also be placed on the two rows of prongs on the left of the upper rack.
Filling with Detergent 1 Use only dishwasher detergent. Fill with Detergent: Prior to the start of a wash programme (not for the Pre Wash programme). The detergent is released into the wash water during the programme. 2 Please observe the manufacturer’s dosing and storage recommendations given on the detergent packaging. The detergent dispenser is on the inside of the door. 1. If the lid is closed: Press the latching lever (1) forwards. The lid springs open. 2 1 2.
Selecting the Wash Programme (Programme Table) Choose the most suitable wash programme with the aid of this table: Type of Dishes: Dinner Service and Cooking Utensils In Addition: Type of Soiling: normally soiled dried left-overs Coffee Service and Dessert Dishes with non-temperature resistant dishes normally soiled normally to lightly soiled lightly soiled particularly suited to the use of concentrated detergents.
Starting the Wash Programme 1. Check that the dishes and cutlery are loaded into the dishwasher in such a manner that the spray arms are free to rotate. 2. Open the tap fully. 3. Close dishwasher door. 4. Turn the programme switch clockwise to f, or g or h (see „ Programme Table“). Interrupting the wash programme by opening the door of the dishwasher Hot steam can escape when the door is opened. There is a risk of scolding! Open the door carefully. 1. Open the door of the dishwasher.
Switching Off the Dishwasher When the wash programme is finished: 1. Turn the program selector to the I position. The power indicator light goes off. Hot steam may escape if the door is opened immediately after the end of the programme. Therefore: 2. Open the door carefully. 1 Emptying the Dishwasher Hot dishes are sensitive to knocks. The dishes should therefore be allowed to cool down before removing them from the appliance.
Care and Cleaning Do not under any circumstances use furniture care products or aggressive cleaners. If necessary, clean the controls only with a soft cloth and pure warm water. The spray arms do not need cleaning. Occasionally check the internal containers, door seal, and water inlet for soiling, clean if necessary. 1 • • • Cleaning the Filter 3 The filters in the base of the washing compartment are to a large extent self-cleaning.
What to do, when ... Try to rectify minor faults on the dishwasher with the aid of the instructions given here. If you call in customer service to resolve one of the malfunctions listed here, or rectify an error made in the operation of the appliance, the customer service engineer’s visit is not free of charge, even during the period of guarantee. ...there are problems with the operation of the dishwasher.
The dishes are wet and dull. • • Rinse aid was not used. The rinse aid container is empty. There are streaks, milky spots or a bluish coating on glasses and dishes. • There are dried water drops on the glasses and dishes. • • Increase rinse aid dosing. The detergent may be the cause. Contact the detergent manufacturer's consumer advisor. Decrease rinse aid dosing. Technical Data Capacity: 12 place settings including serving dishes Permitted Water Pressure: 1-10 bar (=10-100 N/cm2 = 0.1-1.
Notes for Test Institutes The salt container for the water softener and the rinse aid container must be completely full prior to the test. Test Standard: EN 50 242 Comparative Program: Normal 50°C for full and half loads Full Load: 12 place settings incl. serving dishes Detergent Dosing: 30g (Type B) in the detergent container Half Load: 6 place settings including serving dishes Every second place is left empty in the case of a half load.
Example Loading Arrangements: Bottom rack Example Loading Arrangements: Cutlery basket 23
INSTALLATION AND CONNECTION INSTRUCTIONS Installing the Dishwasher • • The dishwasher must be installed on a firm floor and adjusted to ensure that it is stable and level. To compensate for unevenness in the floor and to match the height of the appliance to that of surrounding units extend the threaded feet by unscrewing. Depending on the design of the threaded feet use either – an open-end spanner or – a screwdriver.
Depending on type, the dishwasher is to be installed as follows: Dishwashers That Can Be Integrated (see installation template supplied) 3 The door of the appliance can be fitted with a wooden furniture door with the following dimensions Width: 591 – 594 mm Thickness: 16 – 24 mm Height: (variable) dependent on Weight: max.
1 If the dishwasher is later used as a freestanding appliance, the original work surface must be re-mounted. 3 The plinth on free-standing appliances is not adjustable. • • • • 26 Free-standing appliances can be fitted with a décor panel to match the facings of other kitchen equipment. The décor panels must be obtained from the kitchen manufacturer. A décor frame is necessary for installation, and can be obtained as an accessory from the dealer if not included in the scope of delivery.
Connecting the Dishwasher Water connection The dishwasher is fitted with safety devices that prevent the return of wash water into the drinking water system and comply with the applicable plumbing regulations. • The dishwasher can be connected to cold and hot water supplies up to max. 60 °C. • The dishwasher must not be connected to open hot water appliances or instantaneous water heaters.
Water drain Drain hose The drain hose must not be kinked, crushed or entangled. Connecting the drain hose: – Maximum permitted height: 1 metre. – Minimum required height 30 cm above the lower edge of the machine. 1 • Extension hoses • • Extension hoses are available from your dealer or customer service. The internal diameter of the extension hoses must be 19 mm to ensure that the function of the appliance is not impeded.
Electrical connection 1 In compliance with electric company technical requirements for mains connections, hard-wired connections to the mains may only be made by approved electri-cians. When connecting the appliance, observe the German VDE regulations and, if applicable, any additional conditions required by your local electricity supplier. Following installation, live parts and live insulated wiring must not be accessible using a finger test in accordance with EN 60335/DIN VDE 0700.
Connections The water inlet and drain hoses, as well as the mains cable must be connected beside the dishwasher because there is no space for them behind the appliance. The example plumbing and electrical installation given below can only be regarded as a recommendation; the actual situation where the dishwasher is to be installed will define the exact installation (available connections, local electricity and water board regulations for connecting up appliances, etc.).
SERVICE In the section "What to do, if..." the most important sources of faults that you can rectify yourself are summarised. If, nevertheless, you call in customer service to resolve a problem listed in these instruction, or because of an error made in operating the appliance, the customer service engineer’s visit is not free of charge, even during the warranty period. If you can not find any information on a specific malfunction in these operating instructions, please contact customer service.