user manual Dishwasher ESF 65060
electrolux Electrolux. Thinking of you. Share more of our thinking at www.electrolux.
electrolux 3 • Keep all detergents in a safe area. Do not let children touch the detergents. • Keep children and pets away from the appliance when the door is open. Installation • Make sure that the appliance is not damaged because of transport. Do not connect a damaged appliance. If necessary, contact the supplier. • Remove all packaging before first use. • A qualified and competent person must do the electrical installation. • A qualified and competent person must do the plumbing installation.
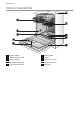
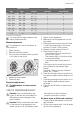
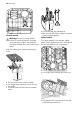
electrolux PRODUCT DESCRIPTION 10 9 1 2 3 4 5 Upper basket Water hardness dial Salt container Detergent dispenser Rinse aid dispenser 6 7 8 9 10 Rating plate Filters Lower spray arm Upper spray arm Worktop
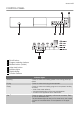
electrolux 5 CONTROL PANEL 7 1 2 3 4 5 6 7 On/off button Program selection buttons Multitab button (Tablet) Delay start button Indicator lights Digital display Function buttons Indicator lights Washing Comes on when the washing phase or the rinsing phase operates. Drying Comes on when the drying phase operates. Ready Comes on when the washing program is completed.
electrolux Indicator lights Rinse Aid Comes on when it is necessary to fill the rinse aid container. Refer to 'Use of rinse aid'. 1) The indicator light is off while a washing program operates. Multitab button Press this button to activate/deactivate the multitab function. Refer to 'Multitab function'. Delay start button Use the delay start button to delay the start of the washing program with an interval between 1 and 9 hours. Refer to 'Select and start a washing program'.
electrolux 7 Water hardness Water hardness setting mg/l ppm mmol/l manually electronically 760 - 909 760 - 909 7,6 - 9,0 2 9 650 - 759 650 - 759 6,5 - 7,5 2 8 510 - 649 510 - 649 5,1 - 6,4 2 7 400 - 509 400 - 509 4,0 - 5,0 2 6 330 - 399 330 - 399 3,3 - 3,9 2 5 260 - 329 260 - 329 2,6 - 3,2 1 4 190 - 259 190 - 259 1,9 - 2,5 1 3 70 - 189 70 - 189 0,7 - 1,8 1 2 < 70 < 70 < 0,7 1 11) 1) No use of salt required.
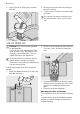
electrolux 3. Use the funnel to fill the salt container with salt. 4. Remove the salt around the opening of the salt container. 5. Turn the cap clockwise to close the salt container. It is normal that water overflows from the salt container when you fill it with salt. USE OF RINSE AID Caution! Only use rinse aid specified for dishwashers. Do not fill the rinse aid dispenser with other products (e.g. dishwasher cleaning agent, liquid detergent). This can cause damage to the appliance. 2.
electrolux 9 Turn the rinse aid dial to increase or decrease the dosage. – Increase the dosage if there are water droplets or limescale on the dishes. – Decrease the dosage if there are streaks, whitish stains or bluish layers on the dishes. Wash hands to remove any residue of rinse aid from skin. LOADING CUTLERY AND DISHES Helpful hints and tips Only use the appliance for household utensils that are suitable for dishwashers. Do not use the appliance to clean objects that can absorb water (e.g.
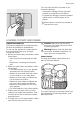
electrolux Cutlery basket Warning! Do not put long-bladed knives in a vertical position. Arrange long and sharp cutlery horizontally in the upper basket. Be careful with sharp items. • Put knives with the handles up. • Mix spoons with other cutlery to prevent them nesting together. Upper basket The upper basket is for saucers, salad bowls, cups, glasses and lids. Arrange the items to let water touch all surfaces. Use the cutlery grids for best washing results.
electrolux 11 Adjustment of the height of the upper basket You can put the upper basket in two positions to increase load flexibility. 1. Pull out the upper basket until it stops. Maximum height of the dishes in: the upper basket the lower basket Upper position 22 cm 30 cm Lower position 24 cm 29 cm Follow these steps to move to the upper basket to the lower/upper position: 2. Hold the upper basket by the handle, lift it as far as possible and lower it vertically.
electrolux 4. If you use detergent tablets, put the detergent tablet in the detergent dispenser (A) . 5. Close the lid of the detergent dispenser. Press the lid until it locks into position. Different brands of detergent dissolve in different times. Some detergent tablets do not have the best cleaning results during short washing programs. Use long washing programs when you use detergent tablets to fully remove the detergent. MULTITAB FUNCTION The multitab function is for combi detergent tablets.
electrolux 13 SELECT AND START A WASHING PROGRAM Set the washing program with the door ajar. The washing program only starts after you close the door. Until then it is possible to modify the settings. 1. Press the on/off button. 2. Make sure that the appliance is in setting mode. 3. Press one of the program buttons. Refer to the 'Washing programs' chart for program details. – The indicator light of the selected program stays on. All other program indicator lights go off.
electrolux • There can be water on the sides and door of the appliance. Stainless steel becomes cool more quickly than the dishes.
electrolux 15 CARE AND CLEANING Warning! Switch the appliance off before you clean it. Cleaning the filters Caution! Do not use the appliance without the filters. Make sure that the installation of the filters is correct. Incorrect installation will cause unsatisfactory washing results and damage to the appliance. 5. Hold the coarse filter (A) by the handle with the hole. 6. Remove the coarse filter from the microfilter. 7. Remove the flat filter (C) from the bottom of the appliance.
electrolux Long periods of non-operation Do these steps when you do not use the appliance for a long period: 1. Disconnect the mains plug from the mains socket. 2. Close the water tap. 3. Keep the door open to prevent unpleasant smells. 4. Keep the inner side of the appliance clean. Frost precautions Caution! Do not install the appliance where the temperature is below 0 °C. The manufacturer is not responsible for damage because of frost. If not possible, empty the appliance and close the door.
electrolux 17 After the check, switch on the appliance. The program continues from the point of interruption. If the malfunction shows again, contact your Customer Care Centre. For other fault codes, not described in the chart, contact your Customer Care Centre. These data are necessary to help you quickly and correctly: • Model (Mod.) • Product number (PNC) • Serial number (S.N.) For these data, refer to the rating plate. Write the necessary data here: Model description : .......... Product number : ....
electrolux INSTALLATION Fitting under a counter Warning! Make sure that mains plug is disconnected from the mains socket during installation. Put the appliance adjacent to a water tap and a water drain. The plinth of a freestanding appliance is not adjustable. Do not remove the appliance's worktop if you want to use it as a freestanding unit. It is not necessary to remove the worktop when installing under a standard kitchen bench top.
electrolux 19 • If cold water pressure is in excess of 800 kPa, a pressure reducing valve should be used. Check for leaks. Warning! Caution! Always use new hoses when you connect the appliance to the water mains. Old hoses must not be used. The water inlet hose must be examined at an interval of twelve months for deterioration and replaced if necessary. The water pressure must be in the limits (refer to 'Technical data').
electrolux Caution! Make sure that the water couplings are tight to prevent water leakage. Ensure that hoses are not crushed or kinked under or behind the appliance. Once connected the inlet hose to the water tap, turn the tap on and check that there are no leaks. ELECTRICAL CONNECTION Warning! Safety standards require the appliance to be earthed.
electrolux 21 WARRANTY FOR SALES IN AUSTRALIA AND NEW ZEALAND This document sets out the terms and conditions of product warranties for Electrolux branded appliances. It is an important document. Please keep it with your proof of purchase documents in a safe place for future reference should you require service for your Electrolux appliance. General Terms and Conditions 1.
electrolux 8. You may not make a claim under this warranty unless the defect claimed is due to faulty or defective parts or workmanship.
electrolux 23 FOR SERVICE OR TO FIND THE ADDRESS OF YOUR NEAREST AUTHORISED SERVICE CENTRE IN NEW ZEALAND Free call 0800 10 66 10 (New Zealand only) SERVICE NEW ZEALAND ELECTROLUX HOME PRODUCTS FOR SPARE PARTS OR TO FIND THE ADDRESS OF YOUR NEAREST SPARE PARTS CENTRE IN NEW ZEALAND Free call 0800 10 66 20 (New Zealand only)
www.electrolux.