ESF 6550ROW ESF 6550ROX ................................................ .............................................
www.electrolux.com CONTENTS 1. 2. 3. 4. 5. 6. 7. 8. 9. 10. 11. 12. SAFETY INSTRUCTIONS . . . . . . . . . . . . . . . . . . . . . . . . . . . . . . . . . . . . . . . . . . . . . . . . . . 3 PRODUCT DESCRIPTION . . . . . . . . . . . . . . . . . . . . . . . . . . . . . . . . . . . . . . . . . . . . . . . . . 5 CONTROL PANEL . . . . . . . . . . . . . . . . . . . . . . . . . . . . . . . . . . . . . . . . . . . . . . . . . . . . . . . 6 PROGRAMMES . . . . . . . . . . . . . . . . . . . . . . . . . . . . . . .
ENGLISH 1. 3 SAFETY INSTRUCTIONS Before the installation and use of the appliance, carefully read the supplied instructions. The manufacturer is not responsible if an incorrect installation and use causes injuries and damages. Always keep the instructions with the appliance for future reference. 1.1 Children and vulnerable people safety WARNING! Risk of suffocation, injury or permanent disability.
www.electrolux.com 1.3 Use • This appliance is intended to be used in household and similar applications such as: – Staff kitchen areas in shops, offices and other working environments – Farm houses – By clients in hotels, motels and other residential type environments – Bed and breakfast type environments. WARNING! Risk of injury, burns, electrical shock or fire. • Do not change the specification of this appliance.
ENGLISH 2.
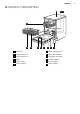
www.electrolux.com 3. CONTROL PANEL 1 Auto Off 50º AutoFlex 45º-70º Intensive 70º Glass Care 45º Quick Plus 60º 2 Rinse & Hold 3 EnergySaver 4 Multitab 3 sec MyFavourite Save MyFavourite 5 Program Delay Option Start 8 7 Reset 6 1 On/off button 5 Delay button 2 Program button 3 Programme indicators 6 Start button 4 Display 8 Option button Indicators 7 Indicators Description Washing phase indicator. It comes on when the washing phase and the rinsing phases operate.
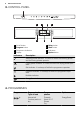
ENGLISH Programme Degree of soil Type of load Programme phases Options All Crockery, cutlery, pots and pans Prewash Wash from 45 °C to 70 °C Rinses Dry EnergySaver Heavy soil Crockery, cutlery, pots and pans Prewash Wash 70 °C Rinses Dry EnergySaver Normal or light soil Delicate crockery and glassware Wash 45 °C Rinses Dry EnergySaver 3) Fresh soil Crockery and cutlery Wash 60 °C Rinse 4) All Prewash 2) 7 1) With this programme you have the most efficient use of water and energy consum
www.electrolux.com 5. OPTIONS Activate or deactivate the options before the start of a programme. You cannot activate or deactivate the options while a programme operates. If one or more options are set, make sure that the related indicators are on before the programme starts. 5.1 EnergySaver This option decreases the temperature in the last rinse phase. The use of this option decreases the energy consumption (up to 25%) and the programme duration. The dishes can be wet at the end of the programme.
ENGLISH 5.4 Acoustic signals The acoustic signals operate when the appliance has a malfunction or when the adjustment of the level of the water softener occurs. It is not possible to deactivate these acoustic signals. There is also an acoustic signal that operates when the programme is completed. By default, this acoustic signal is off, but it is possible to activate it. How to activate the acoustic signal for the end of programme 1. Press the on/off button to activate the appliance. 2.
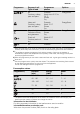
www.electrolux.com Water softener adjustment Water hardness German degrees (°dH) French degrees (°fH) mmol/l Clarke degrees Manual Electronic 15 - 18 26 - 32 2.6 - 3.2 18 - 22 1 4 11 - 14 19 - 25 1.9 - 2.5 13 - 17 1 3 4 - 10 7 - 18 0.7 - 1.8 5 - 12 1 2 <4 <7 < 0.7 <5 12) 12) 1) Factory position. 2) Do not use salt at this level. You must adjust the water softener manually and electronically. Manual adjustment Turn the water hardness dial to the position 1 or 2.
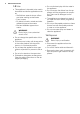
ENGLISH 11 6.2 Filling the salt container 1. 2. 3. 4. 5. Turn the cap counterclockwise and open the salt container. Put 1 litre of water in the salt container (only for the first time). Fill the salt container with dishwasher salt. Remove the salt around the opening of the salt container. Turn the cap clockwise to close the salt container. CAUTION! Water and salt can come out from the salt container when you fill it. Risk of corrosion. To prevent it, after you fill the salt container, start a programme.
www.electrolux.com 7.1 Using the detergent A 1. B 2. 30 3. MAX 4 + 32 - 1 20 C 4. 5. 7.2 Setting and starting a programme The Auto Off function To decrease the energy consumption, this function automatically deactivates the appliance a few minutes after: • You have not closed the door. • You have not pressed Start to start the programme. • The programme is completed. Starting a programme without delay start 1. Open the water tap. 2. Press the on/off button to activate the appliance.
ENGLISH The cancelling of the delay start cancels also the set options (except Multitab). Make sure, before you press Start, to set the options again. Cancelling the programme Press and hold, at the same time, Program and Option for a few seconds. Make sure that there is detergent in the detergent dispenser before you start a new programme. At the end of the programme When the programme is completed, the display shows 0:00. • The phase indicators go off.
www.electrolux.com • Make sure that glasses do not touch other glasses. • Put the small items in the cutlery basket. • Put the light items in the upper basket. Make sure that they do not move. • Make sure that the spray arms can move freely before you start a programme. 8.4 Before starting a programme Make sure that: • The filters are clean and correctly installed. • The spray arms are not clogged. • The position of the items in the baskets is correct.
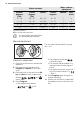
ENGLISH 6. 15 Assemble the filter (A) and put it into position in filter (B). Turn it clockwise until it locks. An incorrect position of the filters can cause bad washing results and damage to the appliance. 9.2 Cleaning the spray arms Do not remove the spray arms. If the holes in the spray arms are clogged, remove remaining parts of soil with a thin pointed object. Only use neutral detergents. Do not use abrasive products, abrasive cleaning pads or solvents. 9.
www.electrolux.com Problem Possible solution Make sure that the pressure of the water supply is not too low. For this information, contact your local water authority. Make sure that the water tap is not clogged. Make sure that the filter in the inlet hose is not clogged. Make sure that the inlet hose has no kinks or bends. The appliance does not drain the water. Make sure that the sink spigot is not clogged. Make sure that the drain hose has no kinks or bends. The anti-flood device is on.
ENGLISH 6. Press the on/off button to deactivate the appliance and to confirm the setting. 17 7. Adjust the released quantity of rinse aid. 8. Fill the rinse aid dispenser. 11. TECHNICAL INFORMATION Dimensions Width / Height / Depth (mm) Electrical connection Refer to the rating plate. Voltage 596 / 850 / 610 220-240 V Frequency 50 Hz Water supply pressure Min. / max. (bar / MPa) (0.5 / 0.05 ) / (8 / 0.
www.electrolux.com МАЗМҰНЫ 1. 2. 3. 4. 5. 6. 7. 8. 9. 10. 11. 12. ҚАУІПСІЗДІК НҰСҚАУЛАРЫ . . . . . . . . . . . . . . . . . . . . . . . . . . . . . . . . . . . . . . . . . . . . . . . . . . . . . . . . . . . БҰЙЫМ СИПАТТАМАСЫ . . . . . . . . . . . . . . . . . . . . . . . . . . . . . . . . . . . . . . . . . . . . . . . . . . . . . . . . . . . . . . БАСҚАРУ ПАНЕЛІ . . . . . . . . . . . . . . . . . . . . . . . . . . . . . . . . . . . . . . . . . . . . . . . . . . . . . . . . . . . . . . . . . . . .
ҚАЗАҚ 1. 19 ҚАУІПСІЗДІК НҰСҚАУЛАРЫ Құрылғыны орнатып іске қолданар алдында бірге жеткізілген нұсқауларды мұқият оқып шығыңыз. Құрылғыны дұрыс орнатпау мен дұрыс пайдаланбау нәтижесінде адам жарақат алса және ақаулық орын алса өндіруші жауапты емес. Нұсқаулықты келешекте қарап жүру үшін үнемі сақтап қойыңыз. 1.1 Балалар мен дәрменсіз адамдардың қауіпсіздігі Назарыңызда болсын! Тұншығып қалу, жарақат алуы немесе мүгедек болып қалу қаупі бар.
www.electrolux.com Назарыңызда болсын! Қатерлі кернеу. • Егер су құятын түтік бүлінсе, ашаны дереу розеткадан суырыңыз. Су құятын түтікті ауыстыру үшін Қызмет көрсету орталығына хабарласыңыз. 1.
ҚАЗАҚ 2.
www.electrolux.com 3. БАСҚАРУ ПАНЕЛІ 1 Auto Off 50º AutoFlex 45º-70º Intensive 70º Glass Care 45º Quick Plus 60º 2 3 EnergySaver 4 Multitab 3 sec MyFavourite Save MyFavourite Delay Option Start 1 Қосу/сөндіру түймешігі 2 Program түймешігі 3 Бағдарлама индикаторлары 4 Бейнебет 7 Reset 5 Program 8 Индикатор шамдар Rinse & Hold 6 5 Delay түймешігі 6 Start түймешігі 7 Индикатор шамдар 8 Option түймешігі Сипаттама Жуу циклінің индикаторы.
ҚАЗАҚ Бағдарлама 2) 3) 4) Ластану дәрежесі Кірдің түрі Бағдарлама циклдар Функциялар Барлығы Фарфор ыдыс, ас құралдары, кәстрөлдер мен табалар Алғашқы жуу Жуу 45 °C градустан 70 °C дейін Шаю циклдары Құрғату EnergySaver Қатты ластанған Фарфор ыдыс, ас құралдары, кәстрөлдер мен табалар Алғашқы жуу Жуу 70 °C Шаю циклдары Құрғату EnergySaver Қалыпты не шамалы ластанған Осал ыдыс-аяқ пен шыны ыдыс Жуу 45 °C Шаю циклдары Құрғату EnergySaver Жаңа ластанған Фарфор ыдыс-аяқ пен ас құралдары Жуу 60
www.electrolux.com Сынақ институттарына арналған ақпарат Сынақ өткізуге қажетті ақпараттар туралы хабарларды мына эл.поштаға жолдаңыз. info.test@dishwasher-production.com Техникалық ақпарат тақтайшасындағы құрылғының нөмірін (PNC) жазып қойыңыз. 5. ФУНКЦИЯЛАР Параметрлерді бағдарламаны бастамай тұрып іске қосыңыз немесе сөндіріңіз. Параметрлерді бағдарлама жұмыс істеп тұрған кезде қосу немесе сөндіру мүмкін емес.
ҚАЗАҚ MyFavourite бағдарламасын қалай орнату керек 1. Program түймешігін MyFavourite бағдарламасына қатысты индикаторлар мен функциялар көрінгенше басып ұстап тұрыңыз • Бейнебетте бағдарламаның ұзақтығы көрсетіледі. 5.4 Дыбыстық сигналдар Құрылғыда ақау пайда болған кезде немесе су жұмсартқыштың деңгейін реттеген кезде дыбыстық сигнал естіледі. Бұл дыбыстық сигналдарды өшіріп қоюға болады. Бағдарлама аяқталған кезде де дыбыстық сигнал естіледі.
www.electrolux.com Су жұмсартқыш реттеу Су қысымы Германия градусы (°dH) Франция градусы (°fH) ммоль/л Кларк градусы Қолдан Электр онды тәсілме н 37 - 42 65 - 75 6.5 - 7.5 46 - 52 21) 8 29 - 36 51 - 64 5.1 - 6.4 36 - 45 21) 7 23 - 28 40 - 50 4.0 - 5.0 28 - 35 21) 6 19 - 22 33 - 39 3.3 - 3.9 23 - 27 21) 51) 15 - 18 26 - 32 2.6 - 3.2 18 - 22 1 4 11 - 14 19 - 25 1.9 - 2.5 13 - 17 1 3 4 - 10 7 - 18 0.7 - 1.8 5 - 12 1 2 <4 <7 < 0.
ҚАЗАҚ 27 6.2 Тұз сауытын толтыру 1. 2. 3. 4. 5. Тұз сауытының қақпағын сағат тілінің бағытына қарсы бұрап ашыңыз. Тұз сауытына 1 литр су құйыңыз (ең алғаш қолданғанда ғана). Тұз сауытына ыдыс жуғыш машина тұзынан салыңыз. Тұз сауытының ернеуіндегі тұзды тазалаңыз. Тұз сауытының қақпағын сағат тілінің бағытымен бұрап жабыңыз. Сақтандыру туралы ескерту! Тұз сауытын толтырған кезде одан су және тұз ағуы мүмкін. Тот басу қауіпі бар.
www.electrolux.com 7.1 Жуғыш затты қолдану A 1. B 2. 3. 30 4 MAX + 32 - 1 20 4. C 7.2 Бағдарламаны орнату және бастау Auto Off функциясы Бұл функция пайдаланылатын қуат мөлшерін азайту үшін, құрылғыны келесі жағдайларда бірнеше минуттан кейін автоматты түрде сөндіреді: • Есік жабылмаса. • Бағарламаны бастау үшін Start басылмаса. • Бағдарлама аяқталғанда. Кешіктіріп бастау функциясы жоқ бағдарламаны бастау 1. Су құятын шүмекті ашыңыз. 2.
ҚАЗАҚ Кешіктіріп бастау функциясын біржола тоқтатқан кезде орнатылған функциялар да (Multitab функциясынан басқа) біржола тоқтайды. Start түймешігін баспай тұрып функциялардың қайта орнатылғанына көз жеткізіңіз. Бағдарламаны біржола тоқтату Program және Option түймешіктерін бірнеше секунд қатар басып ұстап тұрыңыз. Жаңа бағдарламаны бастар алдында, жуғыш зат үлестіргіште жуғыш заттың бар екеніне көз жеткізіңіз. Бағдарламаның соңы 29 • Цикл индикаторлары сөнеді.
www.electrolux.com • Күйіп жабысып қалған тағамды оңай тазалау үшін кәстрөлдер мен табаларды құрылғыға салмай тұрып, суға салып жібітіңіз. • Шұңғыл ыдыстардың (мысалы, кесе, стакан және кәстрөл) аузын төмен қаратып салыңыз. • Ас құралдары мен ыдыс-аяқты араласып кетпейтін етіп салыңыз. Қасықтарды басқа ас құралдарымен араластырып салыңыз. • Стакандарды бір-біріне тигізбей салыңыз. • Кішкене заттарды ас құралдары себетіне салыңыз. • Жеңіл заттарды үстіңгі себетке салыңыз.
ҚАЗАҚ 2. 3. 4. 5. A1 31 (A) сүзгісін бөлу үшін, (A1) және (A2) бөліктерін ажыратыңыз. (B) сүзгісін алыңыз. Сүзгілерді сумен жуыңыз. (B) сүзгісін әдепкі орнына салыңыз. Сүзгінің екі бағыттағыштың (C) астына дұрыс кірігіп орналасқанына көз жеткізіңіз. A2 6. (A) сүзгісін құрастырып, (B) сүзгісіндегі орнына қойыңыз. Сырт етіп орнына түскенше сағат тілінің бағытымен бұраңыз. Сүзгілер дұрыс салынбаса, жуу нәтижесі қанағаттанғысыз болуы және құрылғыға нұқсан келуі мүмкін. 9.
www.electrolux.com Ақаулық Ықтимал шешімі Сақтандырғыш қорабындағы сақтандырғышқа зақым келмегеніне көз жеткізіңіз. Бағдарлама басталмай тұр. Құрылғы есігінің жабық тұрғанына көз жеткізіңіз. Start түймешігін басыңыз. Егер кешіктіріп бастау функциясы орнатылып тұрса, оны ажыратыңыз немесе кері санақ аяқталғанша күтіңіз. Құрылғыға су құйылмай тұр. Су шүмегінің ашық тұрғанына көз жеткізіңіз. Сумен жабдықтау жүйесіндегі судың қысымының өте төмен емес екеніне көз жеткізіңіз.
ҚАЗАҚ 10.2 Шайғыш зат үлестіргішін іске қосу Multitab функциясы іске қосылған кезде ғана шайғыш зат үлестіргішін қосуға болады. 1. Құрылғыны іске қосу үшін қосу/сөндіру түймешігін басыңыз. 2. Program және Option түймешіктерін бірнеше секунд қатар басып ұстап тұрыңыз. 3. Delay және Start түймешіктерін , және индикаторлары жыпылықтай бастағанша бірге басып ұстап тұрыңыз. 4. Option түймешігін басыңыз. • және бағдарламаларының индикаторлары сөнеді. 33 • бағдарламасының индикаторы жыпылықтауын жалғастырады.
www.electrolux.com қосыңыз. Белгі салынған құрылғыларды тұрмыстық қалдықтармен бірге тастамаңыз. Өнімді жергілікті қайта өңдеу орталығына өткізіңіз немесе жергілікті мекемеге хабарласыңыз.
ҚАЗАҚ 35
117918530-B-292012 www.electrolux.