ESF 66814 ................................................ .............................................
electrolux Electrolux. Thinking of you. Share more of our thinking at www.electrolux.
electrolux 3 • Always close the door when you do not use the appliance to prevent injury and not to stumble over the open door. • Do not sit or stand on the open door. CHILD SAFETY • Do not let persons, children included, with reduced physical sensory, reduced mental functions or lack of experience and knowledge use the appliance. They must have supervision or instruction for the operation by a person who is responsible for their safety.
electrolux PRODUCT DESCRIPTION 1 9 2 8 3 7 4 5 1 2 3 4 5 6 7 8 Upper basket Air vent and water hardness dial Salt container Detergent dispenser Rinse aid dispenser Rating plate Filters Lower spray arm 6 9 Upper spray arm INTERNAL LIGHT This appliance has an internal light that comes on when you open the door and goes off when the door is closed. If it is necessary to replace the light, contact your local Customer Care Centre.
electrolux 5 CONTROL PANEL The controls are on the top of the control panel. To operate with the controls keep the appliance door ajar. 1 2 3 4 5 6 7 8 9 10 1 2 3 4 5 6 7 8 9 10 On/off button Display Delay start button Program button (down) Program button (up) Energy saver button Multitab button Reset button Indicators Program-display Indicators Salt indicator. It comes on when it is necessary to fill the salt container.
electrolux THE DISPLAY The display shows: • The electronic adjustment of the level of the water softener • The activation and deactivation of the rinse aid dispenser (only with the multitab function on) • The number of the washing program • The remaining time to the end of the washing program • The end of a washing program (the display shows a zero) • The time of the delay start • The alarm codes • The activation and deactivation of the acoustic signals.
electrolux 7 • You adjust electronically the level of the water softener. • The appliance has a malfunction. Factory setting: acoustic signals active. Deactivating the acoustic signals 1. Switch on the appliance. Make sure that the appliance is in setting mode. 2. Press and hold button (4) and button (5) at the same time until the indicators of buttons (3), (4) and (5) flash. 3. Release button (4) and button (5). 4. Press button (5), • The indicators of button (3) and button (4) go off.
electrolux Water hardness Water hardness setting mg/l ppm mmol/l manually electronically < 70 < 70 < 0.7 1 11) 1) No use of salt required. You must set the water softener manually and electronically. MANUAL ADJUSTMENT The appliance is set at the factory at position 2. 1. Remove the lower basket. 2. Turn the water hardness dial to position 1 or 2 (refer to the chart). 1. Switch on the appliance. Make sure that the appliance is in setting mode. 2.
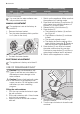
electrolux 9 It is normal that water overflows from the salt container when you fill it with salt. USE OF DETERGENT AND RINSE AID 1 3 2 30 4 MA X + 3 2 USE OF RINSE AID - 1 20 lets do not have the best cleaning results during short washing programs. Use long washing programs when you use detergent tablets to fully remove the detergent. 4 Caution! Only use rinse aid specified for dishwashers. Do not fill the rinse aid dispenser with other products (e.g.
electrolux MULTITAB FUNCTION The multitab function is for combi detergent tablets. These tablets contain agents as detergent, rinse aid and dishwasher salt. Some types of tablets can contain other agents. Be sure that these tablets are suitable for the water hardness in your area (refer to the instructions on the packaging of the products). The multitab function deactivates the flow of rinse aid and salt. The multitab function deactivates the indicators of salt and rinse aid.
electrolux 11 SETTING AND STARTING A WASHING PROGRAM STARTING THE WASHING PROGRAM WITHOUT DELAY START 1. Switch on the appliance. Make sure that the appliance is in setting mode. 2. Set the washing program. • The number related to the washing program flashes in the display. 3. Close the appliance door, the washing program starts. STARTING THE WASHING PROGRAM WITH DELAY START 1. Switch on the appliance. Make sure that the appliance is in setting mode. 2. Set the washing program. 3.
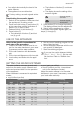
electrolux WASHING PROGRAMS Program 1 Type of soil Type of load Program description Function All Crockery, cutlery, pots and pans Prewash Wash 45 °C or 70 °C Rinses Dry Energy saver 2 Heavy soil Crockery, cutlery, pots and pans Prewash Wash 70 °C Rinses Dry Energy saver 3 Fresh soil Crockery and cutlery Wash 60 °C Rinse Normal soil Crockery and cutlery Prewash Wash 50 °C Rinses Dry 5 Light soil Crockery and cutlery Wash 55 °C Rinses 6 Normal or light soil Delicate crockery and
electrolux 13 Program Program time (minute) Energy (kWh) Water (litre) 4 105 - 115 0.67 - 0.81 9.6 - 11.6 5 50 - 60 1.0 - 1.2 10 - 11 6 70 - 80 0.8 - 0.9 11 - 12 7 14 0.05 4 The water pressure and temperature, the variations of the mains supply and the quantity of dishes can change the consumption values. CARE AND CLEANING Warning! Switch the appliance off before you do any cleaning operations.
electrolux Use detergent, but do not put dishes in the appliance. C 8. Put filter (A) into position in filter (B) and turn it clockwise until it locks. CLEANING THE SPRAY ARMS Do not remove the spray arms. If the holes in the spray arms become clogged, remove remaining parts of soil with a thin pointed object. EXTERNAL CLEANING Clean the external surfaces of the appliance and control panel with a damp soft cloth. Only use neutral detergents. Do not use abrasive products, scouring pads or solvents (e.
electrolux 15 Malfunction The appliance does not drain the water Possible cause Possible solution The water tap is blocked or restricted with limescale. Clean the water tap. The water pressure is too low. Contact your local water authority. There is a blockage in the sink spigot. Clean the sink spigot. The installation of the water drain hose is not correct. The hose is bent or squashed. Make sure that the installation is correct.
electrolux Problem Possible cause Possible solution The salt container cap is not closed correctly. Ensure that the salt container cap is correctly closed. There are streaks, milky stains, or a bluish layer on glasses and dishes. Rinse aid dosage is too high. Decrease the rinse aid dosage. Dry water drop stains on glasses and dishes. Rinse aid dosage is too low. Increase the rinse aid dosage. The detergent can be the cause. Use a different brand of detergent. The dishes are wet.
electrolux 17 TECHNICAL DATA Dimensions Width Height Depth Electrical connection Voltage Overall power Fuse Frequency Water supply pressure min. max.
electrolux ADHESIVE STEAM PROTECTION FOIL Fit the steam protection on the front part of the kitchen counter along the entire width. 600 mm After the adjustment of the level of the appliance, assemble the adjustable plinth on the appliance. INSTALLING THE APPLIANCE UNDER THE KITCHEN COUNTER OR TO ADJACENT UNITS Warning! To prevent injury or damage, make sure that the appliance is secured to adjacent safe structures. ADJUSTING THE HEIGHT OF THE APPLIANCE 1. Remove the adjustable plinth.
electrolux 19 x4 2. Fix laterally the appliance with the spacers and the screws supplied. Make sure that the screws are tight. Once the installation is completed, make sure that the bottom of the adjustable plinth is aligned with the ground. CUSTOM MADE KICK-PANEL For integrated appliances and full-stainlesssteel door appliances. We recommend that you make a custom made kick-panel that aligns your kitchen cabinets.
electrolux WATER CONNECTION WATER INLET HOSE Connect the inlet hose to a water tap with an external BSP thread spout of 3/4”. For best washing performance it is recommended to connect the appliance to a cold water supply. Energy savings can be made by connecting the appliance to a Solar water system and using economy options, however the water temperature must not exceed 60 °C. Once connected the inlet hose to the water tap, turn the tap on and check that there are no leaks.
electrolux 21 Caution! Make sure that the water couplings are tight to prevent water leakage. Ensure that hoses are not bent or squashed under or behind the appliance. Once connected the inlet hose to the water tap, turn the tap on and check that there are no leaks.
electrolux ELECTRICAL CONNECTION Warning! • The manufacturer accepts no liability for failure to observe the below safety precautions. • Safety standards require the appliance to be earthed. • Prior to using the appliance for the first time, ensure that the rated voltage and type of supply on the rating plate match that of the supply where the appliance is to be installed. • The fuse rating can be found on the rating plate and in 'Technical data'.
electrolux 23 WARRANTY FOR SALES IN AUSTRALIA AND NEW ZEALAND APPLIANCE: DISHWASHER This document sets out the terms and conditions of the product warranties for Electrolux Appliances. It is an important document. Please keep it with your proof of purchase documents in a safe place for future reference should you require service for your Appliance. 1.
electrolux 6. Proof of purchase is required before you can make a claim under this warranty. 7. You may not make a claim under this warranty unless the defect claimed is due to faulty or defective parts or workmanship.
electrolux 25 FOR SERVICE or to find the address of your nearest state service centre in Australia Please call 13 13 4 9 For the cost of a local call (Australia on- SERVICE AUSTRALIA ELECTROLUX HOME PRODUCTS www.electrolux.com.
electrolux
electrolux 27
www.electrolux.