ESF7540ROX EN Dishwasher User Manual
www.electrolux.com CONTENTS 1. SAFETY INFORMATION....................................................................................3 2. SAFETY INSTRUCTIONS..................................................................................4 3. PRODUCT DESCRIPTION................................................................................ 5 4. CONTROL PANEL ............................................................................................ 6 5. PROGRAMMES.....................................
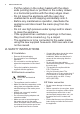
ENGLISH 1. 3 SAFETY INFORMATION Before the installation and use of the appliance, carefully read the supplied instructions. The manufacturer is not responsible for any injuries or damages that are the result of incorrect installation or usage. Always keep the instructions in a safe and accessible location for future reference. 1.
www.electrolux.com • • • • • • Put the cutlery in the cutlery basket with the sharp ends pointing down or put them in the cutlery drawer in a horizontal position with the sharp edges down. Do not leave the appliance with the open door unattended to avoid stepping accidentally onto it. Before any maintenance operation, deactivate the appliance and disconnect the mains plug from the socket. Do not use high pressure water sprays and/or steam to clean the appliance.
ENGLISH • • • • • • Contact the Authorised Service Centre to repair the appliance. We recommend only the use of original spare parts. When you contact the Authorised Service Centre, ensure that you have the following information that is available on the rating plate. Model : PNC : Serial Number : • 2.4 Use • • Do not sit or stand on the open door. Dishwasher detergents are dangerous. Obey the safety instructions on the detergent packaging. Do not drink and play with the water in the appliance.
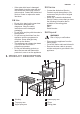
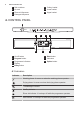
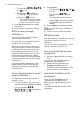
www.electrolux.com 7 8 9 10 Salt container Air vent Rinse aid dispenser Detergent dispenser 11 Cutlery basket 12 Lower basket 13 Upper basket 4. CONTROL PANEL 1 2 8 1 2 3 4 5 On/off button Program button Programme indicators Display Delay button 3 4 7 5 6 6 Start button 7 Indicators 8 Option button 4.1 Indicators Indicator Description Washing phase. It comes on when the washing phase operates. Drying phase. It comes on when the drying phase operates. TimeManager indicator.
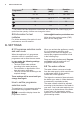
ENGLISH 7 5.
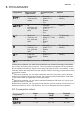
www.electrolux.com Water (l) Energy (kWh) Duration (min) 14 - 16 1.2 - 1.5 139 - 155 12.5 - 14.5 1.4 - 1.7 159 - 169 10 0.9 30 4 0.1 14 Programme 1) 1) The pressure and the temperature of the water, the variations of the mains supply, the options and the quantity of dishes can change the values. 5.2 Information for test institutes For all the necessary information for test performance, send an email to: info.test@dishwasher-production.
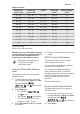
ENGLISH 9 Water hardness German de‐ grees (°dH) French de‐ grees (°fH) mmol/l Clarke de‐ grees Water softener level 47 - 50 84 - 90 8.4 - 9.0 58 - 63 10 43 - 46 76 - 83 7.6 - 8.3 53 - 57 9 37 - 42 65 - 75 6.5 - 7.5 46 - 52 8 29 - 36 51 - 64 5.1 - 6.4 36 - 45 7 23 - 28 40 - 50 4.0 - 5.0 28 - 35 6 19 - 22 33 - 39 3.3 - 3.9 23 - 27 5 1) 15 - 18 26 - 32 2.6 - 3.2 18 - 22 4 11 - 14 19 - 25 1.9 - 2.5 13 - 17 3 4 - 10 7 - 18 0.7 - 1.8 5 - 12 2 <4 <7 <0.
www.electrolux.com • The indicators and • • 2. Press Option. , are off. The indicator still flashes. The display shows the current = level 4. setting: e.g. – The levels of rinse aid range from 0A to 6A where level 0A means no rinse aid is used. 3. Press Delay repeatedly to change the setting. 4. Press on/off to confirm the setting. 6.4 The rinse aid empty notification The rinse aid helps to dry the dishes without streaks and stains.
ENGLISH 11 7. OPTIONS Desired options must be activated every time before you start a programme. It is not possible to activate or deactivate options while a programme is running. Not all options are compatible with each other. If you have selected non compatible options, the appliance will automatically deactivate one or more of them. Only the indicators of the options still active will stay on. 7.1 XtraDry Activate this option when you want to boost the drying performance.
www.electrolux.com 4. Open the water tap. 5. Start a programme to remove any processing residuals that can still be inside the appliance. Do not use detergent and do not load the baskets. After starting a programme, it may take up to 5 minutes for the appliance to recharge the resin in the water softener. It seems that the appliance is not working. The washing phase starts only after this procedure is completed. The procedure is repeated periodically. 8.1 The salt container 5.
ENGLISH 13 If you use multi-tablets and the drying performance is satisfactory, the rinse aid refill indication can be disabled. We recommend to always use rinse aid for better drying performance, also in combination with multitablets containing rinsing agent. 9. DAILY USE 1. Open the water tap. 2. Press the on/off button to activate the appliance. Make sure that the appliance is in programme selection mode. • If the salt indicator is on, fill the salt container.
www.electrolux.com 4. Set the applicable options. 5. Press Start to start the programme. • The washing phase indicator comes on . • The programme duration starts to decrease with steps of 1 minute. Cancelling the delay start while the countdown operates Starting a programme with delay start Press and hold simultaneously Program and Option until the appliance is in programme selection mode. 1. Set a programme. 2.
ENGLISH • • You can use dishwasher detergent, rinse aid and salt separately or you can use the multi-tablets (e.g. ''3in1'', ''4in1'', ''All in 1''). Follow the instructions written on the packaging. Select the programme according to the type of load and degree of soil. With the ECO programme you have the most efficient use of water and energy consumption for crockery and cutlery with normal soil. 10.4 Loading the baskets • • 10.
www.electrolux.com 2. First remove items from the lower basket, then from the upper basket. At the end of the program water can still remain on the sides and on the door of the appliance. 11. CARE AND CLEANING WARNING! Before maintenance, deactivate the appliance and disconnect the mains plug from the main socket. Dirty filters and clogged spray arms decrease the washing results. Make a check regularly and, if necessary, clean them. 2. Remove the filter (C) out of filter (B). 3.
ENGLISH 7. Reassemble the filters (B) and (C). 8. Put back the filter (B) in the flat filter (A). Turn it clockwise until it locks. CAUTION! An incorrect position of the filters can cause bad washing results and damage to the appliance. 11.2 Cleaning the upper spray arm 17 3. Wash the spray arm under running water. Use a thin pointed tool, e.g. toothpick, to remove particles of soil from the holes. 4.
www.electrolux.com 11.4 Internal cleaning • • Carefully clean the appliance, including the rubber gasket of the door, with a soft damp cloth. If you use short duration programmes regularly, these can leave deposits of grease and limescale inside the appliance. To prevent this, we • recommend running long duration programmes at least twice a month. To maintain the performance of your appliance at its best, we recommend using a specific cleaning product for dishwashers (at least once a month).
ENGLISH Problem and alarm code Possible cause and solution The appliance does not drain the water. • • The display shows . • • The anti-flood device is on. • The display shows . 19 Make sure that the sink spigot is not clogged. Make sure that the filter in the outlet hose is not clog‐ ged. Make sure that the interior filter system is not clog‐ ged. Make sure that the drain hose has no kinks or bends. Close the water tap and contact an Authorised Serv‐ ice Centre.
www.electrolux.com For alarm codes not described in the table, contact an Authorised Service Centre. 12.1 The washing and drying results are not satisfactory Problem Possible cause and solution Poor washing results. • • • Poor drying results. • • • • • Refer to "Daily use", "Hints and tips" and basket loading leaflet. Use more intensive washing programmes. Clean spray arm jets and filter. Refer to "Care and Cleaning". Tableware has been left for too long inside a closed appliance.
ENGLISH Problem Possible cause and solution Traces of rust on cutlery. • • There are residues of deter‐ gent in the dispenser at the end of the programme. • • • 21 There is too much salt in the water used for wash‐ ing. Refer to "The water softener". Silver and stainless steel cutlery were placed to‐ gether. Avoid to put silver and stainless steel items close together. The detergent tablet got stuck in the dispenser and therefore was not completely washed away by wa‐ ter.
www.electrolux.com Water supply Cold water or hot water 2) max 60 °C Capacity Place settings 13 Power consumption Left-on mode (W) 5.0 Power consumption Off-mode (W) 0.10 1) Refer to the rating plate for other values. 2) If the hot water comes from alternative source of energy, (e.g. solar panels, aeolian ener‐ gy), use the hot water supply to decrease energy consumption. 14. ENVIRONMENTAL CONCERNS Recycle the materials with the symbol .
ENGLISH 23
117883460-A-512016 www.electrolux.