ESF8725RKX EN Dishwasher User Manual
www.electrolux.com CONTENTS 1. SAFETY INFORMATION....................................................................................3 2. SAFETY INSTRUCTIONS..................................................................................5 3. PRODUCT DESCRIPTION................................................................................ 6 4. CONTROL PANEL............................................................................................. 7 5. PROGRAMMES.....................................
ENGLISH 3 General information and tips Environmental information Subject to change without notice. 1. SAFETY INFORMATION Before the installation and use of the appliance, carefully read the supplied instructions. The manufacturer is not responsible for any injuries or damage that are the result of incorrect installation or usage. Always keep the instructions in a safe and accessible location for future reference. 1.
www.electrolux.com farm houses; staff kitchen areas in shops, offices and other working environments; – by clients in hotels, motels, bed & breakfast and other residential type environments. Do not change the specification of this appliance. The operating water pressure (minimum and maximum) must be between 0.5 (50) / 8 (800) bar (kPa) Obey the maximum number of 15 place settings.
ENGLISH 5 2. SAFETY INSTRUCTIONS 2.1 Installation • WARNING! Only a qualified person must install this appliance. • • • • • • Remove all the packaging. Do not install or use a damaged appliance. Follow the installation instructions supplied with the appliance. Always take care when moving the appliance as it is heavy. Always use safety gloves and enclosed footwear. Do not install or use the appliance where the temperature is less than 0 °C.
www.electrolux.com 2.5 Service • • • • • To repair the appliance contact the Authorised Service Centre. Use original spare parts only. Disconnect the appliance from the mains supply. Cut off the mains cable and discard it. Remove the door catch to prevent children and pets to get closed in the appliance. 2.6 Disposal WARNING! Risk of injury or suffocation. 3.
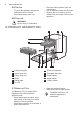
ENGLISH 7 When AirDry is activated during the drying phase, the projection on the floor may not be completely visible. To see if the cycle has ended, check the control panel. 4. CONTROL PANEL 2 1 1 2 3 4 5 On/off button Display Program touchpad Delay touchpad MyFavourite touchpad 3 6 7 8 9 4 5 7 6 8 9 TimeManager touchpad XtraDry touchpad Hygiene touchpad Indicators 4.1 Indicators Indicator Description Rinse aid indicator. It is on when the rinse aid dispenser needs refill‐ ing. 5.
www.electrolux.
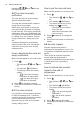
ENGLISH Programme 1) Water (l) Energy (kWh) Duration (min) P3 FlexiWash 14 - 16 1.2 - 1.5 160 - 180 12.5 - 14.5 1.4 - 1.7 170 - 190 P5 Glass Care 12 - 14 0.7 - 0.9 82 - 92 P6 Quick Plus 10.5 0.9 30 4 0.01 14 P4 Intensive P7 Rinse & Hold 9 1) The pressure and the temperature of the water, the variations of the mains supply, the options and the quantity of dishes can change the values. 5.
www.electrolux.com indicators , , and the display is blank. flash and Make sure the appliance is in user mode. 6.2 The rinse aid empty notification 1. Press The rinse aid helps to dry the dishes without streaks and stains. The rinse aid is automatically released during the hot rinse phase. When rinse aid chamber is empty, the rinse aid indicator is turned on notifying to refill rinse aid.
ENGLISH 6.5 AirDry AirDry improves the drying results with less energy consumption. 1. Press 11 . • The indicators off. • • still flashes. The indicator The display shows the current setting. – = AirDry is deactivated. – , and are = AirDry is activated. 2. Press to change the setting. 3. Press on/off to confirm the setting. 6.6 MyFavourite This option allows to set and save the most frequently used programme. While the drying phase operates, a device opens the appliance door.
www.electrolux.com Not all options are compatible with each other. If you select non compatible options, the appliance automatically deactivates one or more of them. Only the indicators of the still active options are on. If an option is not applicable to a programme, the related indicator is off or it flashes quickly for a few seconds and then goes out. Activating options can affect the water and energy consumption as well as the programme duration. 7.
ENGLISH 8.1 How to fill the rinse aid dispenser A B 13 CAUTION! Only use rinse aid designed specifically for dishwashers. 1. Open the lid (C). 2. Fill the dispenser (B) until the rinse aid reaches the marking ''MAX''. 3. Remove the spilled rinse aid with an absorbent cloth to prevent excessive foam formation. 4. Close the lid. Make sure that the lid locks into position. Fill the rinse aid dispenser when the indicator (A) is clear. C 9. DAILY USE 1. Open the water tap. 2.
www.electrolux.com approximately 3 seconds and then show the programme duration. • If you want to select the MyFavourite programme, press . • The indicators of the options related to the MyFavourite programme come on. 4. Set the applicable options. 5. Close the appliance door to start the programme. Starting a programme with delay start 1. Set a programme. 2. Press again and again until the display shows the delay time you want to set (from 1 to 24 hours). The delay indicator comes on. 3.
ENGLISH • • • • Always use the whole space of the baskets. Make sure that items in the baskets do not touch or cover each other. Only then can the water completely reach and wash the dishes. You can use dishwasher detergent and rinse aid separately or you can use the multi-tablets. Follow the instructions on the packaging. Select a programme according to the type of load and the degree of soil. ECO offers the most efficient use of water and energy consumption for crockery and cutlery with normal soil.
www.electrolux.com 11. CARE AND CLEANING WARNING! Before maintenance, deactivate the appliance and disconnect the mains plug from the main socket. Dirty filters and clogged spray arms negatively affect the washing results. Check these elements regularly and, if necessary, clean them. 2. Remove the filter (C) out of filter (B). 3. Remove the flat filter (A). 4. Wash the filters. 11.1 Cleaning the filters The filter system is made of 3 parts. C B A 5.
ENGLISH CAUTION! An incorrect position of the filters can cause bad washing results and damage to the appliance. 17 4. To install the spray arm back, press the spray arm upwards and simultaneously turn it counterclockwise until it locks into place. 11.2 Cleaning the upper spray arm We recommend to clean the upper spray arm regularly to prevent soil from clogging the holes. Clogged holes can cause unsatisfactory washing results. 1. Pull out the upper basket. 2.
www.electrolux.com 11.4 External cleaning • Clean the appliance with a moist soft cloth. • • Only use neutral detergents. Do not use abrasive products, abrasive cleaning pads or solvents. 12. TROUBLESHOOTING If the appliance does not start or it stops during operation. Before you contact an Authorised Service Centre, check if you can solve the problem by yourself with the help of the information in the table. WARNING! Repairs not properly done may result in serious risk to the safety of the user.
ENGLISH Problem and alarm code Possible solution The remaining time in the display increases and skips nearly to the end of program time. • 19 This is not a defect. The appliance is working cor‐ rectly. The options of the program • have to be set again every time. To save your favourite configuration use option My‐ Favourite. Small leak from the appli‐ ance door. • The appliance is not levelled. Loosen or tighten the adjustable feet (if applicable). The appliance door is not centred on the tub.
www.electrolux.com Problem Possible cause and solution Poor drying results. • • • • • Tableware has been left for too long inside a closed appliance. There is no rinse aid or the dosage of rinse aid is not enough. Set the rinse aid dispenser to a higher level. Plastic items may need to be towel dried. For the best drying performance activate the option XtraDry and set AirDry. We recommend to always use rinse aid, even in combination with multi-tablets.
ENGLISH Problem Possible cause and solution Limescale deposits on the tub and on the inside of the door. • Dull, discoloured or chipped tableware. • • • • • 21 Clean the appliance with appliance cleaners which are particularly suitable for this purpose. Try different detergent. Contact the detergent manufacturer. Make sure that only dishwasher-safe items are washed in the appliance. Load and unload the basket carefully. Refer to bas‐ ket loading leaflet. Place delicate items in the upper basket.
www.electrolux.com 14. INSTALLATION There should be a minimum 2mm gap between the top of the dishwasher and underside of bench top Remove entire plastic membrane from sink trap spigot & fit drain hose to spigot with clamp The hose should not be extended by more than 2 metres or water pumpout problems may occur SINK Secure dishwasher with brackets or screws provided DISHWASHER Gap on both sides should be equal, & no greater than 5 mm per side.
ENGLISH 23 Once the installation is completed, make sure that the bottom of the adjustable plinth is aligned with the floor. 14.3 Water inlet hose Connect the inlet hose to a water tap with an external BSP thread spout of 3/4''. For best washing performance it is recommended to connect the appliance to a cold water supply. Energy savings can be made by connecting the appliance to a Solar water system and using economy options, however the water temperature must not exceed 60° C.
www.electrolux.com Remove entire internal membrane 15. WARRANTY FOR SALES IN AUSTRALIA AND NEW ZEALAND APPLIANCE: DISHWASHER This document sets out the terms and conditions of the product warranties for Electrolux Appliances. It is an important document. Please keep it with your proof of purchase documents in a safe place for future reference should you require service for your Appliance. 1.
ENGLISH 4. Parts and Appliances not supplied by Electrolux are not covered by this warranty. 5. To the extent permitted by law, you will bear the cost of transportation, travel and delivery of the Appliance to and from Electrolux or its ASC. If you reside outside of the service area, you will bear the cost of: a) travel of an authorised representative; b) transportation and delivery of the Appliance to and from Electrolux or its ASC.
www.electrolux.com a) carefully check the operating instructions, user manual and the terms of this warranty; b) have the model and serial number of the Appliance available; c) have the proof of purchase (e.g. an invoice) available; d) telephone the numbers shown below. 14. You accept that if you make a warranty claim, Electrolux and its ASC may exchange information in relation to you to enable Electrolux to meet its obligations under this warranty.
117861190-A-112019 www.shop.electrolux.com.