ESI5525LAX EN Dishwasher User Manual
www.electrolux.com CONTENTS 1. SAFETY INFORMATION....................................................................................3 2. SAFETY INSTRUCTIONS..................................................................................4 3. PRODUCT DESCRIPTION................................................................................ 6 4. CONTROL PANEL ............................................................................................ 7 5. PROGRAMMES.....................................
ENGLISH 1. 3 SAFETY INFORMATION Before the installation and use of the appliance, carefully read the supplied instructions. The manufacturer is not responsible for any injuries or damages that are the result of incorrect installation or usage. Always keep the instructions in a safe and accessible location for future reference. 1.
www.electrolux.com • • • • • • • • • The operating water pressure (minimum and maximum) must be between 0.5 (0.05) / 8 (0.8) bar (MPa) Obey the maximum number of 13 place settings. If the supply cord is damaged, it must be replaced by the manufacturer, its Authorised Service Centre or similarly qualified persons in order to avoid a hazard. Put the cutlery in the cutlery basket with the sharp ends pointing down or put them in the cutlery drawer in a horizontal position with the sharp edges down.
ENGLISH • • • • Connect the mains plug to the mains socket only at the end of the installation. Make sure that there is access to the mains plug after the installation. Do not pull the mains cable to disconnect the appliance. Always pull the mains plug. This appliance complies with the E.E.C. Directives. UK and Ireland only. This appliance is fitted with a 13 A mains plug. If it is necessary to change the mains plug fuse, use only a 13 A ASTA (BS 1362) fuse. 2.
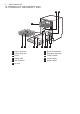
www.electrolux.com 3.
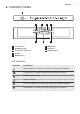
ENGLISH 4. CONTROL PANEL 1 2 8 1 2 3 4 5 On/off button Program button Programme indicators Display Delay button 3 4 7 5 6 6 Start button 7 Indicators 8 Option button 4.1 Indicators Indicator Description Washing phase. It comes on when the washing phase operates. Drying phase. It comes on when the drying phase operates. TimeManager indicator. XtraDry indicator. Rinse aid indicator. It is always off while the programme operates. Salt indicator. It is always off while the programme operates.
www.electrolux.com 5.
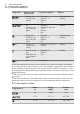
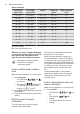
ENGLISH Water (l) Energy (kWh) Duration (min) 9 0.8 30 13 - 14 0.9 - 1.1 70 - 85 4 0.1 14 Programme 1) 9 1) The pressure and the temperature of the water, the variations of the mains supply, the options and the quantity of dishes can change the values. 5.2 Information for test institutes For all the necessary information for test performance, send an email to: info.test@dishwasher-production.com Write down the product number (PNC) that is on the rating plate. 6. SETTINGS 6.
www.electrolux.com Water hardness German de‐ grees (°dH) French de‐ grees (°fH) mmol/l Clarke de‐ grees Water softener level 47 - 50 84 - 90 8.4 - 9.0 58 - 63 10 43 - 46 76 - 83 7.6 - 8.3 53 - 57 9 37 - 42 65 - 75 6.5 - 7.5 46 - 52 8 29 - 36 51 - 64 5.1 - 6.4 36 - 45 7 23 - 28 40 - 50 4.0 - 5.0 28 - 35 6 19 - 22 33 - 39 3.3 - 3.9 23 - 27 5 1) 15 - 18 26 - 32 2.6 - 3.2 18 - 22 4 11 - 14 19 - 25 1.9 - 2.5 13 - 17 3 4 - 10 7 - 18 0.7 - 1.
ENGLISH – = rinse aid empty notification activated. – = rinse aid empty notification deactivated. 2. Press Option to change the setting. 3. Press on/off to confirm the setting. 11 AirDry is automatically activated with all programmes excluding applicable). (if To improve the drying performance refer to the XtraDry option or activate AirDry. CAUTION! If children have access to the appliance, it is advised to deactivate AirDry as opening the door may pose a danger. 6.
www.electrolux.com Activating options can affect the water and energy consumption as well as the programme duration. 7.1 XtraDry The total programme duration decreases by approximately 50%. The washing results are the same as with the normal programme duration. The drying results can decrease. How to activate TimeManager Activate this option to boost the drying performance. With XtraDry on, the duration of some programmes, water consumption and the last rinse temperature can be affected.
ENGLISH It seems that the appliance is not working. The washing phase starts only after this procedure is completed. The procedure is repeated periodically. 8.1 The salt container CAUTION! Use rough salt designed for dishwashers only. Fine salt increases the risk of corrosion. The salt is used to recharge the resin in the water softener and to assure good washing results in daily use. 13 CAUTION! Water and salt can come out of the salt container when you fill it.
www.electrolux.com You can turn the selector of the released quantity (B) between position 1 (lowest quantity) and position 4 or 6 (highest quantity). 9. DAILY USE 1. Open the water tap. 2. Press the on/off button to activate the appliance. Make sure that the appliance is in programme selection mode. • If the salt indicator is on, fill the salt container. • If the rinse aid indicator is on, fill the rinse aid dispenser. 3. Load the baskets. 4. Add the detergent. 5.
ENGLISH • The programme duration starts to decrease with steps of 1 minute. Starting a programme with delay start Cancelling the delay start while the countdown operates When you cancel the delay start you have to set the programme and options again. 1. Set a programme. 2. Press Delay again and again until the display shows the delay time you want to set (from 1 to 24 hours). The indicator of the selected programme flashes. 3. Press Start. 4. Close the appliance door to start the countdown.
www.electrolux.com • • • • programme (if available) or select a programme with a prewash phase. Always use the whole space of the baskets. When loading the appliance, make sure that the dishes can be completely reached and washed by the water released from the spray arm nozzles. Make sure that items do not touch or cover each other. You can use dishwasher detergent, rinse aid and salt separately or you can use the multi-tablets (e.g. ''3in1'', ''4in1'', ''All in 1'').
ENGLISH • • The programme is applicable for the type of load and for the degree of soil. The correct quantity of detergent is used. 10.6 Unloading the baskets 1. Let the tableware cool down before you remove it from the appliance. Hot items can be easily damaged. 17 2. First remove items from the lower basket, then from the upper basket. At the end of the program water can still remain on the sides and on the door of the appliance. 11.
www.electrolux.com CAUTION! An incorrect position of the filters can cause bad washing results and damage to the appliance. 11.2 Cleaning the spray arms Do not remove the spray arms. If the holes in the spray arms are clogged, remove remaining parts of soil with a thin pointed object. 11.3 External cleaning 5. Make sure that there are no residues of food or soil in or around the edge of the sump. 6. Put back in place the flat filter (A). Make sure that it is correctly positioned under the 2 guides.
ENGLISH solve the problem by yourself with the help of the information in the table or contact an Authorised Service Centre. WARNING! Repairs not properly done may result in serious risk to the safety of the user. Any repairs must be performed by qualified personnel. The majority of problems that can occur can be solved without the need to contact an Authorised Service Centre. Problem and alarm code Possible cause and solution You cannot activate the appliance. • The program does not start.
www.electrolux.com Problem and alarm code Possible cause and solution The remaining time in the display increases and skips nearly to the end of program time. • This is not a defect. The appliance is working cor‐ rectly. The options of the program • have to be set again every time. To save your favourite configuration use option My‐ Favourite. Small leak from the appli‐ ance door. • The appliance is not levelled. Loosen or tighten the adjustable feet (if applicable).
ENGLISH Problem Possible cause and solution Poor drying results. • • • • • 21 Tableware has been left for too long inside a closed appliance. There is no rinse aid or the dosage of rinse aid is not enough. Set the rinse aid dispenser to a higher level. Plastic items may need to be towel dried. For the best drying performance activate the option XtraDry and set AirDry. We recommend to always use rinse aid, even in combination with multi-tablets.
www.electrolux.com Problem Possible cause and solution Limescale deposits on the • tableware, on the tub and on • the inside of the door. • • • • • Dull, discoloured or chipped tableware. • • • The level of salt is low, check the refill indicator. The cap of the salt container is loose. Your tap water is hard. Refer to "The water soft‐ ener". Even using multi-functional tabs use salt and set regeneration of the water softener. Refer to "The water softener".
ENGLISH 23 product to your local recycling facility or contact your municipal office. appliances marked with the symbol with the household waste.
156925381-A-482017 www.electrolux.