ESI5550LOX ESI5550LAX EN ZH Dishwasher 洗碗机 User Manual 用户手册 2 24
www.electrolux.com CONTENTS 1. SAFETY INFORMATION....................................................................................3 2. SAFETY INSTRUCTIONS..................................................................................4 3. PRODUCT DESCRIPTION................................................................................ 5 4. CONTROL PANEL ............................................................................................ 6 5. PROGRAMMES.....................................
ENGLISH 1. 3 SAFETY INFORMATION Before the installation and use of the appliance, carefully read the supplied instructions. The manufacturer is not responsible for any injuries or damages that are the result of incorrect installation or usage. Always keep the instructions in a safe and accessible location for future reference. 1.
www.electrolux.com • • • • • • Put knives and cutlery with sharp points in the cutlery basket with the points down or in a horizontal position. Do not keep the appliance door open without supervision to prevent to fall on it. Before any maintenance operation, deactivate the appliance and disconnect the mains plug from the socket. Do not use high pressure water sprays and/or steam to clean the appliance. The ventilation openings in the base (if applicable) must not be obstructed by a carpet.
ENGLISH • The water inlet hose has a safety valve and a sheath with an inner mains cable. • • • • • WARNING! Dangerous voltage. If the water inlet hose is damaged, immediately close the water tap and disconnect the mains plug from the mains socket. Contact the Authorised Service Centre to replace the water inlet hose. 2.5 Disposal WARNING! Risk of injury or suffocation. • • • 2.4 Use • • Do not sit or stand on the open door. Dishwasher detergents are dangerous.
www.electrolux.com 3 4 5 6 7 Filters Rating plate Salt container Air vent Rinse aid dispenser 8 9 10 11 Detergent dispenser Cutlery basket Lower basket Upper basket 4. CONTROL PANEL 1 2 8 1 2 3 4 5 On/off button Program button Programme indicators Display Delay button 3 4 7 5 6 6 Start button 7 Indicators 8 Option button 4.1 Indicators Indicator Description Washing phase. It comes on when the washing phase operates. Drying phase. It comes on when the drying phase operates.
ENGLISH 7 5.
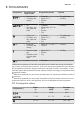
www.electrolux.com Water (l) Energy (kWh) Duration (min) 9 0.8 30 13 - 14 0.9 - 1.1 70 - 85 4 0.1 14 Programme 1) 1) The pressure and the temperature of the water, the variations of the mains supply, the options and the quantity of dishes can change the values. 5.2 Information for test institutes For all the necessary information for test performance, send an email to: info.test@dishwasher-production.com Write down the product number (PNC) that is on the rating plate. 6. SETTINGS 6.
ENGLISH 9 Water hardness German de‐ grees (°dH) French de‐ grees (°fH) mmol/l Clarke de‐ grees Water softener level 47 - 50 84 - 90 8.4 - 9.0 58 - 63 10 43 - 46 76 - 83 7.6 - 8.3 53 - 57 9 37 - 42 65 - 75 6.5 - 7.5 46 - 52 8 29 - 36 51 - 64 5.1 - 6.4 36 - 45 7 23 - 28 40 - 50 4.0 - 5.0 28 - 35 6 19 - 22 33 - 39 3.3 - 3.9 23 - 27 5 1) 15 - 18 26 - 32 2.6 - 3.2 18 - 22 4 11 - 14 19 - 25 1.9 - 2.5 13 - 17 3 4 - 10 7 - 18 0.7 - 1.8 5 - 12 2 <4 <7 <0.
www.electrolux.com How to deactivate the rinse aid empty notification The appliance must be in programme selection mode. 1. To enter the user mode, press and hold simultaneously Delay and Start until the indicators , , and start to flash and the display is blank. 2. Press Option. • The indicators , and go off. • • The indicator continues to flash. The display shows the current setting. – • The indicators and • • , go off. The indicator continues to flash.
ENGLISH How to deactivate AirDry The appliance must be in programme selection mode. 1. To enter the user mode, press and hold simultaneously Delay and Start until the indicators , , and start to flash and the display is blank. 2. Press Start. • The indicators and • • 11 , go off. The indicator continues to flash. The display shows the current = AirDry activated. setting: 3. Press Start to change the setting: = AirDry deactivated. 4. Press the on/off button to confirm the setting. 7.
www.electrolux.com You can only save 1 programme. A new setting cancels the previous one. How to save the MyFavourite programme How to set the MyFavourite programme 1. Set the programme that you want to save You can also set applicable options together with the programme. 2. Press and hold simultaneously Program and Delay until the indicators of the programme and the options flash for a few seconds.
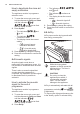
ENGLISH 8.2 How to fill the rinse aid dispenser A D CAUTION! Only use rinse aid specifically designed for dishwashers. B C M AX 4 1 3 2 + 1. Press the release button (D) to open the lid (C). 2. Pour the rinse aid in the dispenser (A) until the liquid reaches the fill level 'max'. 3. Remove the spilled rinse aid with an absorbent cloth to prevent too much foam. 4. Close the lid. Make sure that the release button locks into position.
www.electrolux.com A 30 B The display shows the programme duration. 4. Set the applicable options. 5. Press Start to start the programme. • The washing phase indicator comes on . • The programme duration starts to decrease with steps of 1 minute. D 20 C 1. Press the release button (B) to open the lid (C). 2. Put the detergent, in powder or tablets, in the compartment (A). 3. If the programme has a prewash phase, put a small quantity of detergent in the compartment (D). 4. Close the lid.
ENGLISH Cancelling the delay start while the countdown operates When you cancel the delay start you have to set the programme and options again. Press and hold simultaneously Program and Option until the appliance is in programme selection mode. Cancelling the programme Press and hold simultaneously Program and Option until the appliance is in program selection mode. Make sure that there is detergent in the detergent dispenser before you start a new program.
www.electrolux.com 10.3 What to do if you want to stop using multi-tablets Before you start to use separately detergent, salt and rinse aid do the following procedure. 1. Set the highest level of the water softener. 2. Make sure that the salt and rinse aid containers are full. 3. Start the shortest programme with a rinsing phase. Do not add detergent and do not load the baskets. 4. When the programme is completed, adjust the water softener according to the water hardness in your area. 5.
ENGLISH 17 C B A 1. Turn the filter (B) counterclockwise and remove it. 2. Remove the filter (C) out of filter (B). 3. Remove the flat filter (A). 5. Make sure that there are no residues of food or soil in or around the edge of the sump. 6. Put back in place the flat filter (A). Make sure that it is correctly positioned under the 2 guides. 7. Reassemble the filters (B) and (C). 8. Put back the filter (B) in the flat filter (A). Turn it clockwise until it locks. 4. Wash the filters.
www.electrolux.com 11.2 Cleaning the spray arms • Do not remove the spray arms. If the holes in the spray arms are clogged, remove remaining parts of soil with a thin pointed object. 11.3 External cleaning • • • • Clean the appliance with a moist soft cloth. Only use neutral detergents. Do not use abrasive products, abrasive cleaning pads or solvents. If you regularly use short duration programmes, these can leave deposits of grease and limescale inside the appliance.
ENGLISH Problem and alarm code Possible cause and solution The appliance does not fill with water. • • The display shows . • • • The appliance does not drain the water. The display shows . • • • • The anti-flood device is on. • The display shows . 19 Make sure that the water tap is open. Make sure that the pressure of the water supply is not too low. For this information, contact your local water authority. Make sure that the water tap is not clogged.
www.electrolux.com Problem and alarm code Possible cause and solution The appliance trips the cir‐ • cuit-beaker. The amperage is insufficient to supply simultaneous‐ ly all the appliances in use. Check the socket amper‐ age and the capacity of the meter or turn off one of the appliances in use. Internal electrical fault of the appliance. Contact an Authorised Service Centre. • Refer to "Before first use", "Daily use", or "Hints and tips" for other possible causes.
ENGLISH Problem Possible cause and solution The dishes are wet. • • • • • 21 For the best drying performance activate the option XtraDry and set AirDry . The programme does not have a drying phase or has a drying phase with low temperature. The rinse aid dispenser is empty. The quality of the rinse aid can be the cause. The quality of the multi-tablets can be the cause. Try a different brand or activate the rinse aid dis‐ penser and use rinse aid and multi-tablets together.
www.electrolux.com Refer to "Before first use", "Daily use" or "Hints and tips" for other possible causes. 13. TECHNICAL INFORMATION Dimensions Width / height / depth (mm) 596 / 818 - 898 / 575 Electrical connection 1) Voltage (V) 200 - 240 Frequency (Hz) 50 / 60 Water supply pressure Min. / max. bar (MPa) 0.5 (0.05) / 8 (0.8) Water supply Cold water or hot water 2) max 60 °C Capacity Place settings 13 Power consumption Left-on mode (W) 5.0 Power consumption Off-mode (W) 0.
X X X Hydraulic circuit (including tanks)* Wiring harnesses Hg Cd Cr6+ Hazardous substances PBBs PBDEs Note: 1. This table is compiled according to SJ/T11364-2014. means that this kind of hazardous substance content in all of the homogenous materials of this part is under the limitations 2. regulated in GB/T26572-2011. 3. X means that this kind of hazardous substance content in at least one homogenous material of this part exceeds the limitations regulated in GB/T26572-2011. 4.
www.electrolux.com 内容 1. 安全信息........................................................................................................... 25 2. 安全说明........................................................................................................... 26 3. 产品说明........................................................................................................... 27 4. 控制面板........................................................................................................... 28 5. 程序........
中文 1. 25 安全信息 在安装和使用本机之前,请认真阅读随附的操作说明。对 于不当安装或使用本机而造成的任何伤害或损害,制造商 不承担任何责任。请妥善保管操作说明,并置于易于取用 的地方,供将来参考之用。 1.1 兒童和易受傷者安全事項 • • • • • 本机适用对象:8 岁及以上的儿童;能力有限的人群, 前提是他们了解安全使用本机的说明和/或有人监管,并 且知道潜在的危害。 请勿让儿童玩本机。 洗衣剂应远离儿童。 机门处于打开状态时,请让儿童和宠物远离本机。 在无人监管的情况下,儿童不能擅自清理和维护本机。 1.2 一般安全信息 本机适用于家庭和类似的应用领域,例如: – 农舍;商店、办公室及其他工作环境的员工厨房区; – 酒店、汽车旅馆、家庭旅馆和其他住宅类型环境中的 顾客。 • 请勿更改本机规格。 • 工作水压(最低和最高)必须介于 0.5 (0.05) / 8 (0.
www.electrolux.com 2. 安全说明 2.1 安装 • • • • • • 去除所有包装物。 请勿安装或使用已损坏的设备。 请勿在温度低于 0 °C 的地方安装或使 用本机。 按照本机附带的安装说明书操作。 务必将本机安装在靠近安全结构的下 方。 进水管有一个安全阀和一个带有内部 电源线的护套。 2.2 电气连接 警告! 存在火灾和触电危险。 • • • • • • • • • 本机必须接地。 请确保铭牌上的电气信息与供电情况 相匹配。如果不匹配,请联系电气技 师。 始终使用正确安装的防电击插座。 请勿使用多插头扩展适配器和延长电 缆。 切勿损坏电源插头和电源电缆。在需 要更换电源线时,应交给我们的授权服 务中心来完成。 只有在安装过程结束后,才能将电源插 头插入电源插座。确保在安装后,仍可 方便地插拔电源插头。 断开设备与电源的连接时,请勿拉动电 源线,请始终拉动电源插头。 设备符合欧盟 E.E.C. 指令。 仅针对英国与爱尔兰。本机随附有 13 安培的电源插头。如果需要更换电源 插座中的保险丝,使用以下保险丝: 13 amp ASTA (BS 1362). • 2.
中文 3.
www.electrolux.com 4. 控制面板 1 2 8 1 2 3 4 5 电源开关 Program 按钮 程序指示灯 显示屏 Delay 按钮 3 4 7 5 6 6 Start 按钮 7 指示灯 8 Option 按钮 4.
中文 29 5.
www.electrolux.com 5.2 测试机构信息 info.test@dishwasher-production.com 请写下铭牌上的产品编号 (PNC)。 有关性能测试的全部必要信息,请发送电 子邮件至: 6. 设置 6.1 程序选择模式和用户模式 通常本机在启动时就会进入程序选择模 式。但是,如果本机启动时未进入程序选 择模式,您也可以通过以下方式设置该模 式: 当本机处于程序选择模式下时,可设置程 序并进入用户模式。 在用户模式下,可更改以下设置: • 根据水质硬度调节软水器档位。 • 启用或停用程序结束时的声音信号。 • 启用或停用漂洗添加剂用尽通知。 • 启用或停用 AirDry。 同时按住 Program 和 Option,直到本机 进入程序选择模式为止。 6.
中文 1. 要进入用户模式,同时按住 Delay 和 Start,直到指示灯 、 、 和 开始闪烁并且显 示屏不显示任何内容。 2. 按触 Program。 • 指示灯 、 和 熄灭。 指示灯继续闪烁。 • • 显示屏将显示当前设置:例如, 表示 5 级。 3. 反复按触 Program 以更改设置。 4. 按触开/关按钮,确认设置。 6.3 漂洗添加剂用尽通知 漂洗添加剂可以使碗碟变干且无斑纹和污 渍。 漂洗添加剂在热水漂洗阶段自动释放。 当漂洗添加剂盒变空,漂洗添加剂指示灯 会亮起,提醒重新装满漂洗添加剂。如果 您使用含有漂洗添加剂的多效洗涤剂片, 并且对干燥效果感到满意,则可以停用重 新装满漂洗添加剂通知。但是,我们建议 您始终使用漂洗添加剂以实现最佳干燥性 能。 如果您使用标准洗涤剂或者不含漂洗添加 剂的多效洗涤剂片,请激活通知并让漂洗 添加剂重新装满指示灯保持使用状态。 6.
www.electrolux.com AirDry 与所有程序一起自动启动,但 和 (若适用)除外。 要改善干燥性能,请参考 XtraDry 选项, 或者激活 AirDry。 • • 如何停用 AirDry 指示灯 熄灭。 、 和 指示灯继续闪烁。 = 显示屏将显示当前设置: AirDry 启用。 = AirDry 3. 按触 Start 以更改设置: 停用。 4. 按触开/关按钮,确认设置。 • 本机必须处于程序选择模式下。 1. 要进入用户模式,同时按住 Delay 和 Start,直到指示灯 、 和 开始闪烁并且显 示屏不显示任何内容。 2. 按触 Start。 、 7.
中文 33 8. 初次使用前 1. 确保软水器的当前档位设置与所用水 源的水质硬度相当。否则,请调节软水 器的档位。 2. 在盐容器中装入洗碗机用盐。 3. 在漂洗添加剂分配器中装入漂洗添加 剂。 4. 打开水龙头。 5. 启动程序,去除仍残留在本机内部的所 有处理残渣。请勿使用洗涤剂或在洗 涤篮中放入待洗物品。 启动程序后,本机可能会用去长达 5 分钟 的时间来为软水器补充树脂,这期间本机 看起来就像没有运转一样。只有在完成了 此步骤之后,才能启动洗涤阶段。应定期 重复此程序。 5. 顺时针旋转盐容器盖可将盐容器合上。 警告 加盐时,水和盐可能会从盐容 器中溢出。加满盐容器之后, 立即启动程序以防止发生腐 蚀。 8.2 如何充填漂洗添加剂分配器 A D B 8.1 盐容器 警告 只能使用专为洗碗机设计的 洗碗机用盐。 C 洗碗机用盐用于为软水器补充树脂,并确 保日常使用时能获得良好的洗涤效果。 M AX 3 2 + 1 1. 沿逆时针方向转动盐容器盖,并将此盖 取下。 2. 向盐容器中加入 1 升水(仅在首次使用 时)。 3.
www.electrolux.com 9. 日常使用 1. 打开水龙头。 2. 按下开关按钮,启动本机。 确保机器处于程序选择模式。 • 如果洗碗机盐指示灯亮起,请向盐 容器添加洗碗机盐。 • 如果漂洗添加剂指示灯亮起,请向 漂洗添加剂分配器添加漂洗添加 剂。 3. 将待洗物品放入洗涤篮。 4. 添加洗涤剂。 5. 根据待洗涤物品的类型和脏污程度,设 置并启动正确的程序。 9.1 使用洗涤剂 30 20 C 30 B Auto Off 功能 此功能可通过在机器不运行时自动将其关 闭来降低能耗。 功能开始工作: • 程序完成 5 分钟后。 • 如果程序未启动,5 分钟后开始工作。 启动程序 1. 按触开/关按钮,启动本机。确保本机 处于程序选择模式。 2. 关闭本机机门。 3. 反复按触 Program,直到要选择的程 序的指示灯亮起。 • 如果想选择 MyFavourite 程序,按 住 Program,直到 MyFavourite 设 置亮起。 本显示屏显示程序持续时间。 4. 设置适用的选项。 5.
中文 请勿尝试在 AirDry 自动打开 机门之后 2 分钟内将其关闭, 因为这会对本机造成损害。 之后若机门再关闭 3 分钟,则 运行的程序结束。 在倒计时期间取消延迟启动 若取消延迟启动,则必须重新设置程序和 选项。 同时按住 Program 和 Option,直到本机 进入程序选择模式为止。 35 在启动新程序之前,确保洗涤剂分配器中 有洗涤剂。 程序结束 当程序完成后,显示屏显示 0:00。阶段指 示灯熄灭。 除开/关按钮外,所有按钮关闭。 1. 按触开/关按钮,或等 Auto Off 功能自 动关闭本机。 如果您在 Auto Off 启动前打开机门, 本机将自动关闭。 2. 关闭水龙头。 取消程序 同时按住 Program 和 Option,直到本机 进入程序选择模式为止。 10. 建议和提示 10.
www.electrolux.com • • • • • • • 将碗碟上较大的食物残渣倒入垃圾桶 中。 软化物品中残留的烧焦食物。 放置空心物品(杯子、玻璃杯和平底 锅)时应将其开口朝下。 确保玻璃杯之间不会相互碰触。 将刀叉和小物件放入刀叉篮。 将轻的物品放在上篮中。并确保这些 物品不会移动。 在启动一个程序之前,请确保喷淋臂移 动自如。 10.5 启动程序前 请确保: • • 过滤器清洗干净并正确安装。 盐容器盖已拧紧。 • • • • • 喷淋臂未被堵塞。 备有洗碗机用盐和漂洗添加剂(除非使 用多效洗涤剂片)。 洗涤篮中的物品摆放正确。 设定的程序适用于待洗物品类型和污 渍程度。 使用适量的洗涤剂。 10.6 取出篮中物品 1. 先让餐具冷却下来,然后再将其从本机 中取出。热碗碟很容易损坏。 2. 依次从下篮和上篮中取出物品。 在程序结束时,本机的侧面和 机门上可能仍有水分残留。 11. 养护和清洁 警告! 进行维护之前,请关闭本机的 电源,然后将电源插头从电源 插座上拔下。 脏污的过滤器和堵塞的喷淋 臂会降低洗涤效果。请进行 定期检查,如有必要,进行清 洁。 11.
中文 37 警告 如果过滤器位置不正确,将可 能导致洗涤效果差,并对本机 造成损害。 11.2 清洁喷淋臂 请勿取下喷淋臂。如果喷淋臂中的孔被堵 塞,请用细尖物体去除污垢的残余部分。 11.3 外部清洁 5. 确保安装槽中或其周围没有食物残渣 和污物。 6. 将平过滤器 (A) 装回原位。确保其位 于 2 条导轨下方的正确位置。 • • • 11.4 内部清洁 • • • 7. 重新组装过滤器 (B) 和 (C)。 8. 将过滤器 (B) 重新装在平过滤器 (A) 上。顺时针旋转,直到将其锁定。 12.
www.electrolux.
中文 故障和警报代码 可能的原因与解决方法 本机断路器跳闸。 • 39 电流强度不足以为所有正在使用的电器同时供电。检 查插座电流强度和电表容量或关闭其中一个正在使用 的电器。 本机内部电气故障。请联系授权服务中心。 • 有关其他可能的原因,请参 阅“首次使用前”、“日常使用” 或“提示与技巧”。 对于本表中未描述的警报代码,请联系授 权服务中心。 检查本机之后,请关机并重新启动本机。 如果问题再次出现,请联系授权服务中心。 12.
www.electrolux.
中文 功耗 关闭模式 (W) 41 0.10 1) 有关其他值,请参阅铭牌。 2) 如果热水来自替代能源(如太阳能电池板、风力发电),则请用热水供应以减少能耗。 14.
www.electrolux.
中文 维修站名称 43 送修日 故障内容 故障原因 维修内容 维修技师签字 交验日期 维修站名称 送修日 故障内容 故障原因 维修内容 维修技师签字 交验日期 伊莱克斯(中国)电器有限公司 全国统一服务热线: 95105801 伊莱克斯官方网站: http://www.electrolux.com.cn 15.
X X X X X X X X www.electrolux.
中文 45
www.electrolux.
中文 47
156913170-A-022017 www.electrolux.