user manual Dishwasher ESI63010
electrolux Electrolux. Thinking of you. Share more of our thinking at www.electrolux.
electrolux 3 • Keep all detergents in a safe area. Do not let children touch the detergents. • Keep children away from the appliance when the door is open. Installation • Make sure that the appliance is not damaged because of transport. Do not connect a damaged appliance. If necessary, contact the supplier. • Remove all packaging before first use. • A qualified and competent person must do the electrical installation. • A qualified and competent person must do the plumbing installation.
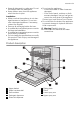
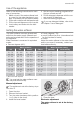
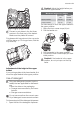
electrolux Control panel 5 1 1 2 3 4 5 4 2 3 Programme knob Start/cancel button /(Cancel) Delay start button Indicator lights On/off indicator light Indicator lights The indicator light comes on when the washing phase or the rinsing phase operates. The indicator light comes on when the drying phase operates. The indicator light comes on when the washing programme is completed. Auxiliary functions: • Level of the water softener. • An alarm if the appliance has a malfunction.
electrolux 5 Use of the appliance Refer to the following instructions for each step of procedure: 1. Make a check if the water softener level is correct for the water hardness in your area. If necessary set the water softener. 2. Fill the salt container with dishwasher salt. 3. Fill the rinse aid dispenser with rinse aid. 4. Load cutlery and dishes into the dishwasher. 5. Set the correct washing programme for the type of load and soil. 6.
electrolux 1. Press and hold the start/cancel button. Turn the programme knob clockwise until the programme marker agrees with the first washing programme on the control panel. 2. Release the start/cancel button when the on/off indicator light and the start/cancel indicator light start to flash. – At the same time, the end indicator light flashes to show the level of the water softener. Example: 5 flashes, pause, 5 flashes, pause, etc... = level 5 3.
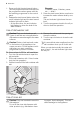
electrolux 7 Rinse aid makes it possible to dry the dishes without streaks and stains. Rinse aid is automatically added during the last rinsing phase. Do these steps to fill the rinse aid dispenser: 1. Press the release button (A) to open the rinse aid dispenser. 3. Remove the spilled rinse aid with an absorbent cloth to prevent too much foam during the subsequent washing programme. 4. Close the rinse aid dispenser. Adjusting the rinse aid dosage The rinse aid is set at the factory at position 4.
electrolux • While you load cutlery and dishes, do these steps: – Load hollow items (e.g. cups, glasses and pans) with the opening down. – Make sure that water does not collect in the container or in a deep base. – Make sure that cutlery and dishes do not lie inside one another. – Make sure that cutlery and dishes do not cover other cutlery and dishes. – Make sure that glasses do not touch other glasses. – Put small objects in the cutlery basket.
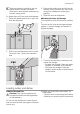
electrolux 9 Caution! Adjust the height before you load the upper basket. Maximum height of the dishes Prevent to put plates in the first three sectors in the front part of the basket. Make sure the plates tilt forward. upper basket lower basket Upper position 20 cm 31 cm Lower position 24 cm 27 cm Do these steps to move the upper basket to the upper position: 1. Move the front runner stops (A) out. 2. Pull the basket out. Put glasses with long stems in the cup racks with the stems up.
electrolux 2. Fill the detergent dispenser (A) with detergent. The marking shows the dosage: 20 = approximately 20 g of detergent 30 = approximately 30 g of detergent. 3. If you use a washing programme with prewash phase, put more detergent in the prewash detergent compartment (B). A B 4. If you use detergent tablets, put the detergent tablet in the detergent dispenser (A). 5. Close the lid of the detergent dispenser. Press the lid until it locks into position.
electrolux 11 Setting and starting a washing programme Do these steps to set and start a washing programme: 1. Close the door. 2. Turn the programme knob to set the washing programme. Refer to the chapter 'Washing programmes'. – The on/off indicator light comes on. – The phase indicator light for the washing programme starts to flash. 3. Press the start/cancel button. – The washing programme starts automatically. – The start/cancel indicator light comes on.
electrolux Washing programmes Washing programmes Programme and knob position 1) 2) Degree of soil Type of load Programme description Heavy soil Crockery, cutlery, pots and pans Prewash Main wash up to 70°C 2 intermediate rinses Final rinse Drying Normal soil Crockery and cutlery Prewash Main wash up to 65°C 2 intermediate rinses Final rinse Drying Normal or light soil Crockery and cutlery Main wash up to 60°C Final rinse Normal soil Crockery and cutlery Prewash Main wash up to 50°C 1 int
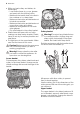
electrolux 13 8. Clean the filters below running water. 9. Put the flat filter (C) in the bottom of the appliance. Install the flat filter correctly under the two guide (D). 10. Put the coarse filter (A) in the microfilter (B) and push the filters together. 11. Put the filter system in position. 12. To lock the filter system, turn the handle on the microfilter (B) clockwise until it lock in position. A B C Do these steps to clean the filters: 1. Open the door. 2. Remove the lower basket. 3.
electrolux What to do if… The appliance does not start or stops during operation. If there is a fault, first try to find a solution to the problem yourself. If you cannot find a solution to the problem yourself, contact the Service Force Centre. Fault code and malfunction Caution! Switch off the appliance before you do the below suggested corrective actions. Possible cause and solution • continuous flash of the start/can- • The water tap is blocked or furred with limescale.
electrolux 15 The cleaning results are not satisfactory The dishes are wet and dull • No rinse aid has been used. • The rinse aid dispenser is empty. There are streaks, milky spots • Decrease the rinse aid dosage. or a bluish coating on glasses and dishes Dry water drop signs on glasses and dishes • Increase rinse aid dosage. • The detergent can be the cause.
electrolux Caution! Do not use connection hoses from an old appliance. The water pressure must be in the limits (refer to 'Technical data'). Make sure that the local water authority gives you the average mains pressure in your area. Make sure that there are no kinks in the water inlet hose and that the water inlet hose is not squashed or entangled. Fit the locknut correctly to prevent water leaks. Caution! Do not connect the appliance to new pipes or pipes that are not used for a long time.
electrolux 17 Warning! The appliance is supplied with a 13 amp plug attached. Use a 13 amp ASTA approved (BS 1362) fuse if it is necessary to change the fuse in the plug supplied. Environment concerns The symbol on the product or on its packaging indicates that this product may not be treated as household waste. Instead it should be taken to the appropriate collection point for the recycling of electrical and electronic equipment.
electrolux
electrolux 19
www.electrolux.com To buy accessories, consumables and spare parts at our online shop please visit: www.electrolux.co.uk www.electrolux.